Inhaltsverzeichnis
- The Administration Area of OTRS
- Grundlagen
- Benutzer, Gruppen und Rollen
- Customer Users and Customers
- Queues
- Salutations, Signatures, Attachments and Templates
- Automatische Antworten
- System Email Addresses
- Ticket-Benachrichtigungen
- S/MIME
- PGP
- Status
- Systemkonfiguration
- Using Mail Accounts
- Filtering Incoming Email Messages
- Executing Automated Jobs with the GenericAgent
- Administrative Messages
- Sitzungsverwaltung
- Systemwartung
- System Log
- Kommunikationsprotokoll
- SQL Abfragen über die SQL Box
- Paketverwaltung
- Web-Services
- Dynamische Felder
- Kalender
- Systemkonfiguration
- Backing Up the System
- E-Mail-Einstellungen
- Using External backends
- Ticket-Einstellungen
- Date and Time Related Functions
- Customizing the PDF Output
- Statistiken
- Dynamische Felder
- Einführung
- Konfiguration
- Hinzufügen eines dynamischen Feldes
- Konfiguration der Textzeilen in dynamischen Feldern
- Konfiguration von Textfeldern in dynamischen Feldern
- Konfiguration von Checkboxen in dynamischen Feldern
- Konfiguration von Einfachauswahlen in dynamischen Feldern
- Konfiguration der Mehrfachauswahl in dynamischen Feldern
- Konfiguration von Datumsfeldern in dynamischen Feldern
- Konfiguration von Datum / Zeit in dynamischen Feldern
- Editieren eines dynamischen Feldes
- Anzeigen eines dynamischen Feldern
- Setting a Default Value by a Ticket Event Module
- Setzt die Standard-Einstellung abhängig von den Benutzereinstellungen
- Generic Interface
- The OTRS Daemon
- Grundlagen
- Benutzer, Gruppen und Rollen
- Customer Users and Customers
- Queues
- Salutations, Signatures, Attachments and Templates
- Automatische Antworten
- System Email Addresses
- Ticket-Benachrichtigungen
- S/MIME
- PGP
- Status
- Systemkonfiguration
- Using Mail Accounts
- Filtering Incoming Email Messages
- Executing Automated Jobs with the GenericAgent
- Administrative Messages
- Sitzungsverwaltung
- Systemwartung
- System Log
- Kommunikationsprotokoll
- SQL Abfragen über die SQL Box
- Paketverwaltung
- Web-Services
- Dynamische Felder
- Kalender
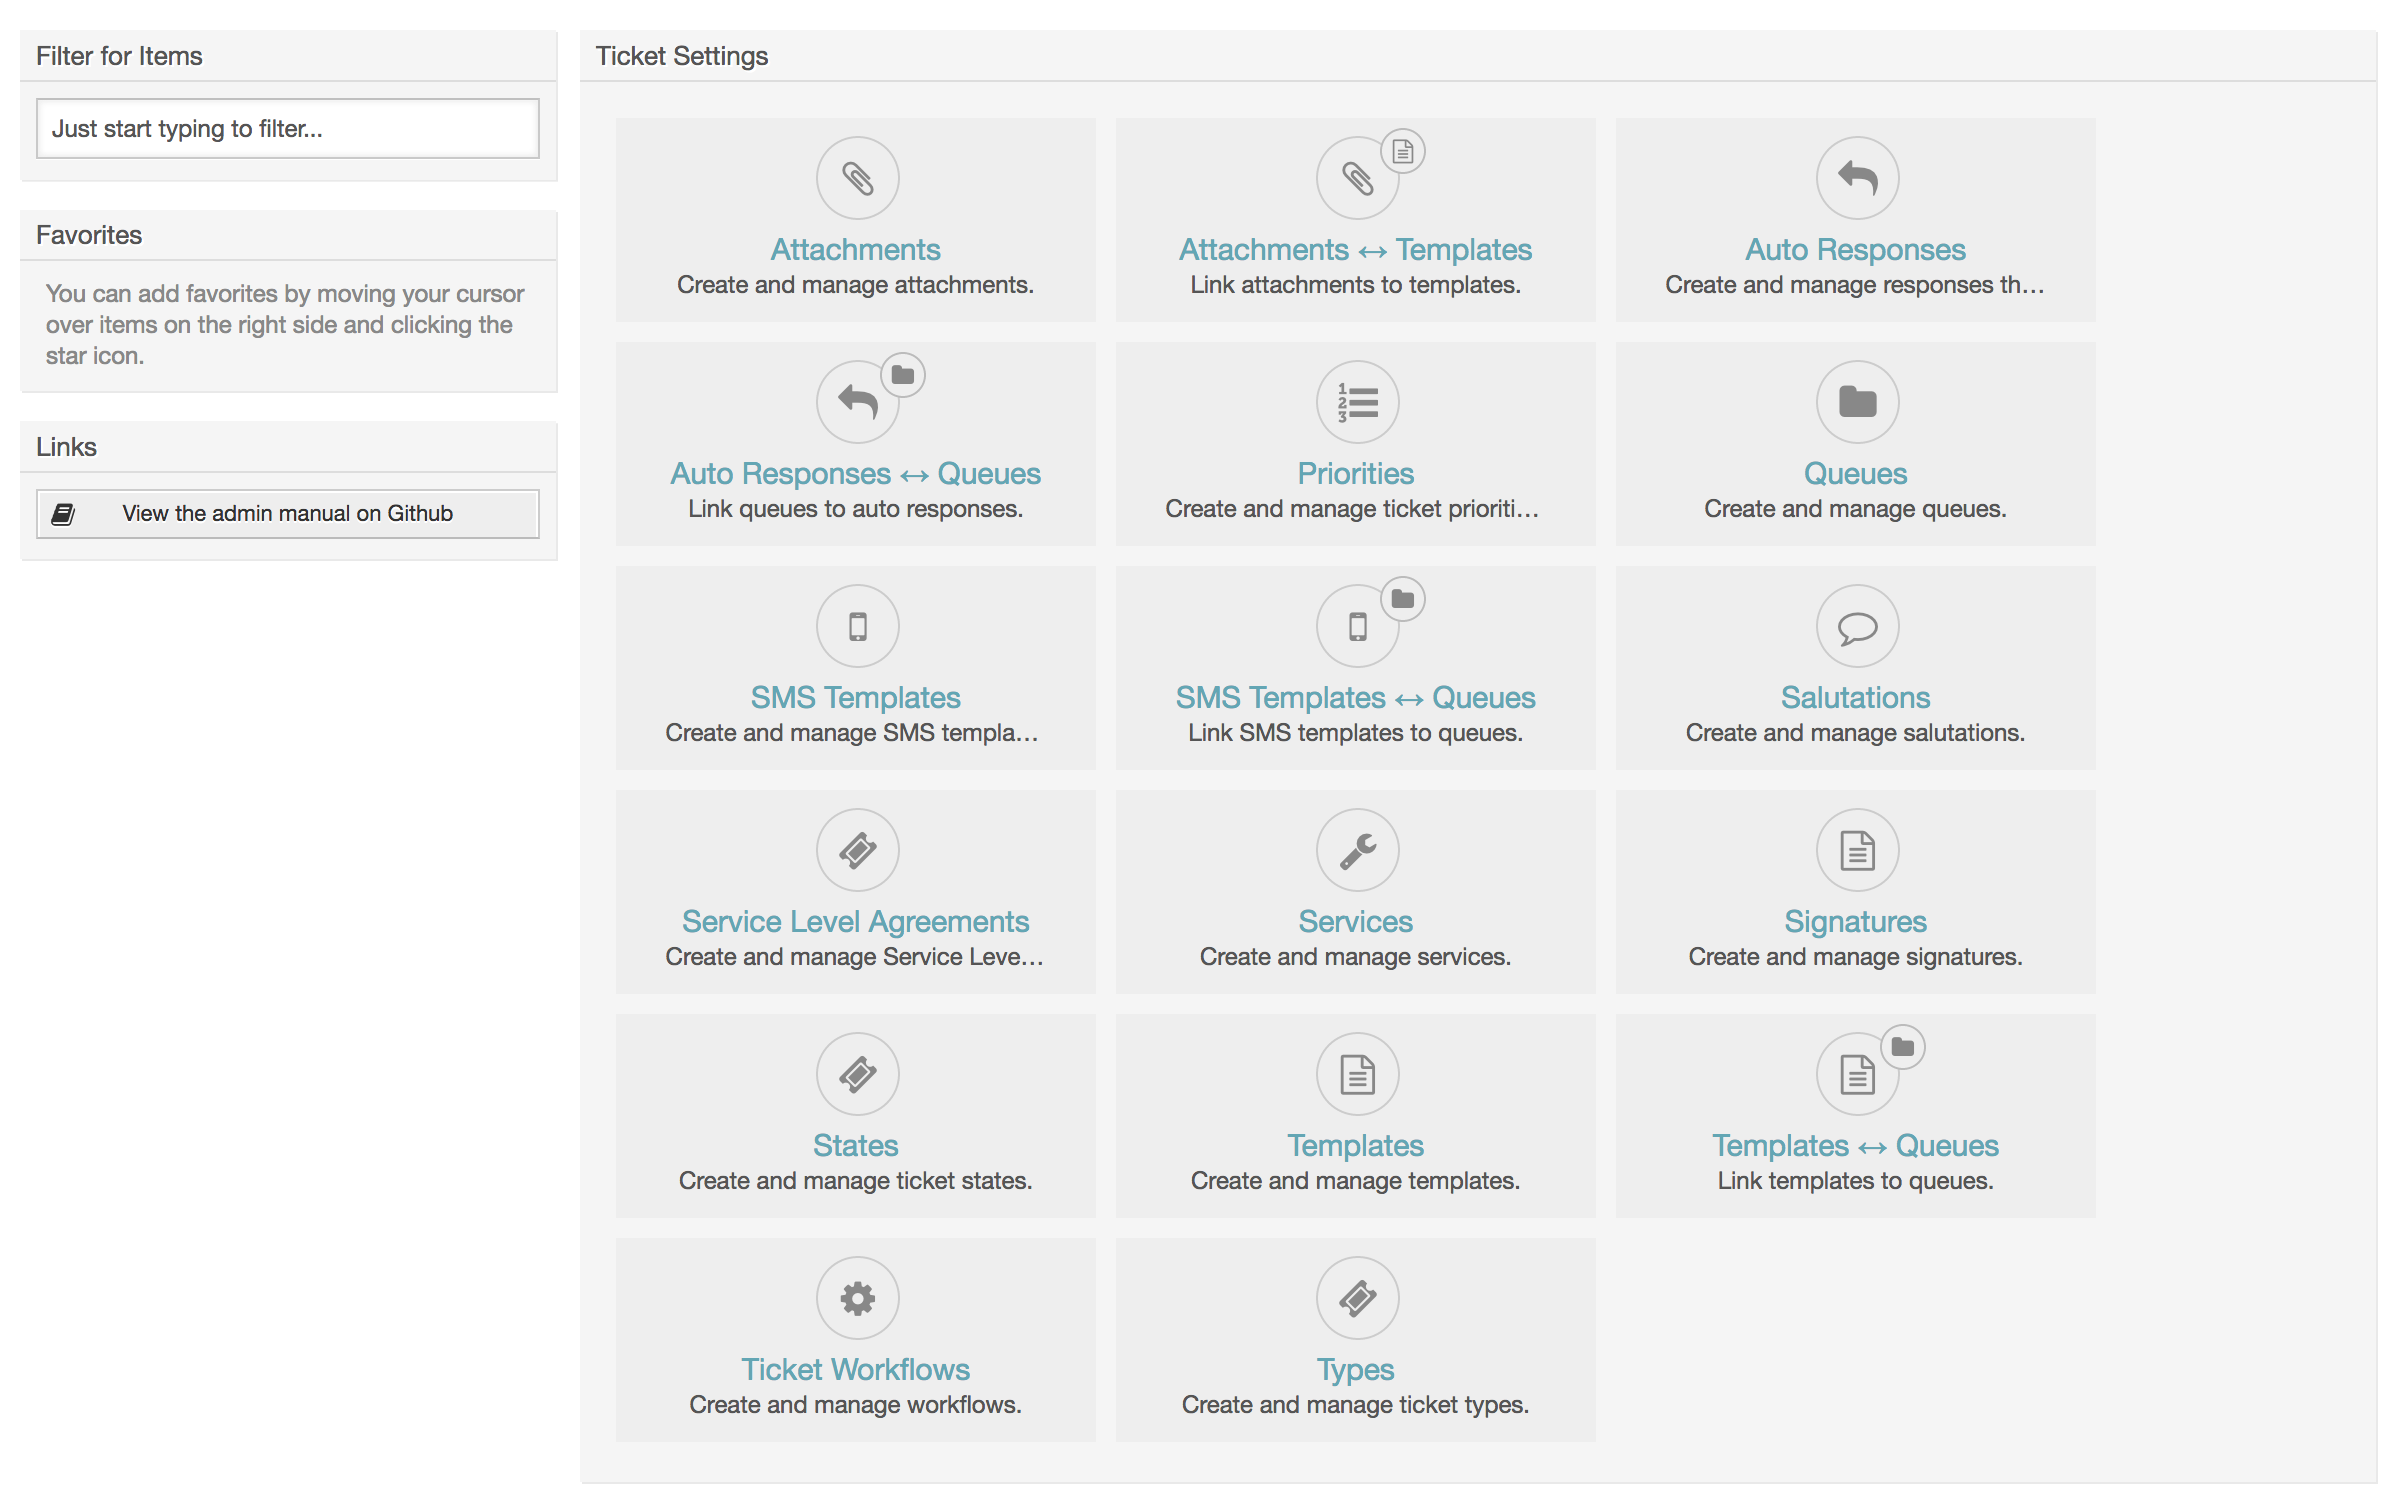
The following system configuration settings are available to OTRS administrators by accessing the Admin page of the OTRS web interface - adding agents, customers and queues, ticket and mail settings, installing additional packages such as FAQ and ITSM, and much more.
Agents who are members of the admin group can access the Admin area by clicking the Admin link in the navigation bar (see figure below). Agents without sufficiently elevated access rights will not be able to access this link.
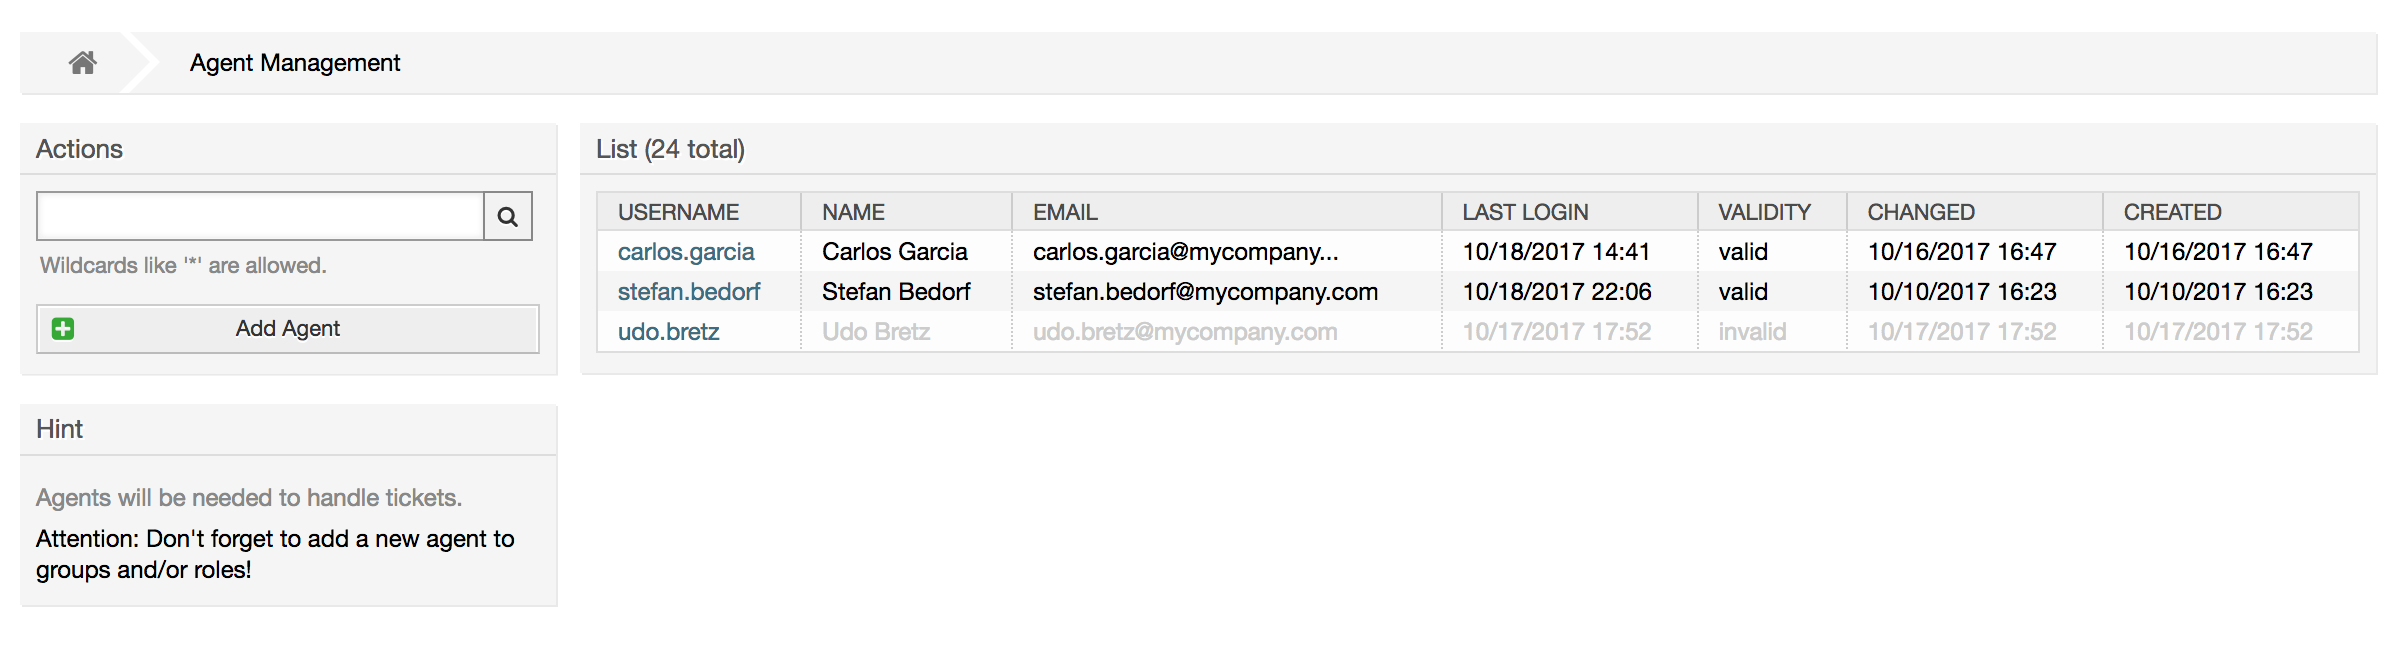
By clicking the link Agents, you get access to the agent management screen of OTRS (see figure below). Administrators can add, change or deactivate agent accounts. Furthermore they can also manage agent preferences, including the language and notification settings for the individual agent's interface.
Anmerkung
Ein OTRS-Benutzer kann deaktiviert, aber nicht gelöchst werden. Um einn Benutzer zu deaktivieren, setzen Sie die Einstellung für "Gültig" auf "ungültig" oder "ungültig-temporär".
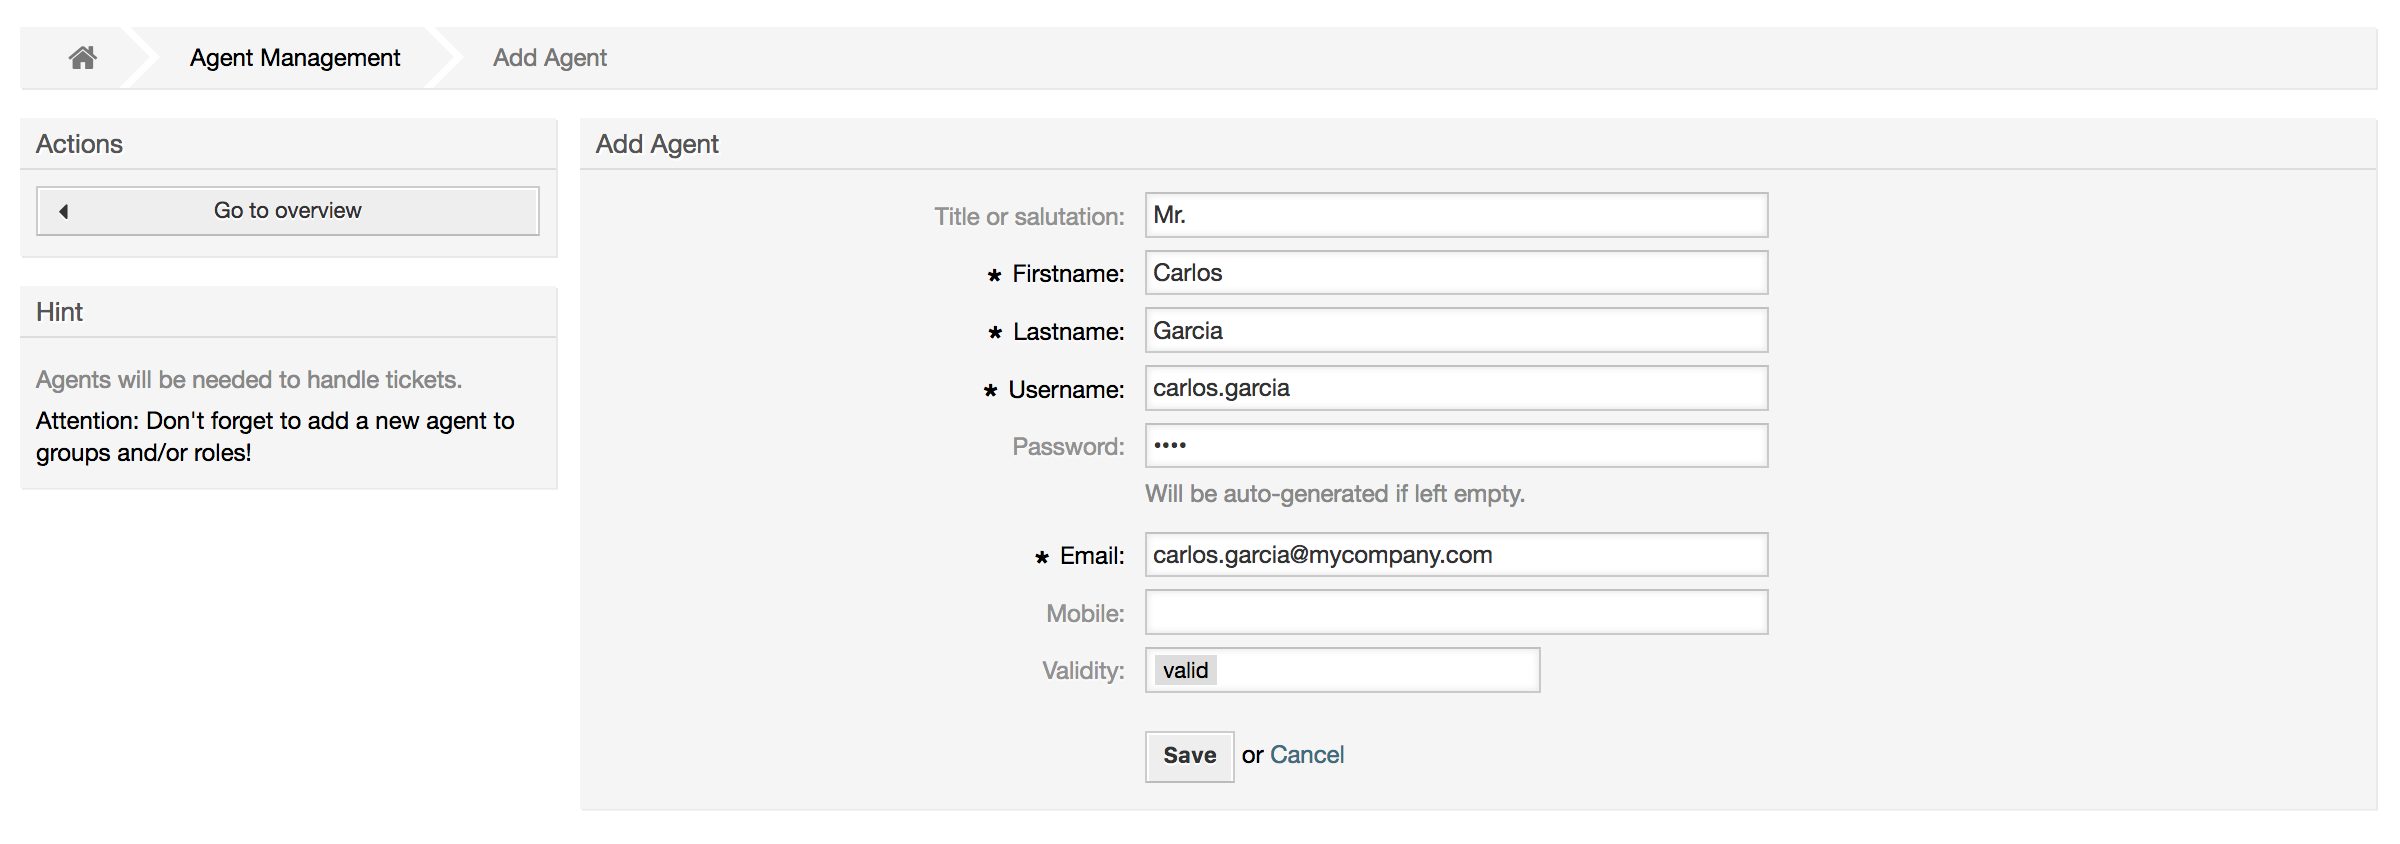
To register an agent, click on the Add agent button,
enter the required data and press the Submit button at the bottom of the
screen, as shown in Figure.
Nachdem Sie einen neuen Benutzer angelegt haben, muss dieser einer Gruppe bzw. einer Rolle zugewiesen werden. Sie werden nach dem Anlegen eines neuen Benutzers automatisch auf die Bildschirmmaske für die Zuweisung eines Benutzers in Gruppen weitergeleitet. Weitere Informationen über Gruppen und Rollen finden Sie in den Abschnitten Gruppen und Rollen dieses Kapitels.
Every agent's account should belong to at least one group or role. In a brand new installation, there are three pre-defined groups available, as shown in Table 4-1.
Tabelle 4.1. Standardmäßig vorhandene Gruppen in OTRS
| Gruppe | Beschreibung |
|---|---|
| admin | Gruppe für die Benutzer mit Administrationsrechten. |
| stats | Benutzer in dieser Gruppe dürfen lesend (ro) oder schreibend (rw) auf das Statistikmodul von OTRS zugreifen, d.h. sie können Statistiken einsehen oder auch erstellen. |
| users | Dies ist die Gruppe, in die normale Mitarbeiter aufgenommen und mit den kompletten Rechten ausgestattet werden sollten. Dadurch wird für die Mitarbeiter das normale Arbeiten im System ermöglicht, der Zugriff auf alle Funktionen rund um Tickets ist gegeben. |
Anmerkung
In a brand new OTRS installation, the agent 'root@localhost' belongs by default to the admin, stats and users groups.
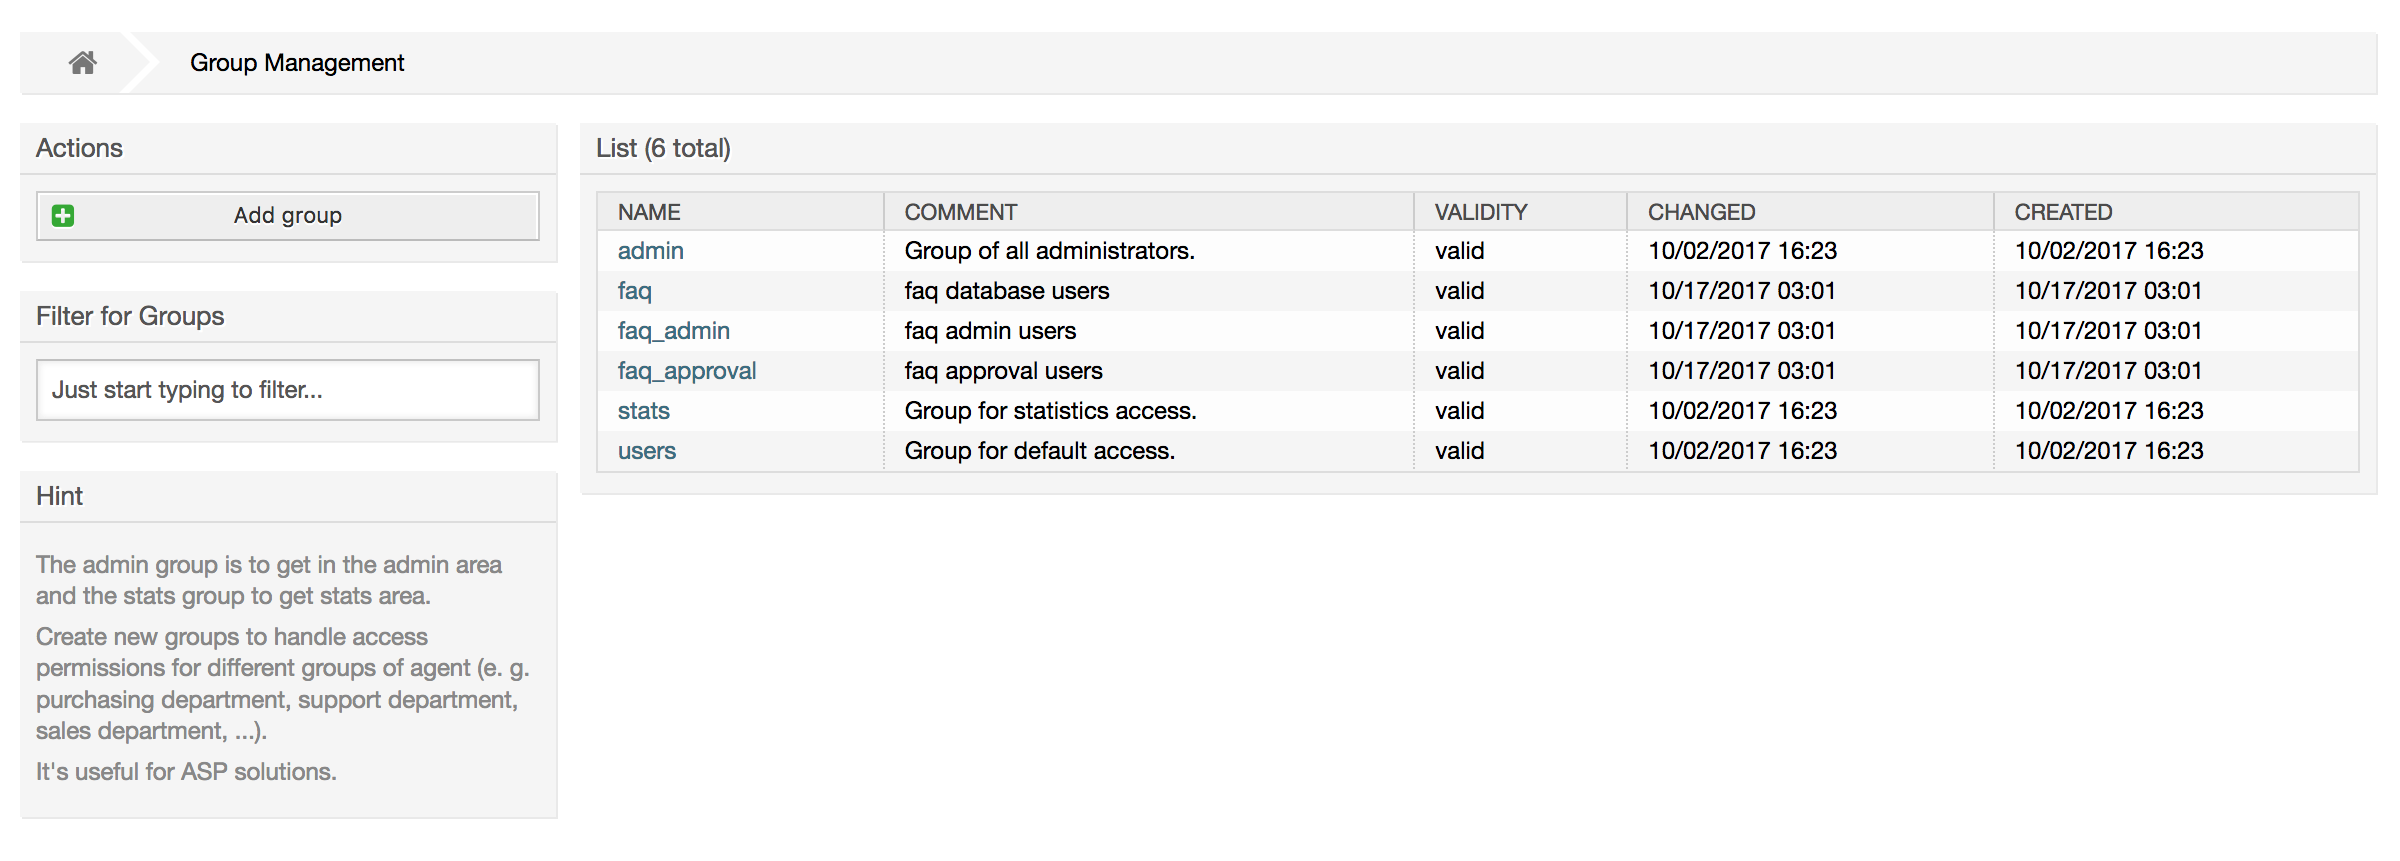
You can access the group management page (see figure below) by clicking the Groups link in the admin area.
Anmerkung
In OTRS können Gruppen deaktiviert, aber nicht gelöscht werden. Deaktivieren Sie eine Gruppe, indem Sie für "Gültig" den Wert entweder auf "ungültig" oder auf "ungültig-temporär" setzen.
To add an agent to a group, or to change the agents who belong to a group, you can use the link Agents <-> Groups from the Admin page (see figure below).

An overview of all groups and agents in the system is displayed on this page. You can also use the available filters to find a specific entity. If you want to change the groups that an agent is a member of, just click on the agent's name (see figure below). To change the agents associated with a group, just click on the group you want to edit (see figure below).

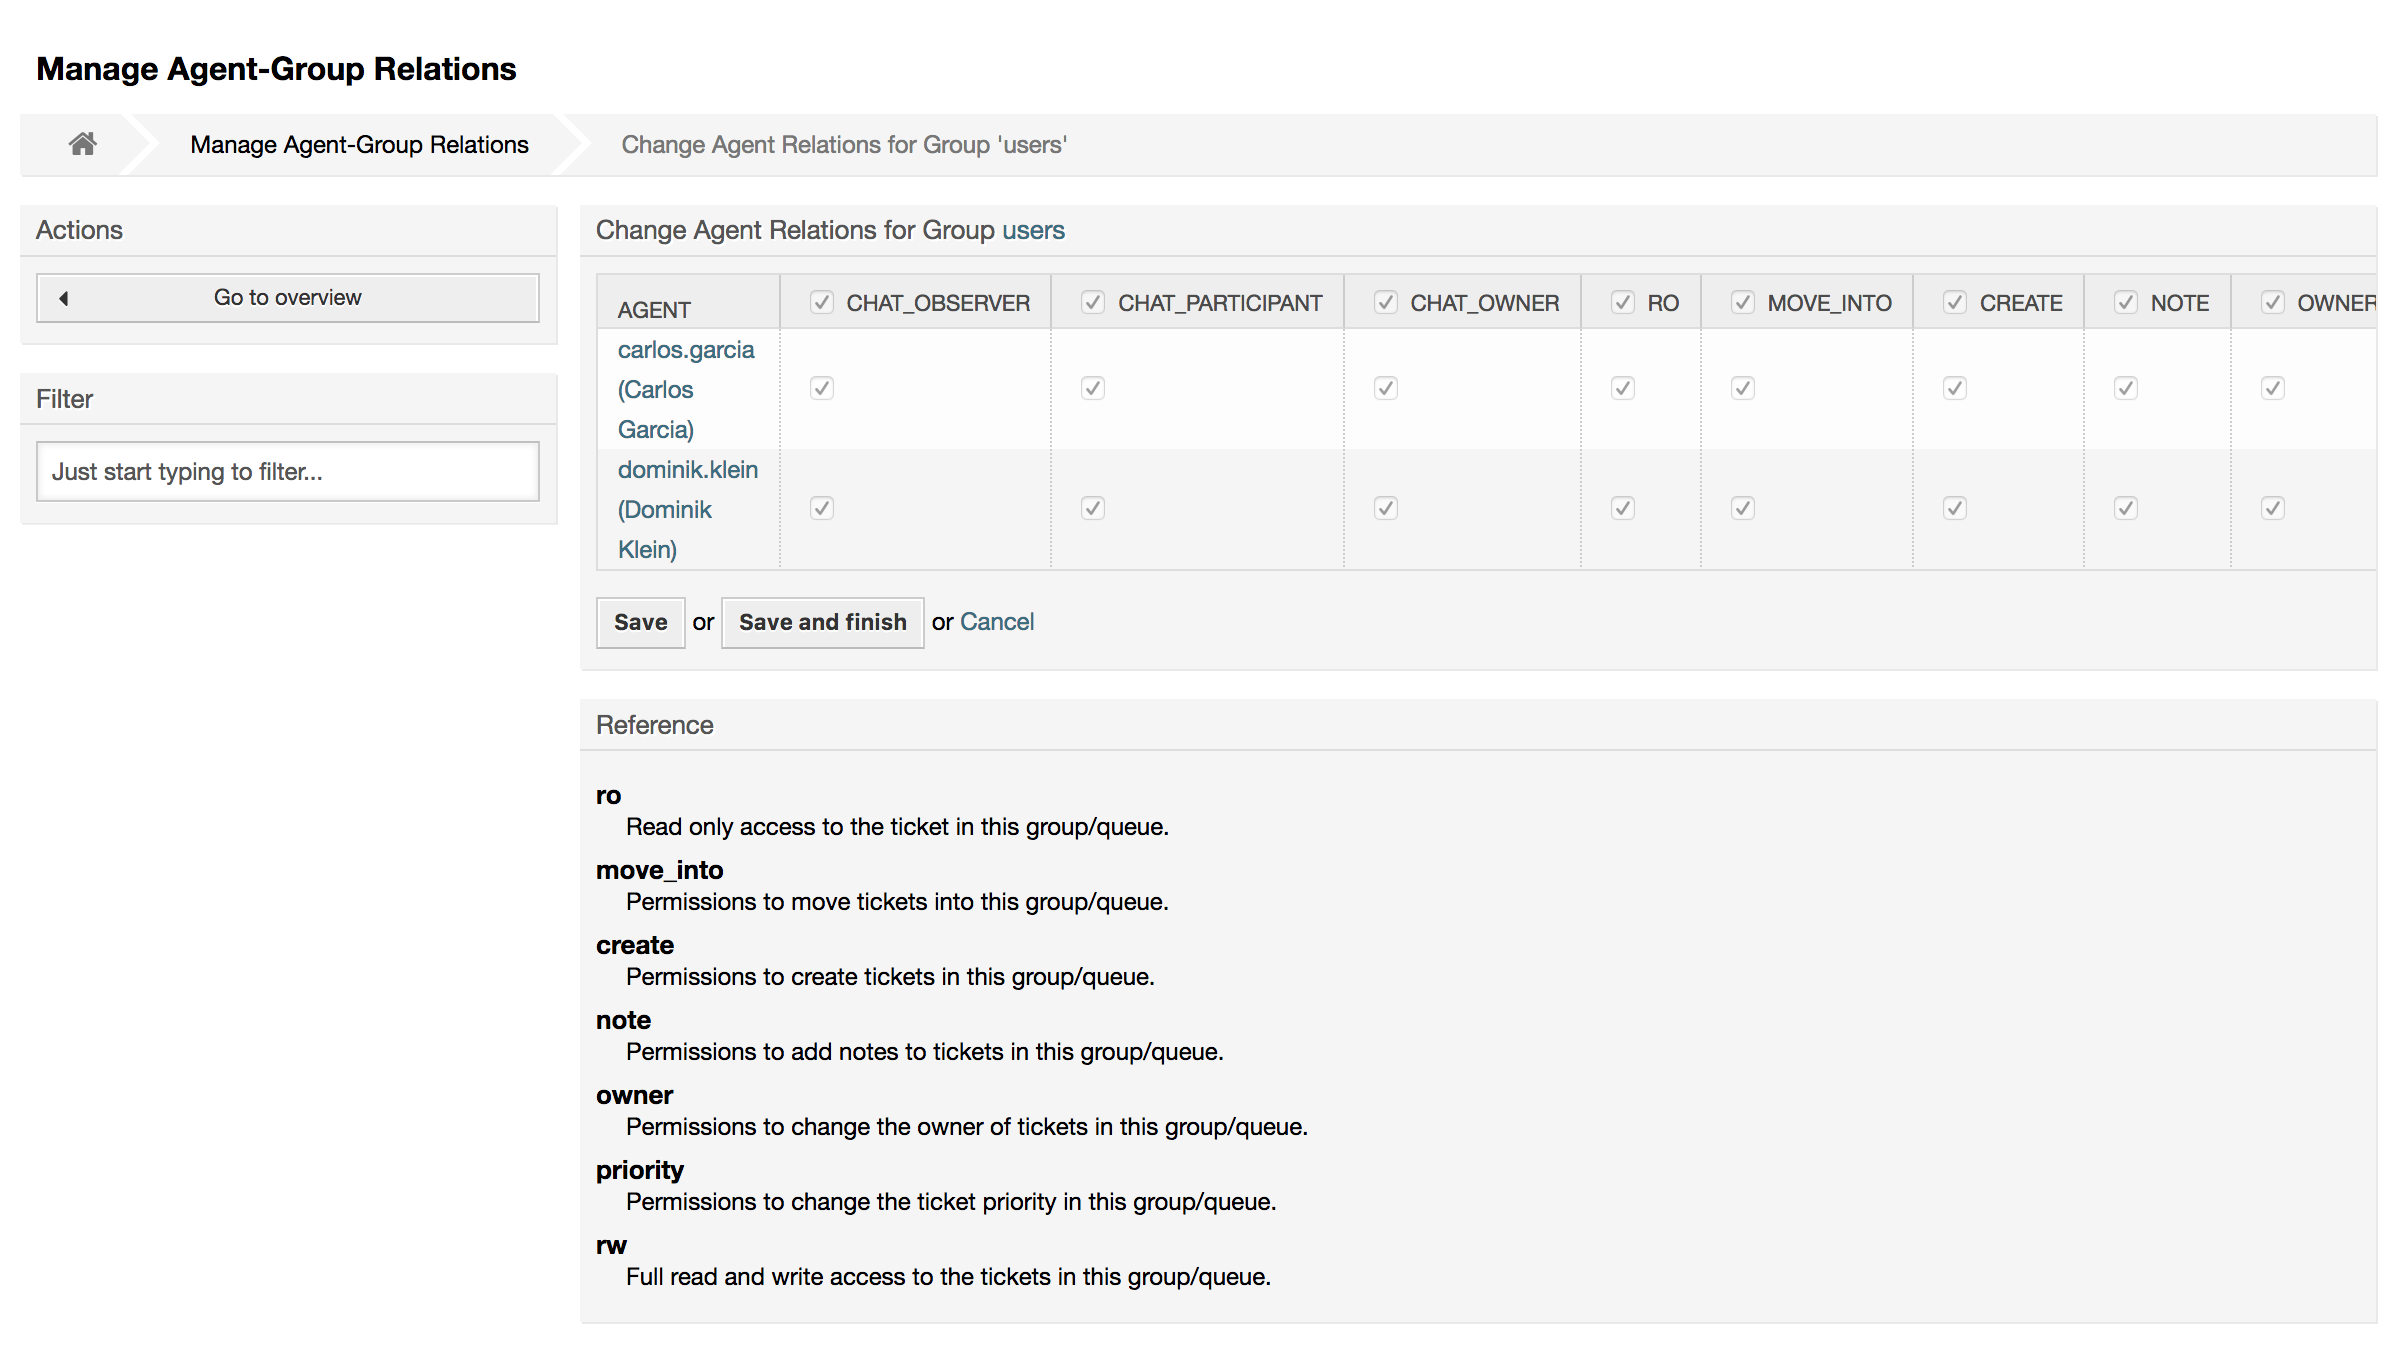
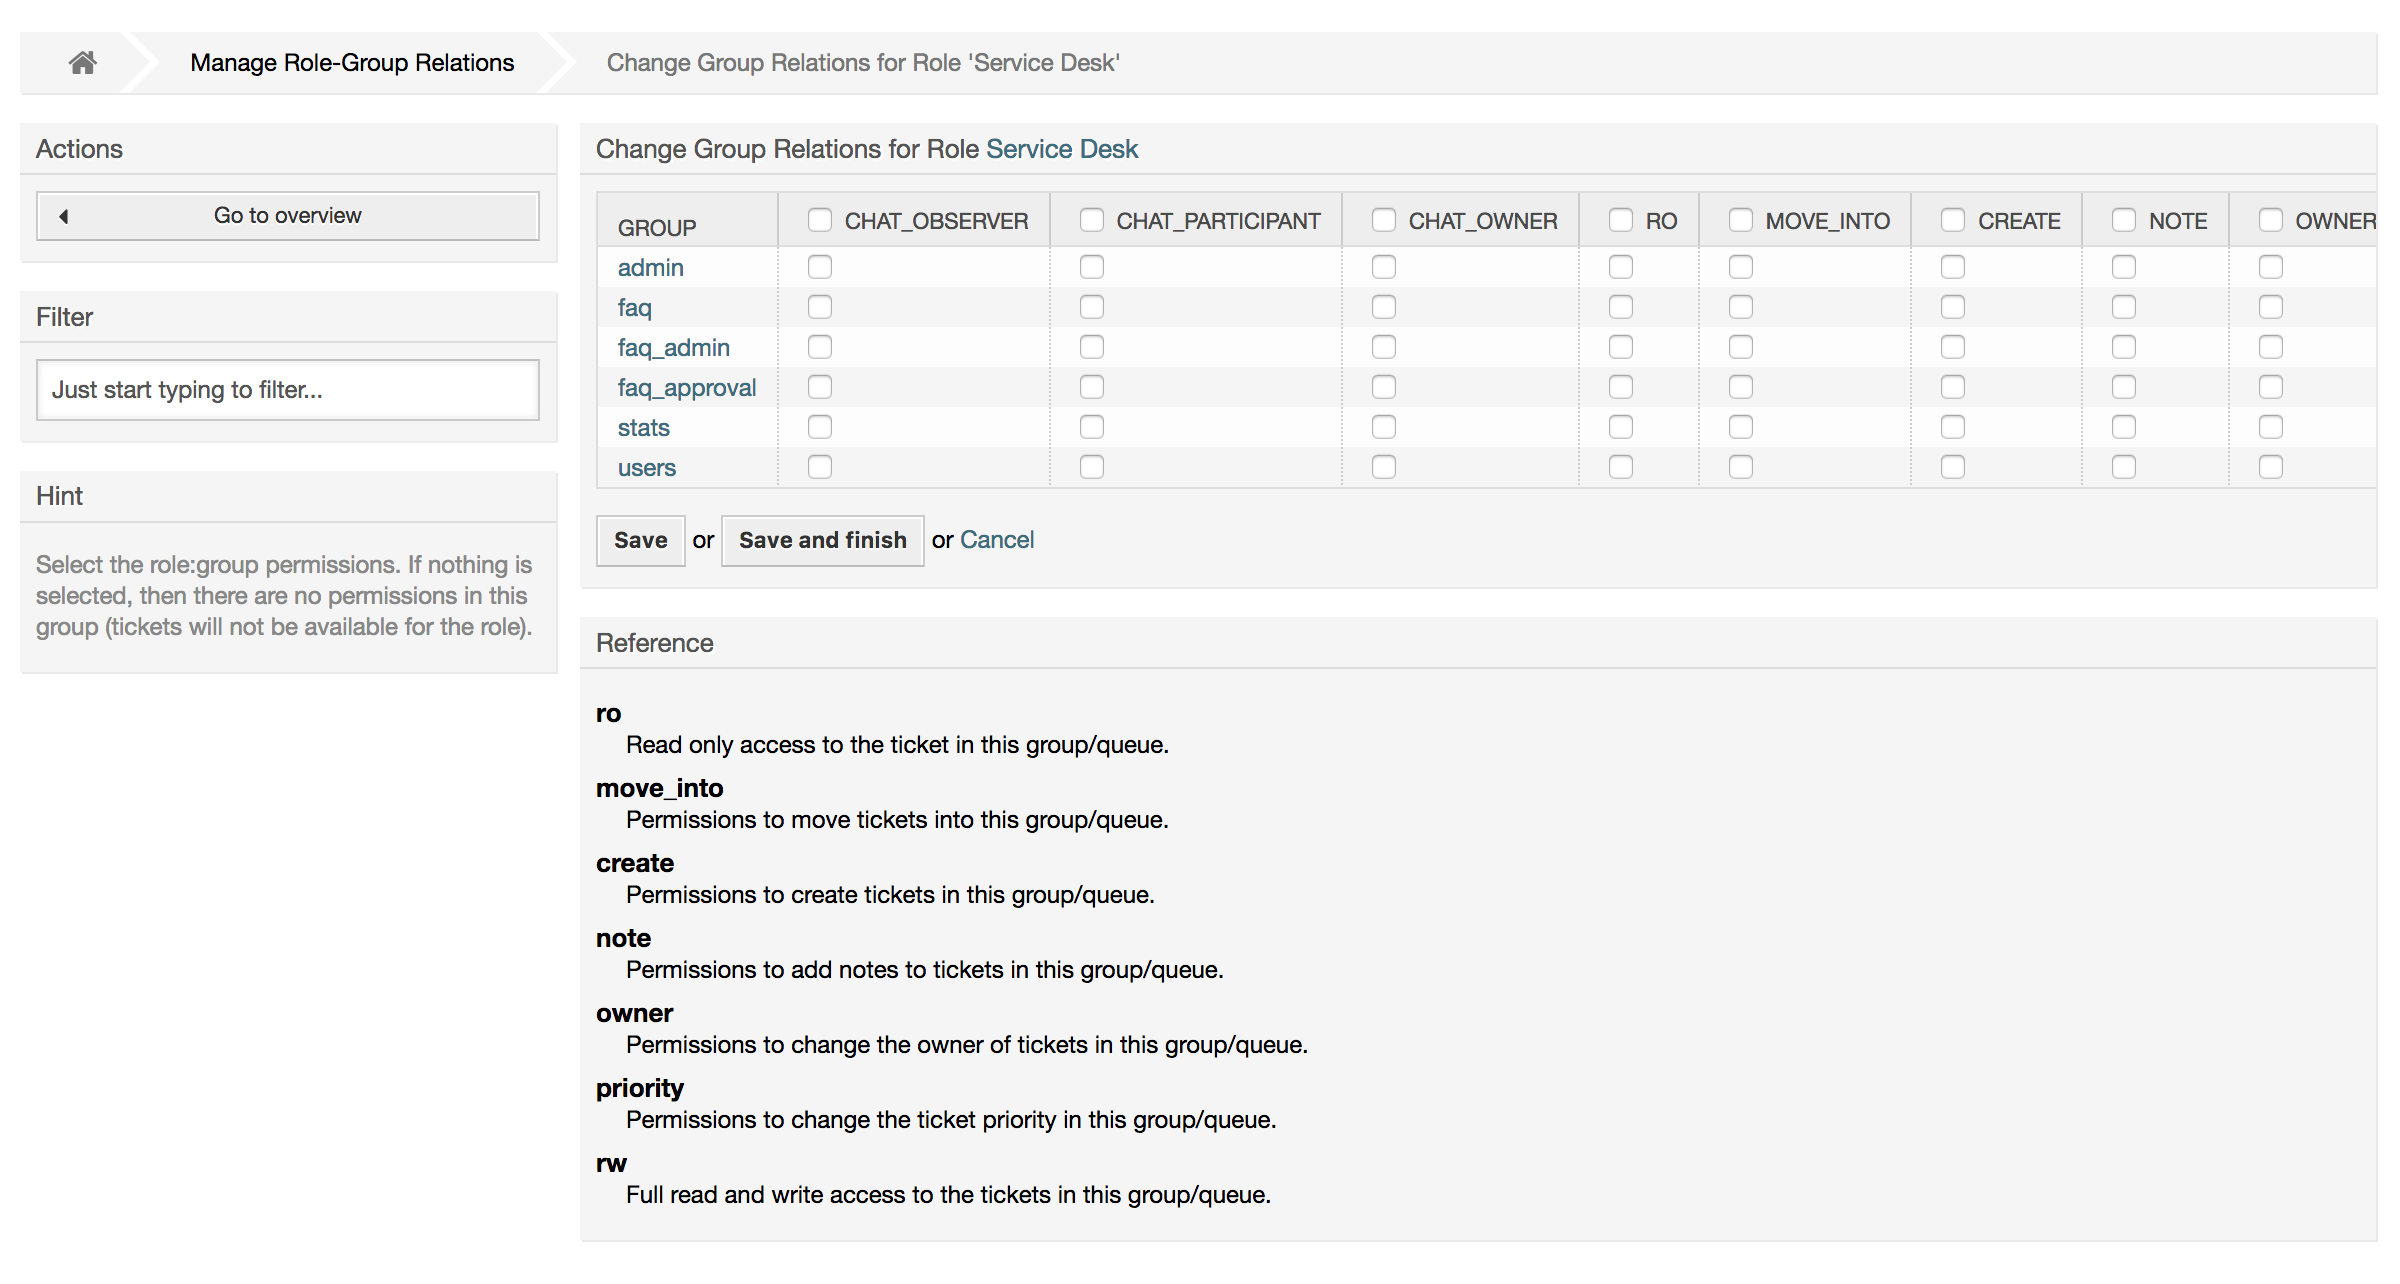
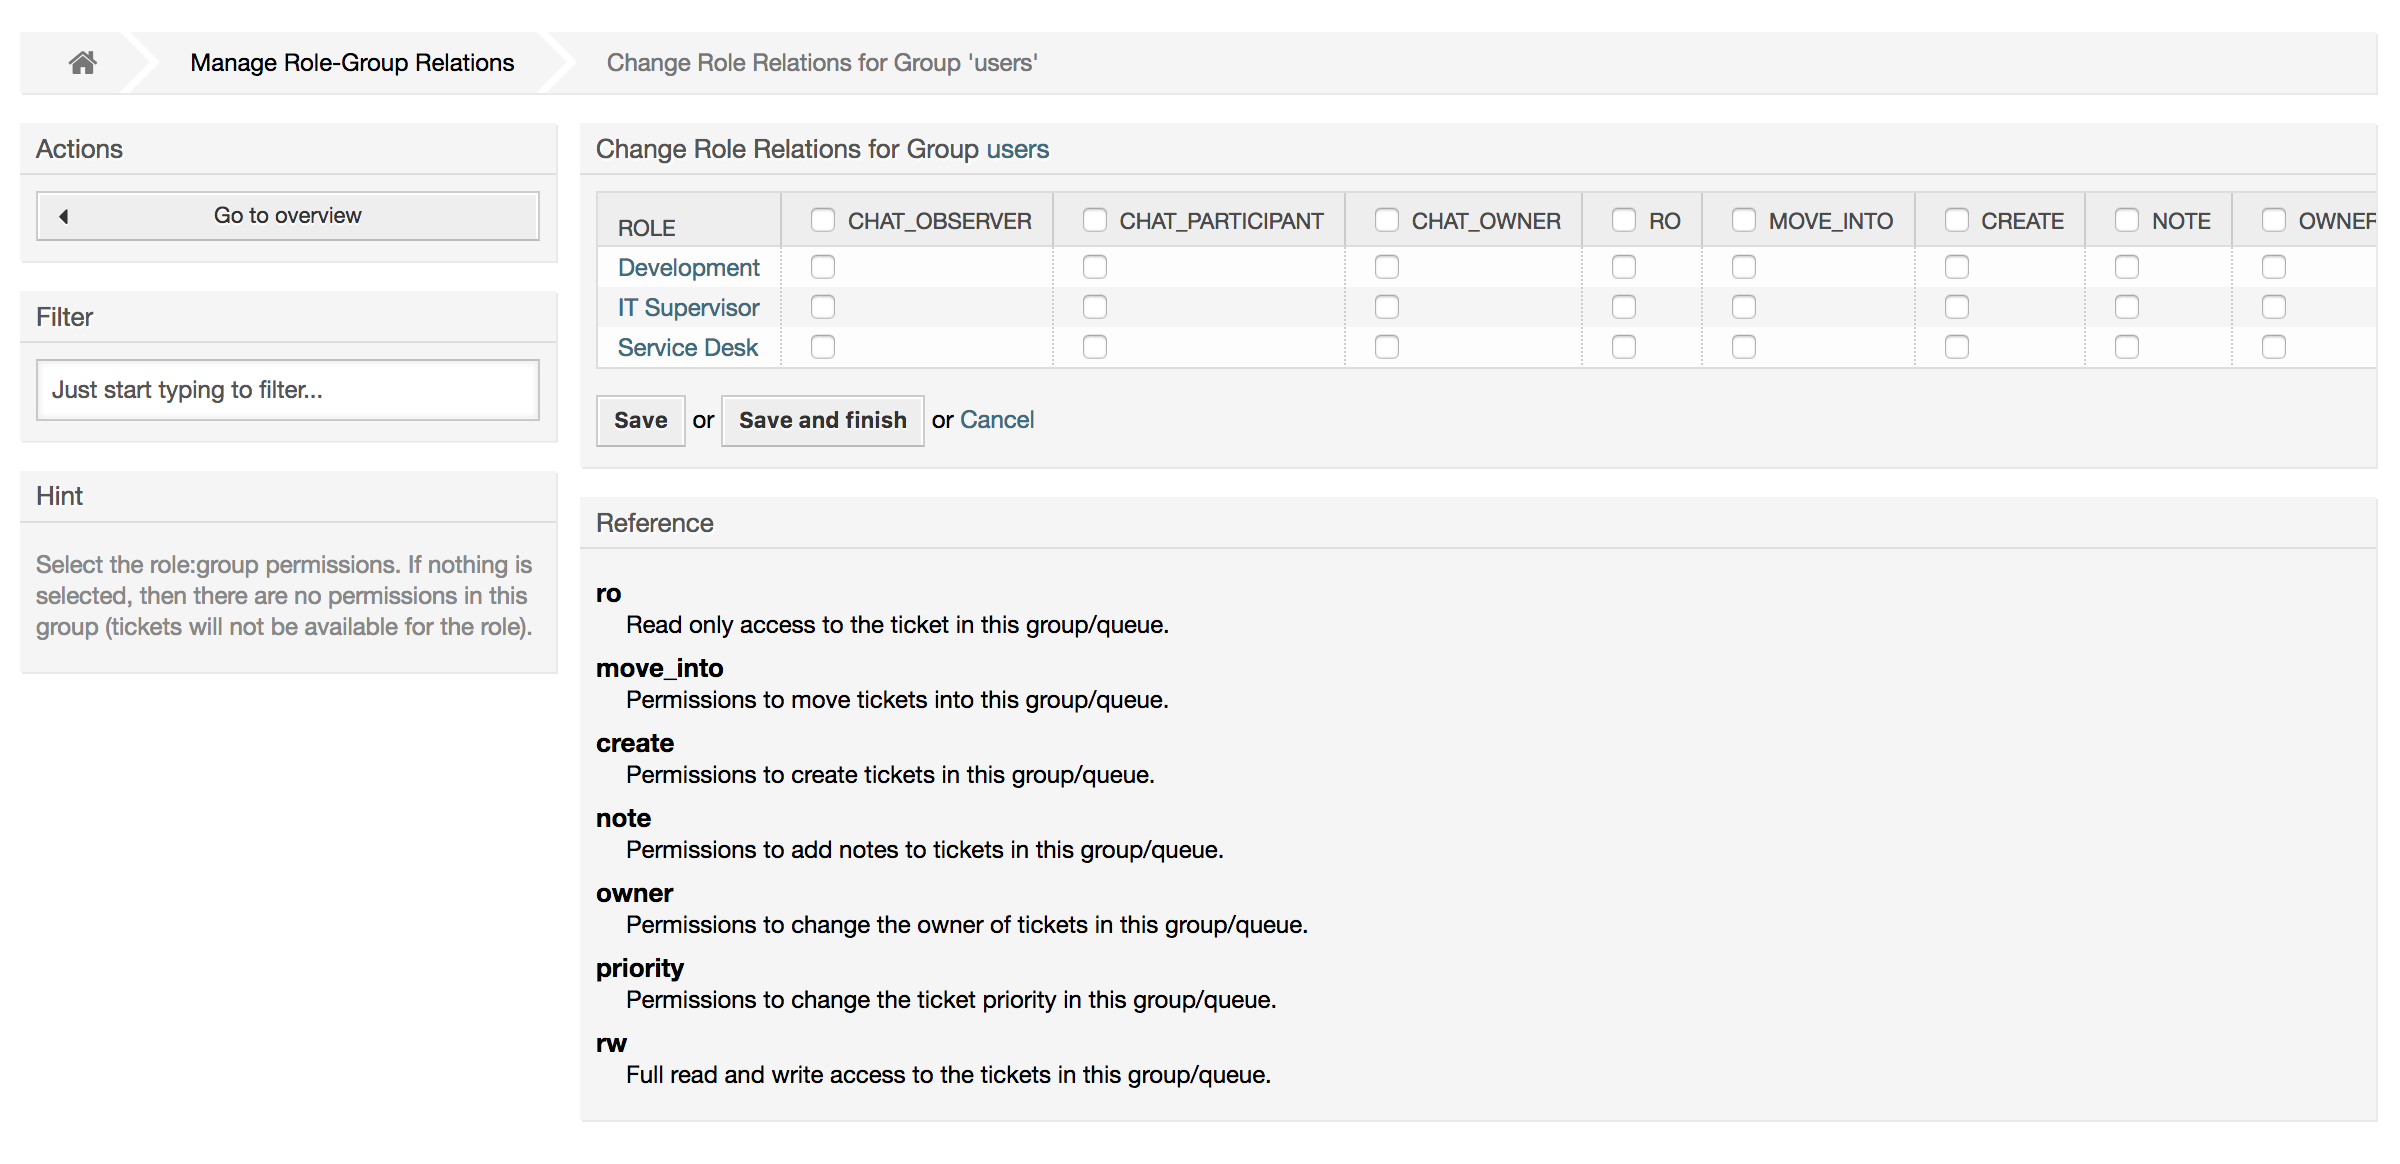
Each group has a set of rights associated with it, and each group member (agent) may have some combination of these rights for themselves. A list of the permissions / rights is shown in Table 4-2.
Tabelle 4.2. Rights associated with OTRS groups
| Berechtigung | Beschreibung |
|---|---|
| chat_observer | Agents may take part silently in a chat (available in OTRS Business Solution™). |
| chat_participant | Agents may normally participate in a chat (available in OTRS Business Solution™). |
| chat_owner | Agents have full rights for a chat and can accept chat requests (available in OTRS Business Solution™). |
| ro | Nur Lesezugriff auf die Tickets bzw. Beiträge dieser Gruppe bzw. der Gruppe zugewiesenen Queues oder Bereiche. |
| Verschieben in (move into) | Recht zum Verschieben von Tickets oder Beiträgen innerhalb der Queues bzw. Bereiche dieser Gruppe. |
| erstellen | Recht zum Erstellen von Tickets oder Beiträgen in den Queues, bzw. Bereichen dieser Gruppe. |
| Notiz | Right to add notes to tickets or entries in the queues or areas of this group. |
| Besitzer (owner) | Recht zum Ändern des Eigentümers von Tickets, bzw. Beiträgen in den der Gruppe zugewiesenen Queues bzw. Bereiche. |
| Priorität | Recht zum Ändern der Priorität von Tickets, bzw. Beiträgen in den der Gruppe zugewiesenen Queues bzw. Bereiche. |
| rw | Voller Lese- und Schreibzugriff auf alle Inhalte der dieser Gruppe zugewiesenen Queues, bzw. Bereiche. |
Anmerkung
By default, the QueueView only lists tickets in queues that an agent has rw access to, i.e., the tickets the agent needs to work on. If you want to change this behaviour, you can set Ticket::Frontend::AgentTicketQueue###ViewAllPossibleTickets to Yes.
Nicht alle verfügbaren Berechtigungen werden standardmäßig angezeigt. Diese zusätzlichen Berechtigungen können hinzugefügt werden.
Tabelle 4.3. Weitere Berechtigungsgruppen
| Berechtigung | Beschreibung |
|---|---|
| stats | Erlaubt den Zugriff auf die Statistikseite |
| Umleiten | Das Recht eine E-Mail umzuleiten (mit Umleiten-Knopf im TicketZoom) |
| Verfassen | Das Recht eine Antwort zu einem Ticket zu verfassen. |
| Kunde | Das Recht den Kunden eines Tickets zu ändern. |
| Weiterleiten | Das Recht eine Nachricht weiterzuleiten (mit dem Weiterleiten-Knopf) |
| Warten | Das Recht ein Ticket auf "warten" zu setzen. |
| Telefon | Das Recht einen Telefonanruf zu einem Ticket hinzuzufügen. |
| Verantwortlicher | Das Recht den Verantwortlichen Agenten eines Tickets zu ändern. |
Anmerkung
These permissions can be added by changing the System::Permission
Rollen sind ein sehr mächtiges Feature in OTRS, um schnell und einfach die Vergabe von Zugriffsrechten für viele Benutzer vorzunehmen. Vor allem bei großen und komplexen Installationen mit vielen Benutzern, Gruppen und Queues, zahlt sich dieses Feature schnell aus und erspart dem OTRS-Administrator viel Zeit und Arbeit. Das nachfolgende Beispiel stellt ein mögliches Szenario vor.
Um den Nutzen von Rollen zu verdeutlichen, stellen Sie sich die Situation vor, dass Sie ein OTRS-System mit 100 Benutzern verwalten. 90 Benutzer haben Zugriff auf eine Queue namens Support, die mehrere themenspezifische Unter-Queues enthält und in der die Support-Anfragen Ihrer Kunden landen. Die restlichen Queues des Systems sind für die 90 Supporter nicht zugänglich, dies wurde durch Gruppenzugriffsrechte so festgelegt. Die übrigen 10 Benutzer haben Zugriff auf alle Queues im System. Sie sortieren falsch einsortierte Mails aus, behalten die "Raw"-Queue im Auge und verschieben Spam-Mails in die "Junk"-Queue.
Im Rahmen einer Unternehmensumstrukturierung wird eines Tages zusätzlich eine Abteilung eröffnet, die Produkte verkaufen soll. Es müssen Angebote, Auftragsbestätigungen und Rechnungen erstellt, Anfragen bearbeitet, Bestellungen ans Lager weitergeleitet und Stornierungen entgegen genommen werden. Ein Teil der bisherigen Mitarbeiter soll in verschiedenen Bereichen der neuen Abteilung tätig werden und Sie als OTRS-Administrator haben nun die Aufgabe die neuen Queues anzulegen, die erweiterten Zugriffsrechte anzupassen und diese für die einzelnen Benutzer zu ändern.
Da es mühsam und viel zu umständlich wäre, für einen Teil aller 100 Benutzer einzeln die Zugriffsrechte zu ändern, richten Sie Rollen ein die mit Hilfe von Gruppenberechtigungen die verschiedenen Zugriffsrechte regeln. Anschließend ändern Sie für die entsprechenden Benutzer auf einmal die Zugriffsberechtigungen, indem Sie diese der entsprechenden Rolle zuweisen. Beim Anlegen neuer Benutzer müssen Sie nicht mehr einzeln die Gruppen und Zugriffsrechte einstellen, auch hier genügt die Verknüpfung des neuen Benutzers mit einer Rolle.
Anmerkung
Roles are really useful when dealing with complex organizations and when maintaining larger OTRS installations. Proper care is advised though. Mixing Agent to Group with Agent to Role mappings can make for a complex access control scheme, that is difficult to understand and maintain. If you wish to use only roles and disable the Agents <-> Groups option in the Admin area, you can do so by modifying the Frontend::Module###AdminUserGroup in the SysConfig. Be aware that this won't remove already existing Agents to Group assignments!
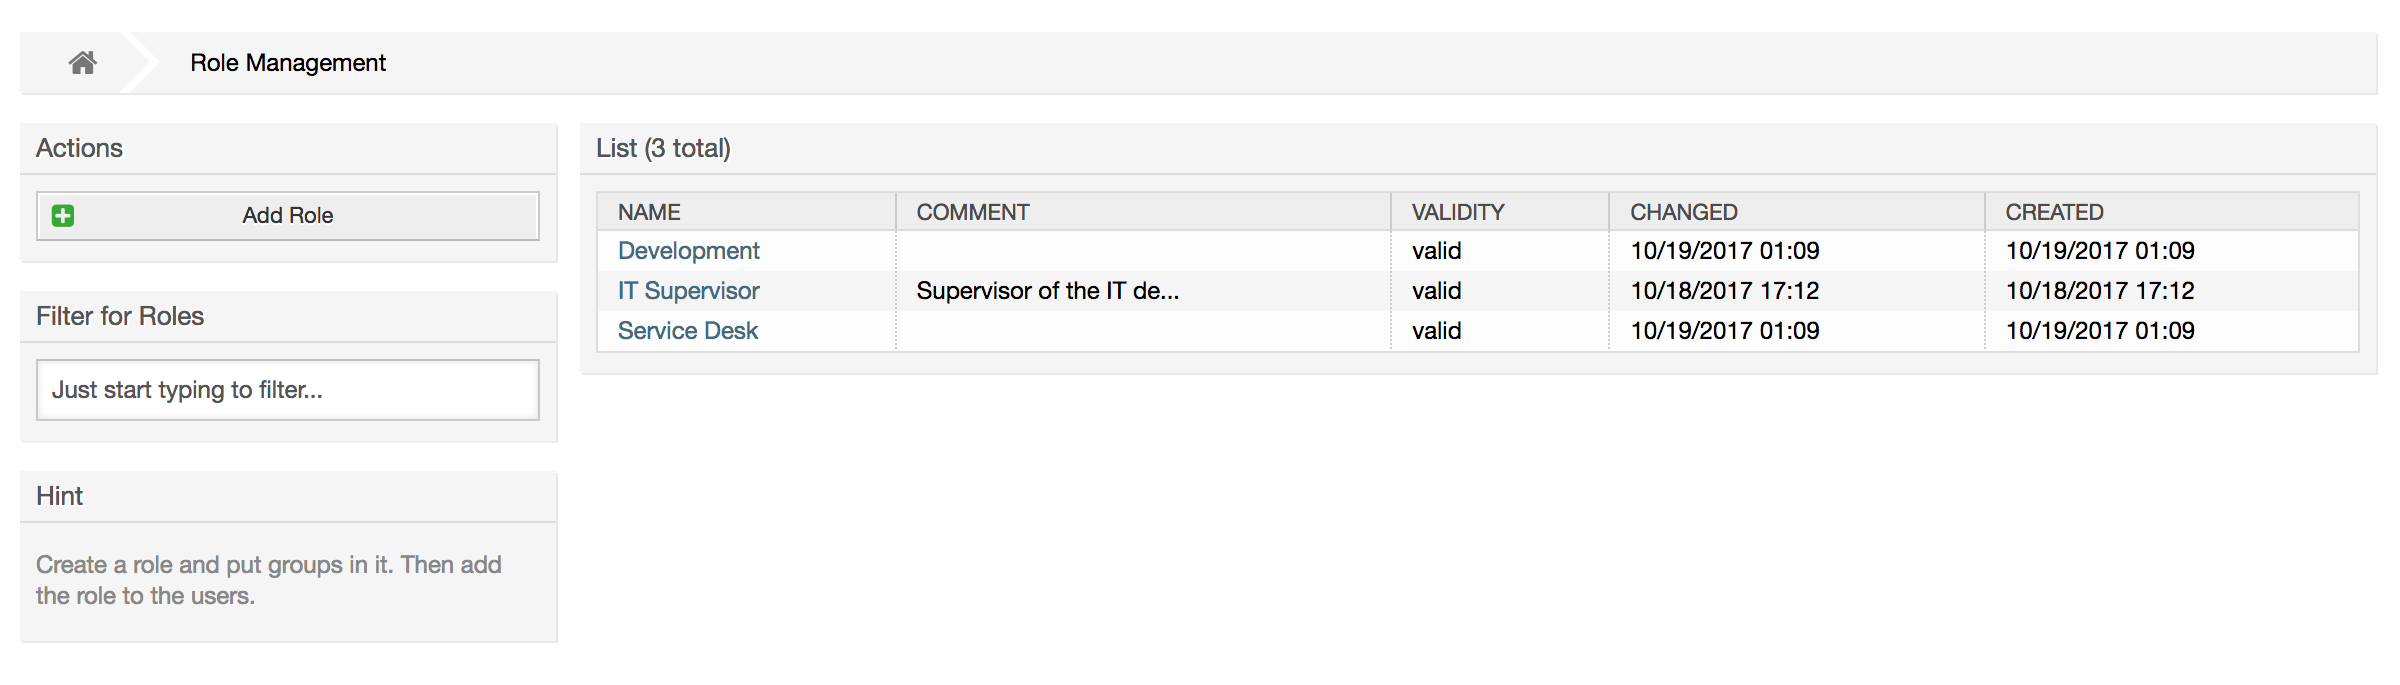
You can access the role management section (see figure below) by clicking the Roles link on the Admin page.
Anmerkung
In OTRS können Rollen deaktiviert, aber nicht gelöscht werden. Deaktivieren Sie eine Rolle, indem Sie für "Gültig" den Wert entweder auf "ungültig" bzw. "ungültig-temporär" setzen.
An overview of all roles in the system is displayed. To edit a role's
settings, click on the role's name. In a fresh new OTRS installation, there
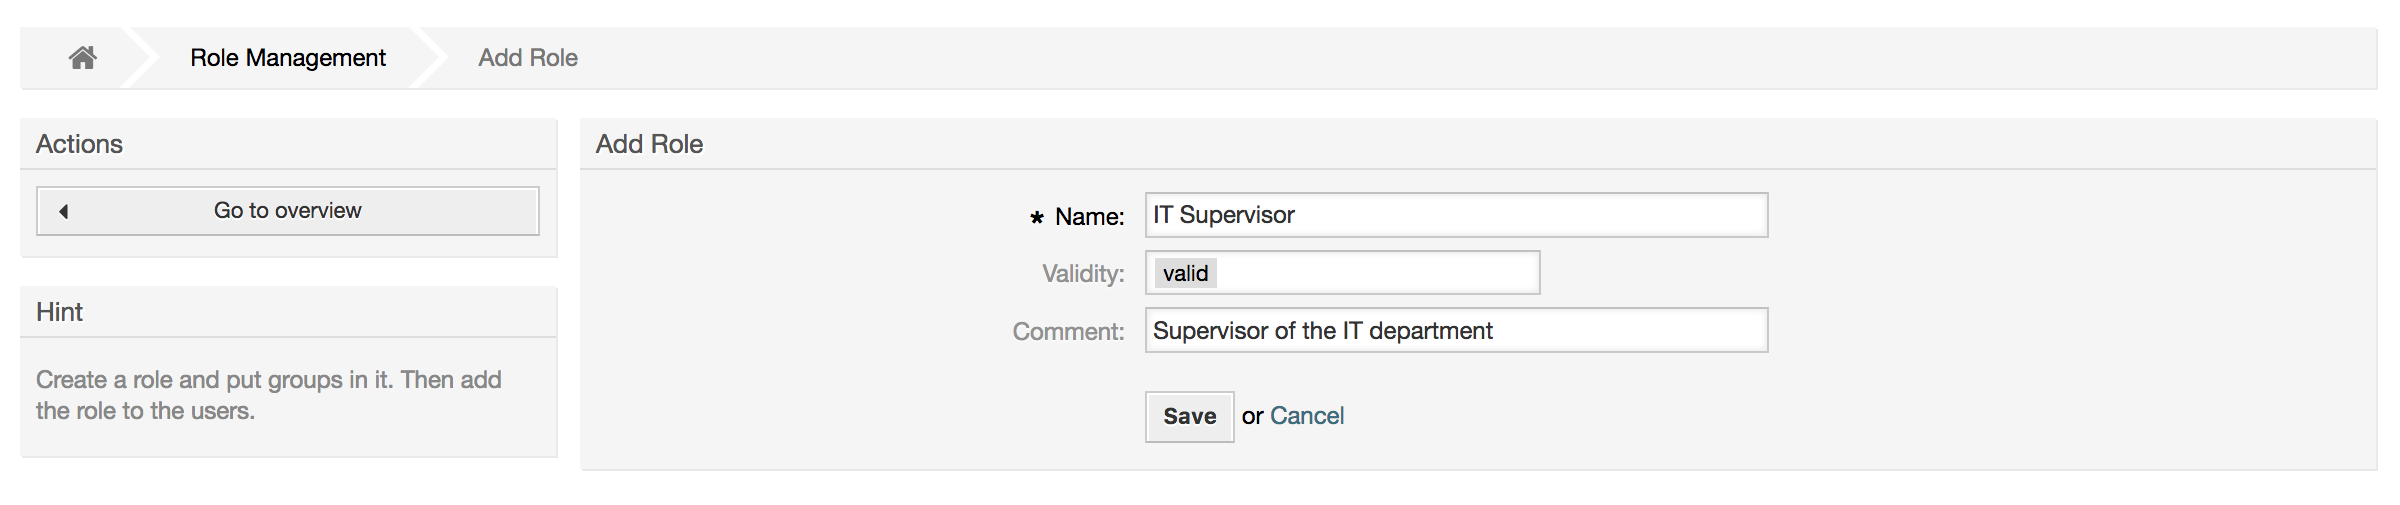
are no roles defined by default. To register one, click on the Add
role button, provide the needed data and submit it (see figure
below).
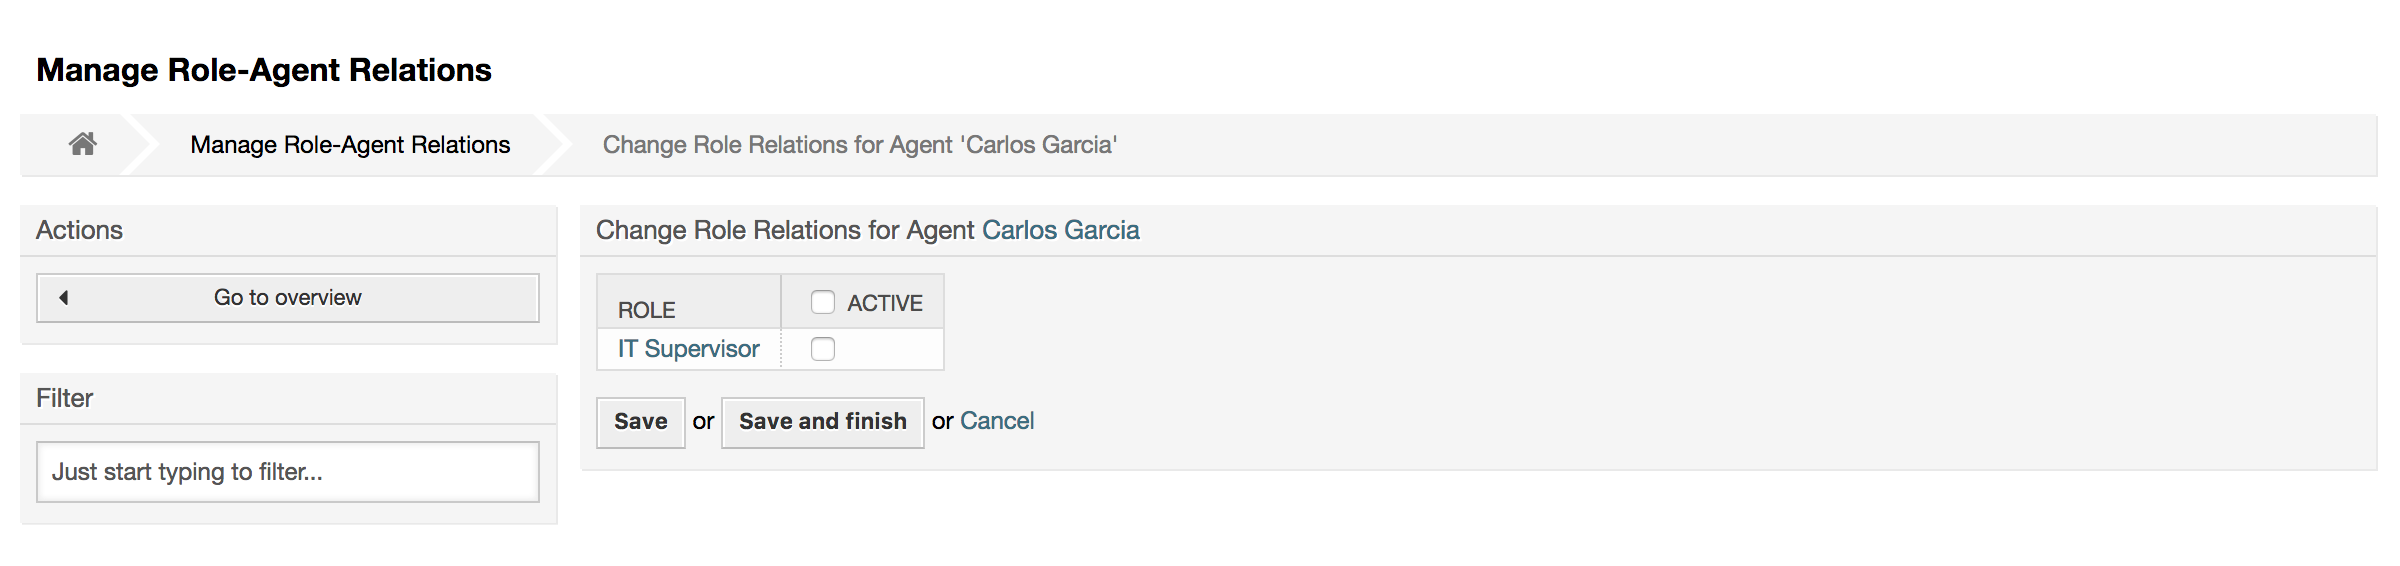
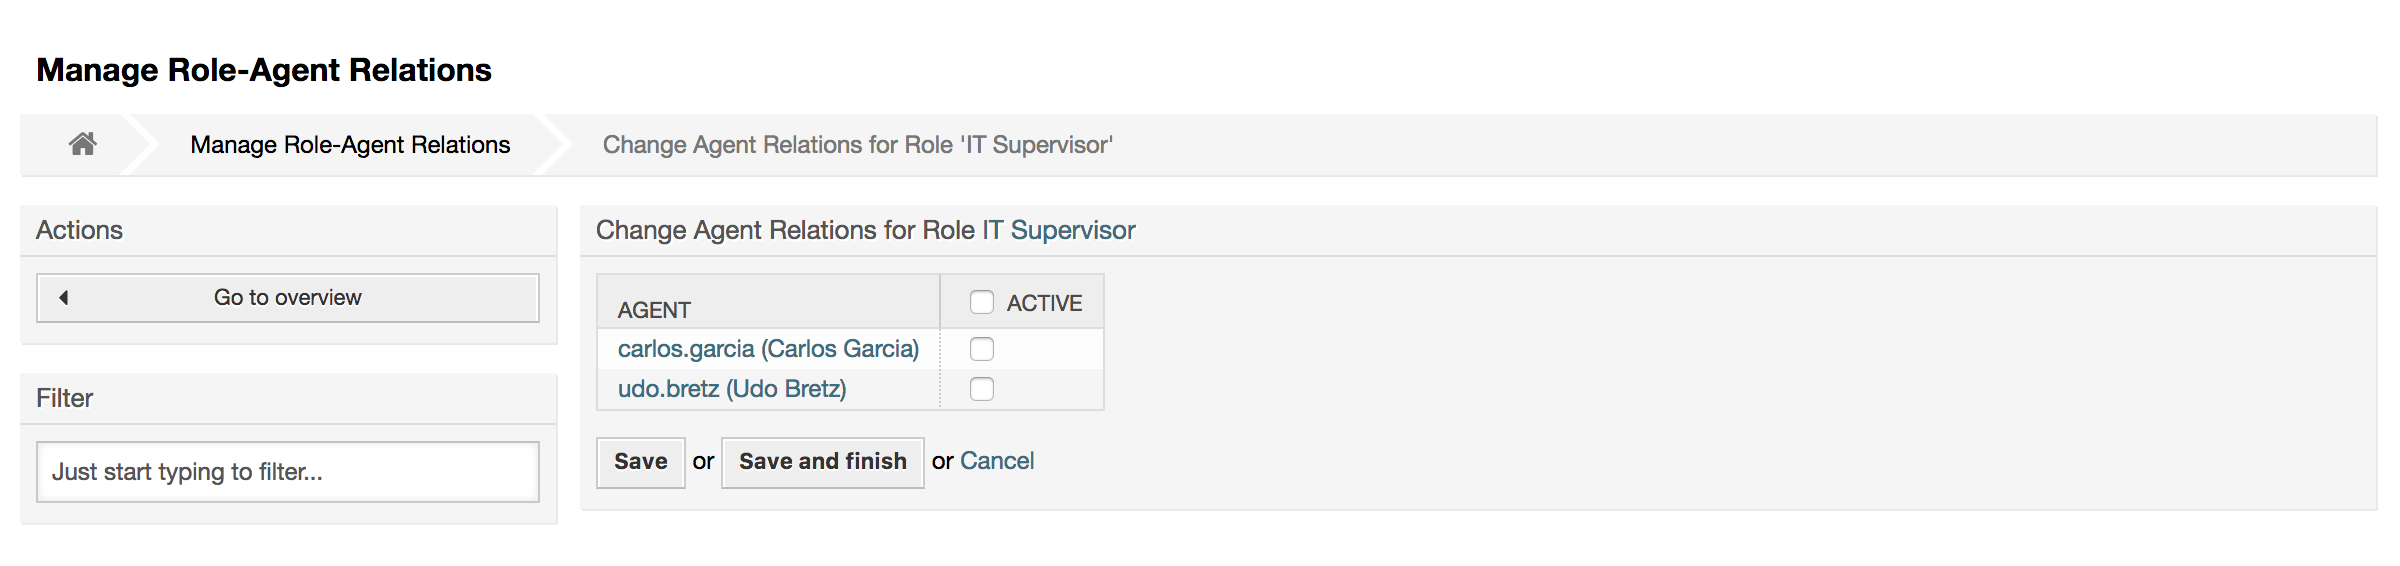
To get an overview of all roles and agents in the system, click on the link Roles <-> Agents on the Admin page. You can also use filters to find a specific element. If you want to change the roles associated with an agent, just click on the agent's name (see figure below). To change the agents associated with a role, click on the role you want to edit (see figure below).
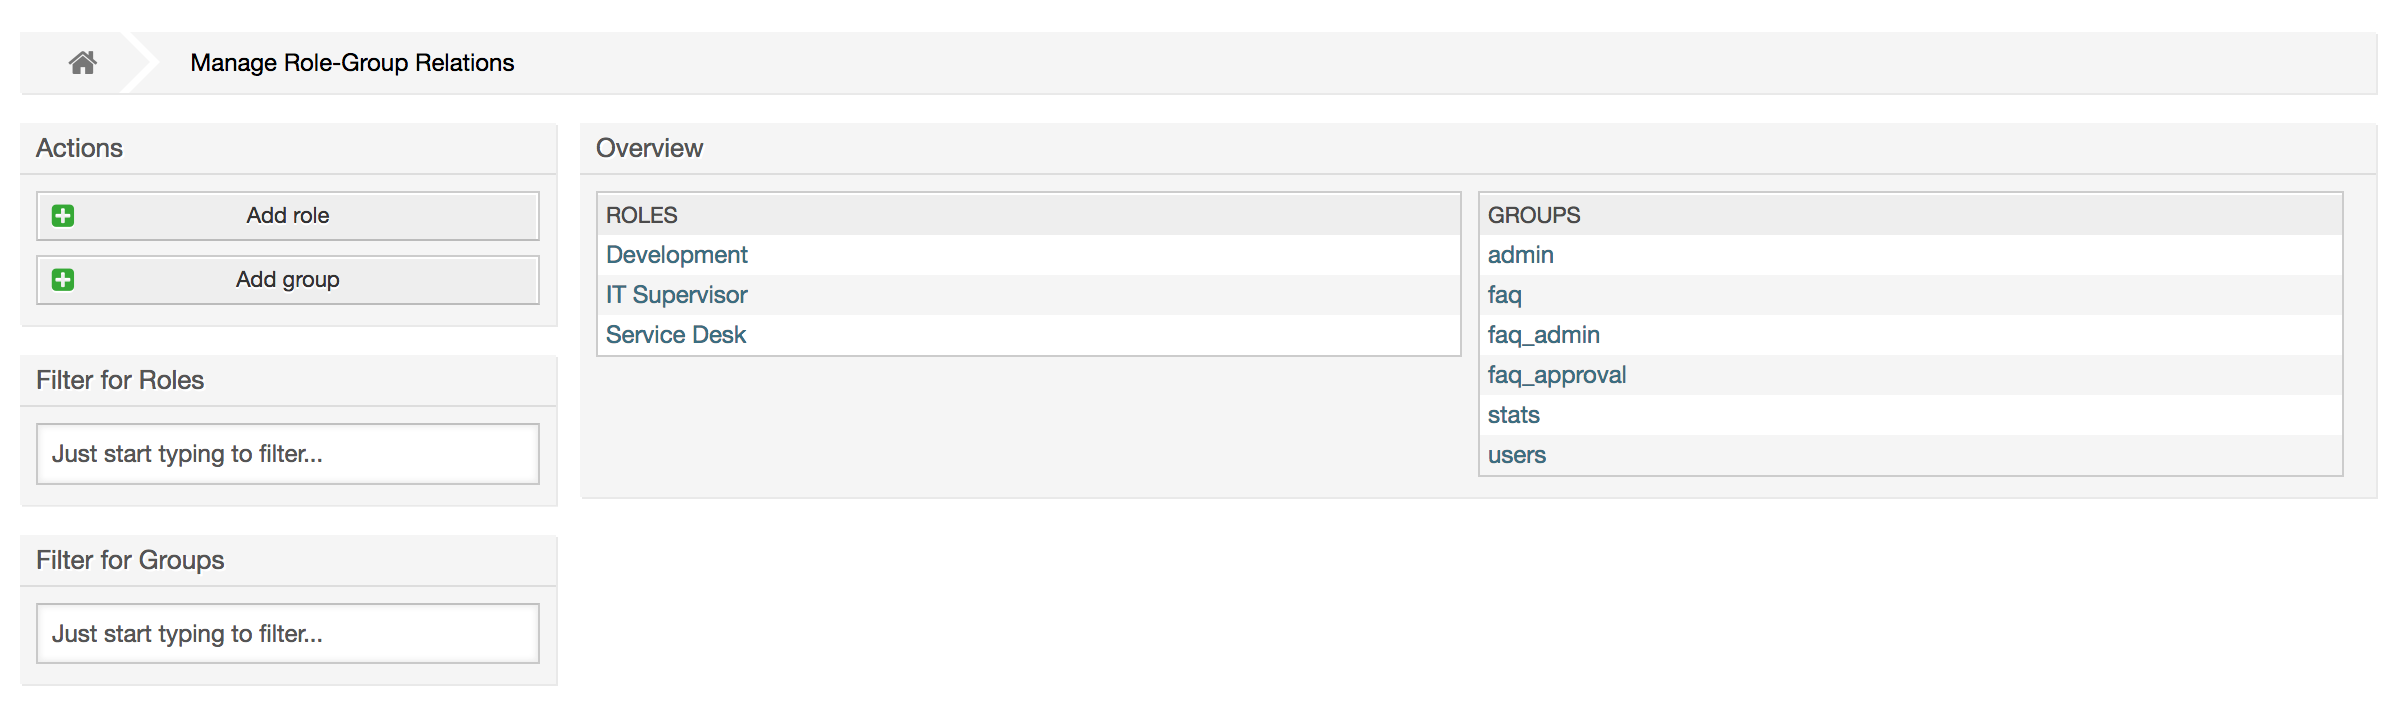
Um eine Übersicht aller Rollen und Gruppen im System zu erhalten, verwenden Sie den Link "Rollen <-> Gruppen" im Administrationsbereich.
To define the different access rights for a role, click on the name of a role or a group (see below the Figures 4.13 and 4.14, respectively).
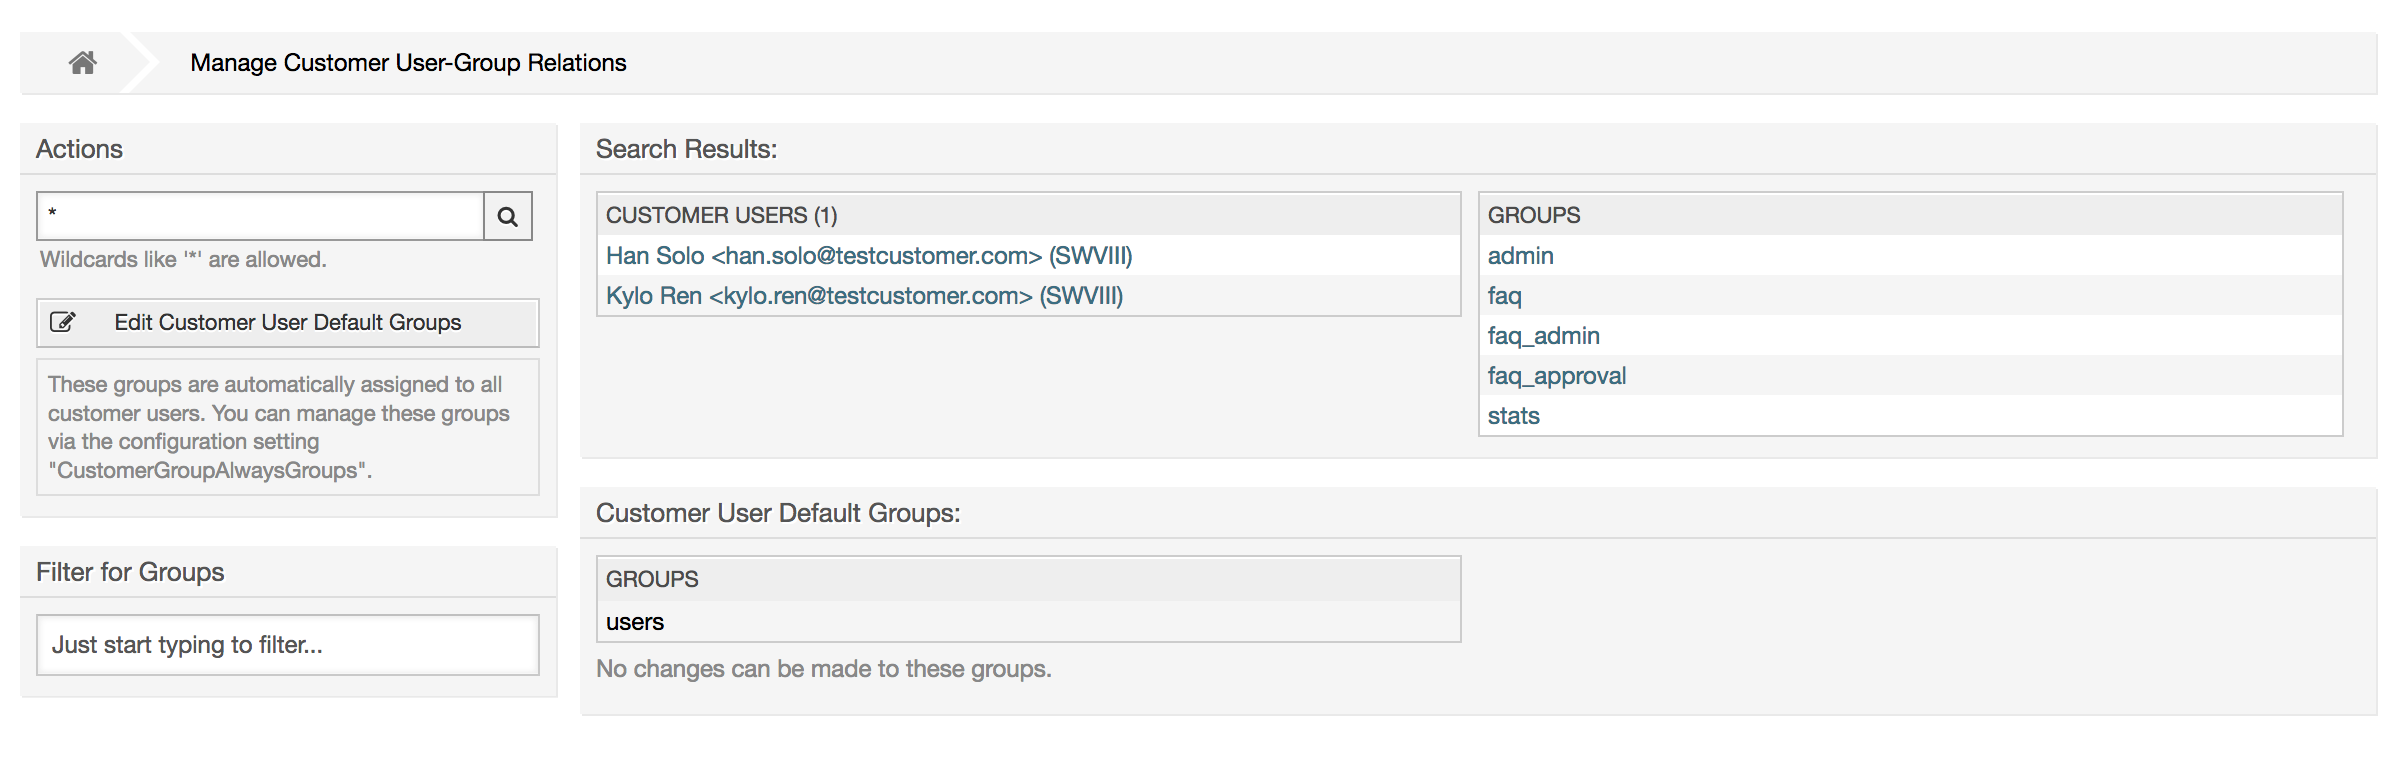
OTRS supports different types of users. Using the link Customer
Users (via the navigation bar, or the Admin page), you can manage
the accounts of your customer users (see figure below), who can log into the
system via the Customer Users interface
(customer.pl). Through this interface, your customers
can not only create tickets but also review their past tickets for new
updates. It is important to know that a customer user is needed for the
ticket history in the system.

You can search for a registered customer user, or edit their settings by clicking on their name. You also have the possibility to change the customer back-end, for further information please refer to the chapter about external back-ends.
To create a new customer user account, click on the Add customer user button (see figure below). Some of the fields are mandatory, i.e., they have to contain values, so if you leave one of those empty, it will be highlighted in red.

Customer Users can access the system by providing their username and password. The CustomerID is needed by the system to identify the user and associated tickets. Since the email address is a unique value, it can be used as the ID.
With the configuration parameter AdminCustomerUser::UseAutoComplete in the Admin SysConfig the autocomplete field can be activated for the customer ID selection in the customer user add or edit screen.
Anmerkung
As with agents, groups and roles, customer users can not be deleted from the system, only deactivated by setting the Valid option to invalid or invalid-temporarily.
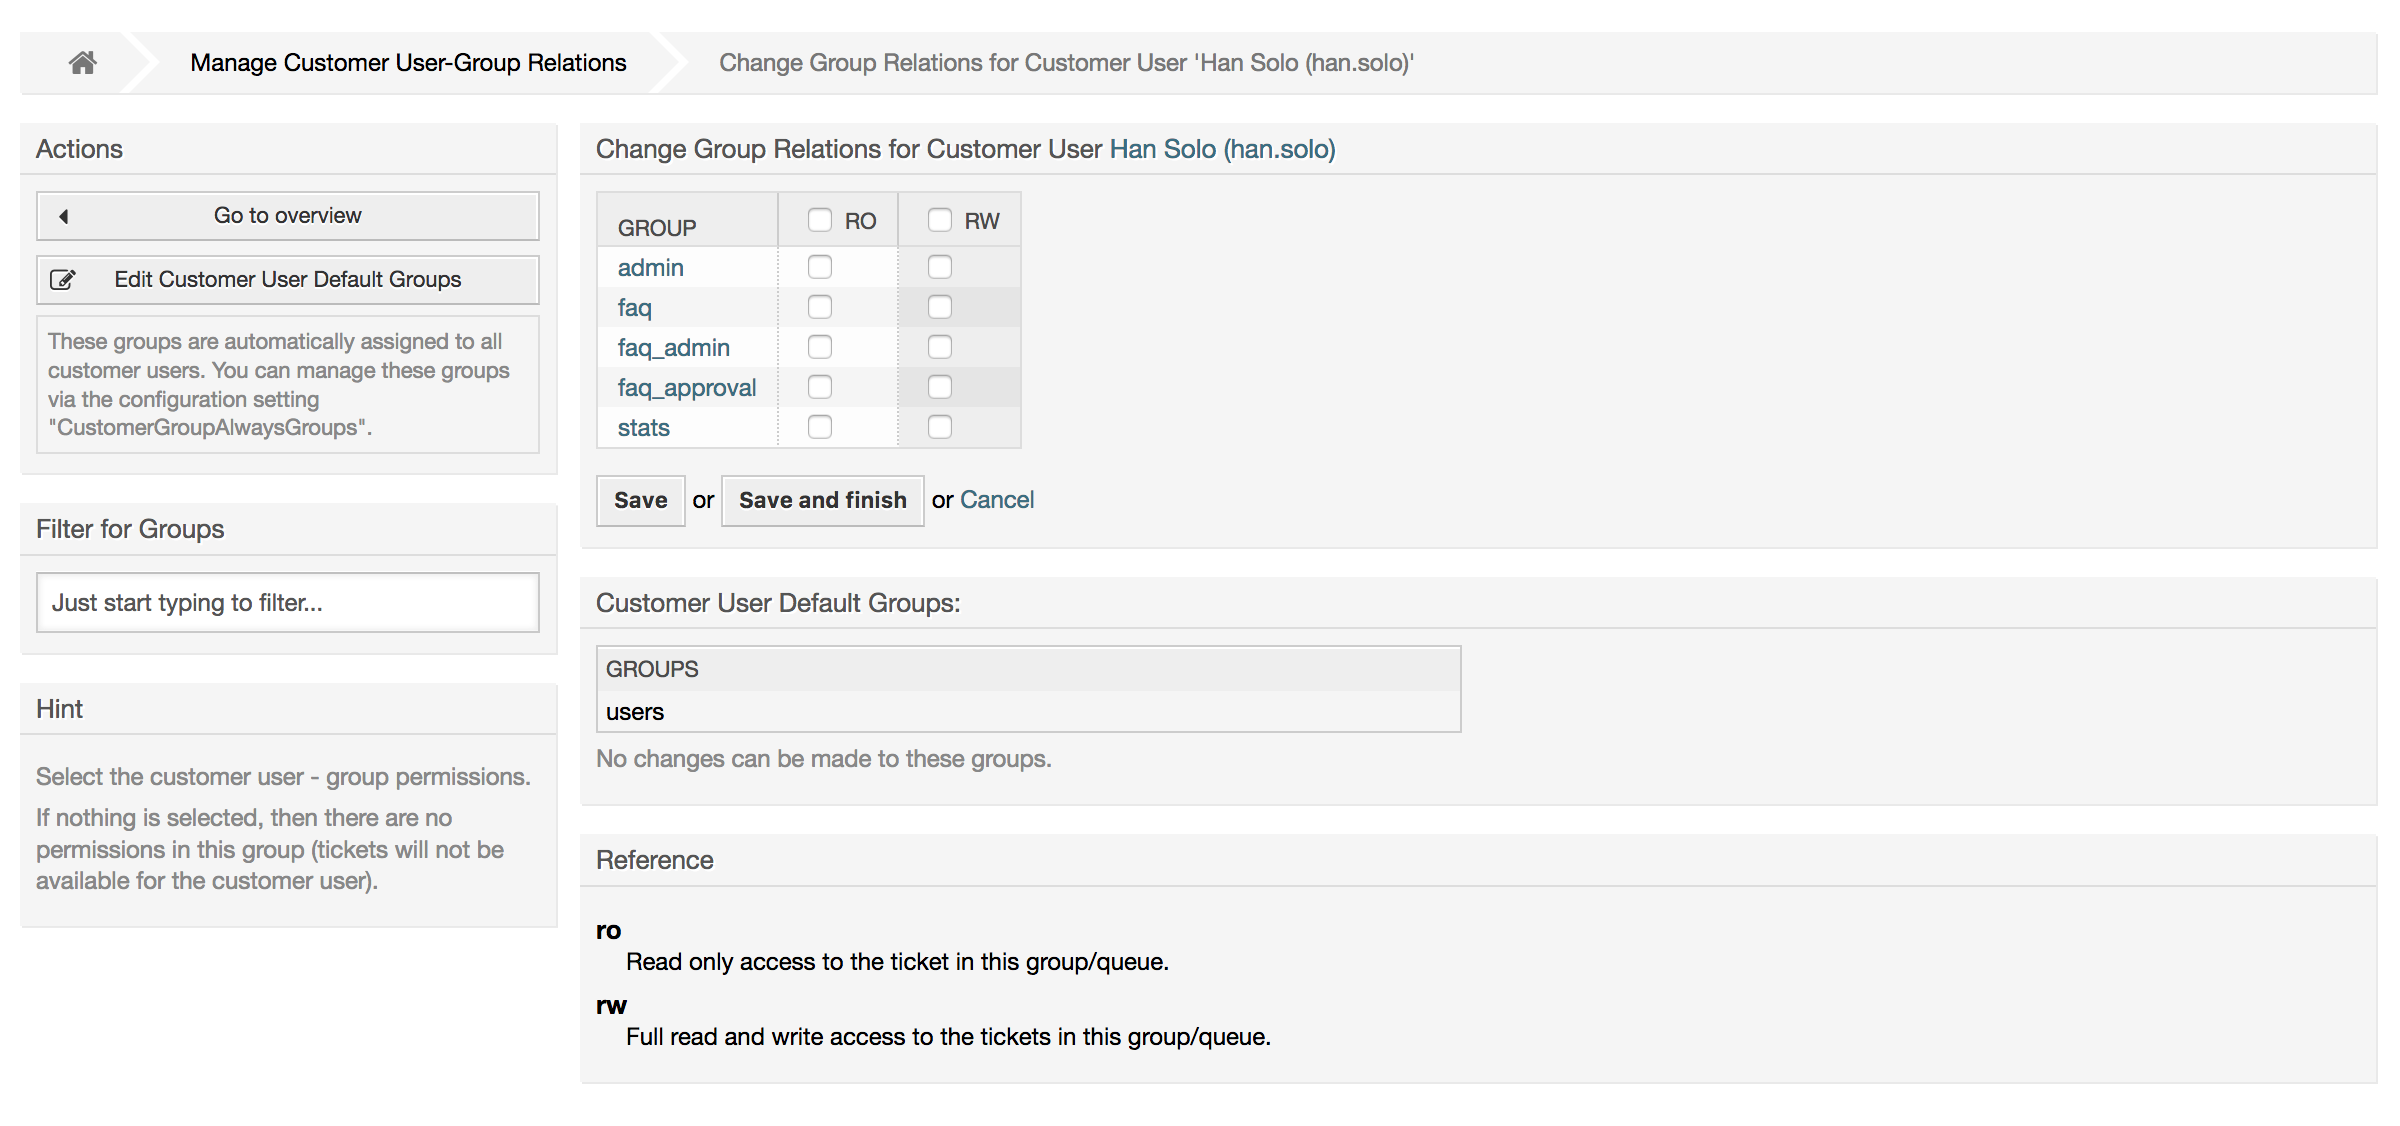
Customer users can be assigned to multiple customers (and vice-versa) using the link Customer Users ↔ Customers on the admin page. In addition to their own (primary) customer, they will be linked to any other customer for which there is a defined relation.
This gives them access to tickets of customer users from these customers.

Customer users can also be added to a group, which can be useful if you want to add customer users of the same company with access to one or a few queues. First create the group to which your customer users will belong, via the Group management module. Then add the queues and select the new group for the queues.
The next step is to activate the customer group support. This can be done with the configuration parameter CustomerGroupSupport, from the Admin SysConfig option. Using the parameter CustomerGroupAlwaysGroups, you can specify the default groups for a newly added customer user, so that every new account will be automatically added to these groups.
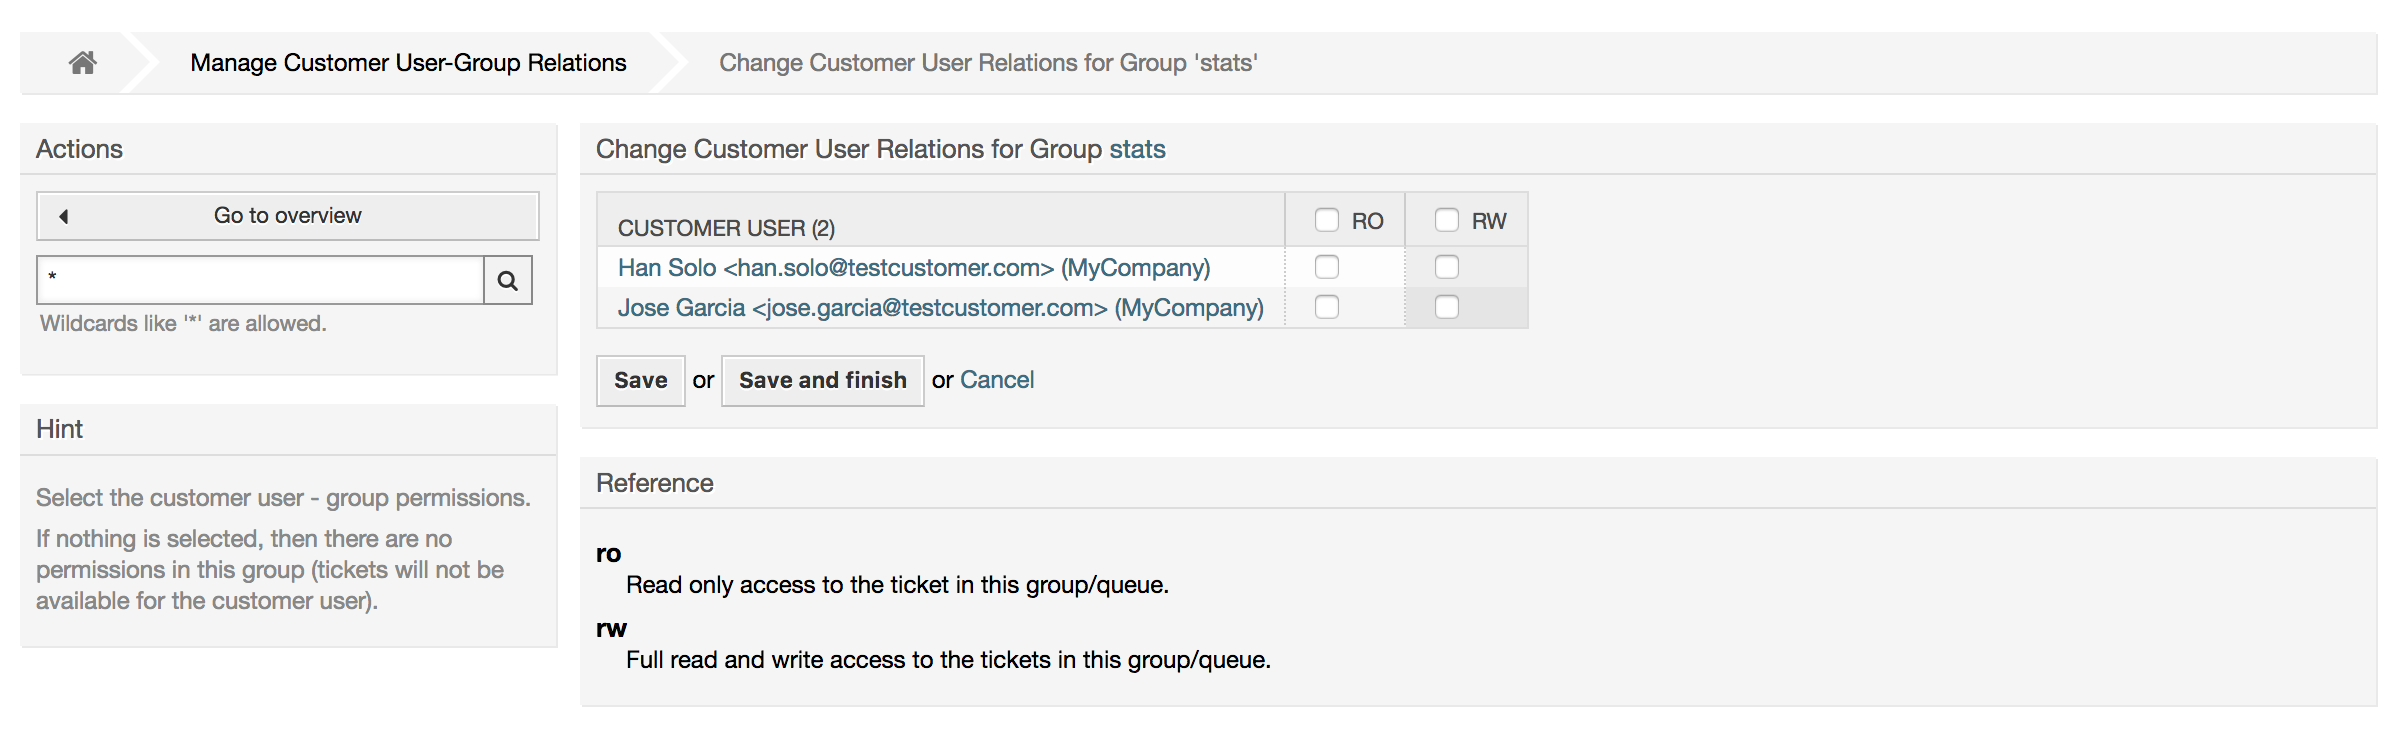
Through the link Customer Users ↔ Groups you can manage which customer shall belong to the different groups (see figure below).
To define the different groups a customer should be part of and vice versa, click on the corresponding customer username or group (see below the Figures 4.18 and 4.19, respectively).
Customers can also be added to a group, which can be useful if you don't want to add group relations to every single customer user. First create the group to which your customers will belong, via the Group management module. Then add the queues and select the new group for the queues.
The next step is to activate the customer group support. This can be done with the configuration parameter CustomerGroupSupport, from the Admin SysConfig option. Using the parameter CustomerGroupAlwaysGroups, you can specify the default groups for a newly added customers, so that every new customer will be automatically added to these groups. Available permission levels can be changed via configuration.
Assigned permissions will be shared among all customer users of this customer, so permissions don't have to be given individually to every customer user (although this is still possible if required).
Different contexts of permission assignment are available, which will determine how the permissions are inherited by customer users.
The following contexts are available:
Gleicher Kunde
Group permissions will be inherited by all customer users of this customer. This provides them with access to tickets of all customer users from the this customer if they are located in a queue that's assigned to this group.
Andere Kunden
Group permissions will be inherited by all customer users of this customer. This provides them with access to tickets of all customer users from other customers if they are located in a queue that's assigned to this group and if the other customer also has permissions to this group.
Access is limited to the level the customer user of a ticket has.
Through the link Customers ↔ Groups you can manage which customer shall belong to the different groups (see figure below).
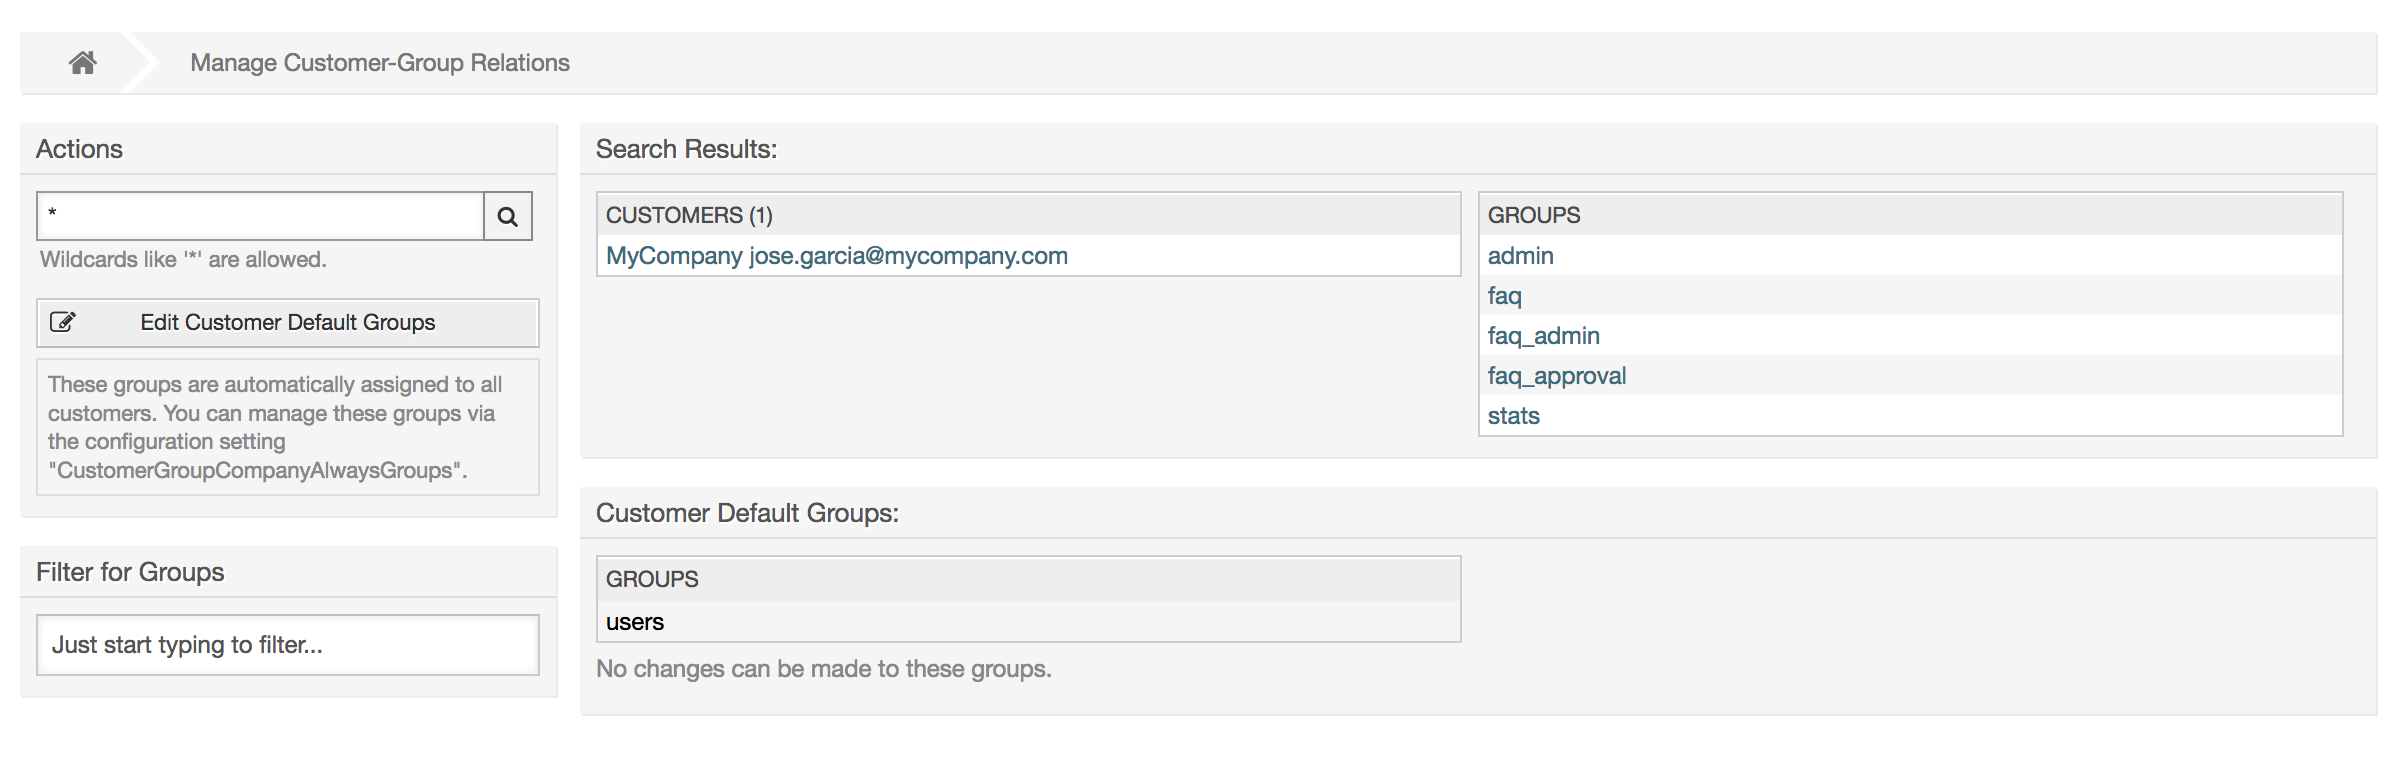
To define the different groups a customer should be part of and vice versa, click on the corresponding customer username or group (see below the Figures 4.18 and 4.19, respectively).
Access to tickets on the customer interface with enabled group support is mostly evaluated by a combination of group and individual (customer/customer user based) permission. Only if both criteria are met, specific access is granted.
If the resulting access is rw, a customer user can view and modify a ticket, if the access is ro only viewing is possible.
For ticket creation only the group permissions are used and a customer user
can create tickets for all queues with rw permissions
(unless restricted otherwise, e.g. ACL or
CustomerPanelOwnSelection).
Group permissions are additive (meaning that only one method needs to grant permissions) and the following possibilities are taken into account:
Customer user default groups via SysConfig setting
Groups assigned to the customer user via Customer Users ↔ Customers admin frontend
Customer default groups via SysConfig setting
Groups assigned to the customer via Customers ↔ Groups admin frontend
For the methods above, all customers related to a customer user are used. This includes the 'primary' customer (selected in Customer User admin frontend), additional customers (added in Customer Users ↔ Customers admin frontend) and other customer that might exist in the backend.
Individual permission checks require one of the following conditions to be met:
Ticket is assigned to the customer user
Ticket is assigned to a customer that the customer user is related to (as explained above)
Ticket is assigned to a customer with group permissions for the ticket queue while a customer related to the customer user has Other Customers permission to the same group
An example for the last item to clarify the functionality:
Ticket is assigned to customer user 'Arvid Karlsson' with related customer 'Ericsson AB'
Ticket is located in queue 'Support Sweden'
Queue 'Support Sweden' is in group 'support-se'
Customer 'Ericsson AB' has 'Same Customer' context 'rw' permission to group 'support-se'
Logged in customer user is 'Barry Smith' which is related to customer 'Farmers Inc.'
Customer 'Farmers Inc.' has 'Same Customer' context 'ro' permission to group 'support-se'
Now, if Customer 'Farmers Inc.' is given 'Other Customers' context 'ro' permission to group 'support-se', Barry Smith will be able to view the ticket
In order for Barry to modify the ticket, 'rw' permission is required for both 'Same Customer' and 'Other Customers' context
In this example we will create a multi-tier customer structure with resulting ticket permissions. To get the same results you will need a relatively clean system without many customizations.
First, create following customers through 'Admin → Customers' frontend:
CustomerID: de, Customer: Graubrot AG
CustomerID: mx, Customer: Hernandez SA
CustomerID: se, Customer: Ericsson AB
CustomerID: us, Customer: Farmers Inc.
Next, create the following customer users through Admin → Customer Users frontend and assign them to the already created customers. Use any valid email addresses for Email field.
Firstname: Arvid, Lastname: Karlsson, Username: ak, CustomerID: Ericsson AB
Firstname: Barry, Lastname: Smith, Username: bs, CustomerID: Farmers Inc.
Firstname: Christian, Lastname: Müller, Username: cm, CustomerID: Graubrot AG
Firstname: Diego, Lastname: Garcia, Username: dg, CustomerID: Hernandez SA
Then, go to 'Admin → Groups' frontend and add the following as new groups:
faq-amer
faq-emea
support-de
support-mx
support-se
support-us
Then, go to Admin → Queues and add corresponding queues which will use previously created groups. For the System address you can use any available.
Name: FAQ Germany, Group: faq-emea
Name: FAQ Mexico, Group: faq-amer
Name: FAQ Sweden, Group: faq-emea
Name: FAQ USA, Group: faq-amer
Name: Support Germany, Group: support-de
Name: Support Mexico, Group: support-mx
Name: Support Sweden, Group: support-se
Name: Support USA, Group: support-us
Go to Admin → Customer Users ↔ Customers frontend and assign customer users to other customers.
Arvid Karlsson
de Graubrot AG → active {1}
Diego Garcia
se Ericsson AB, us Farmers Inc. → active {2}
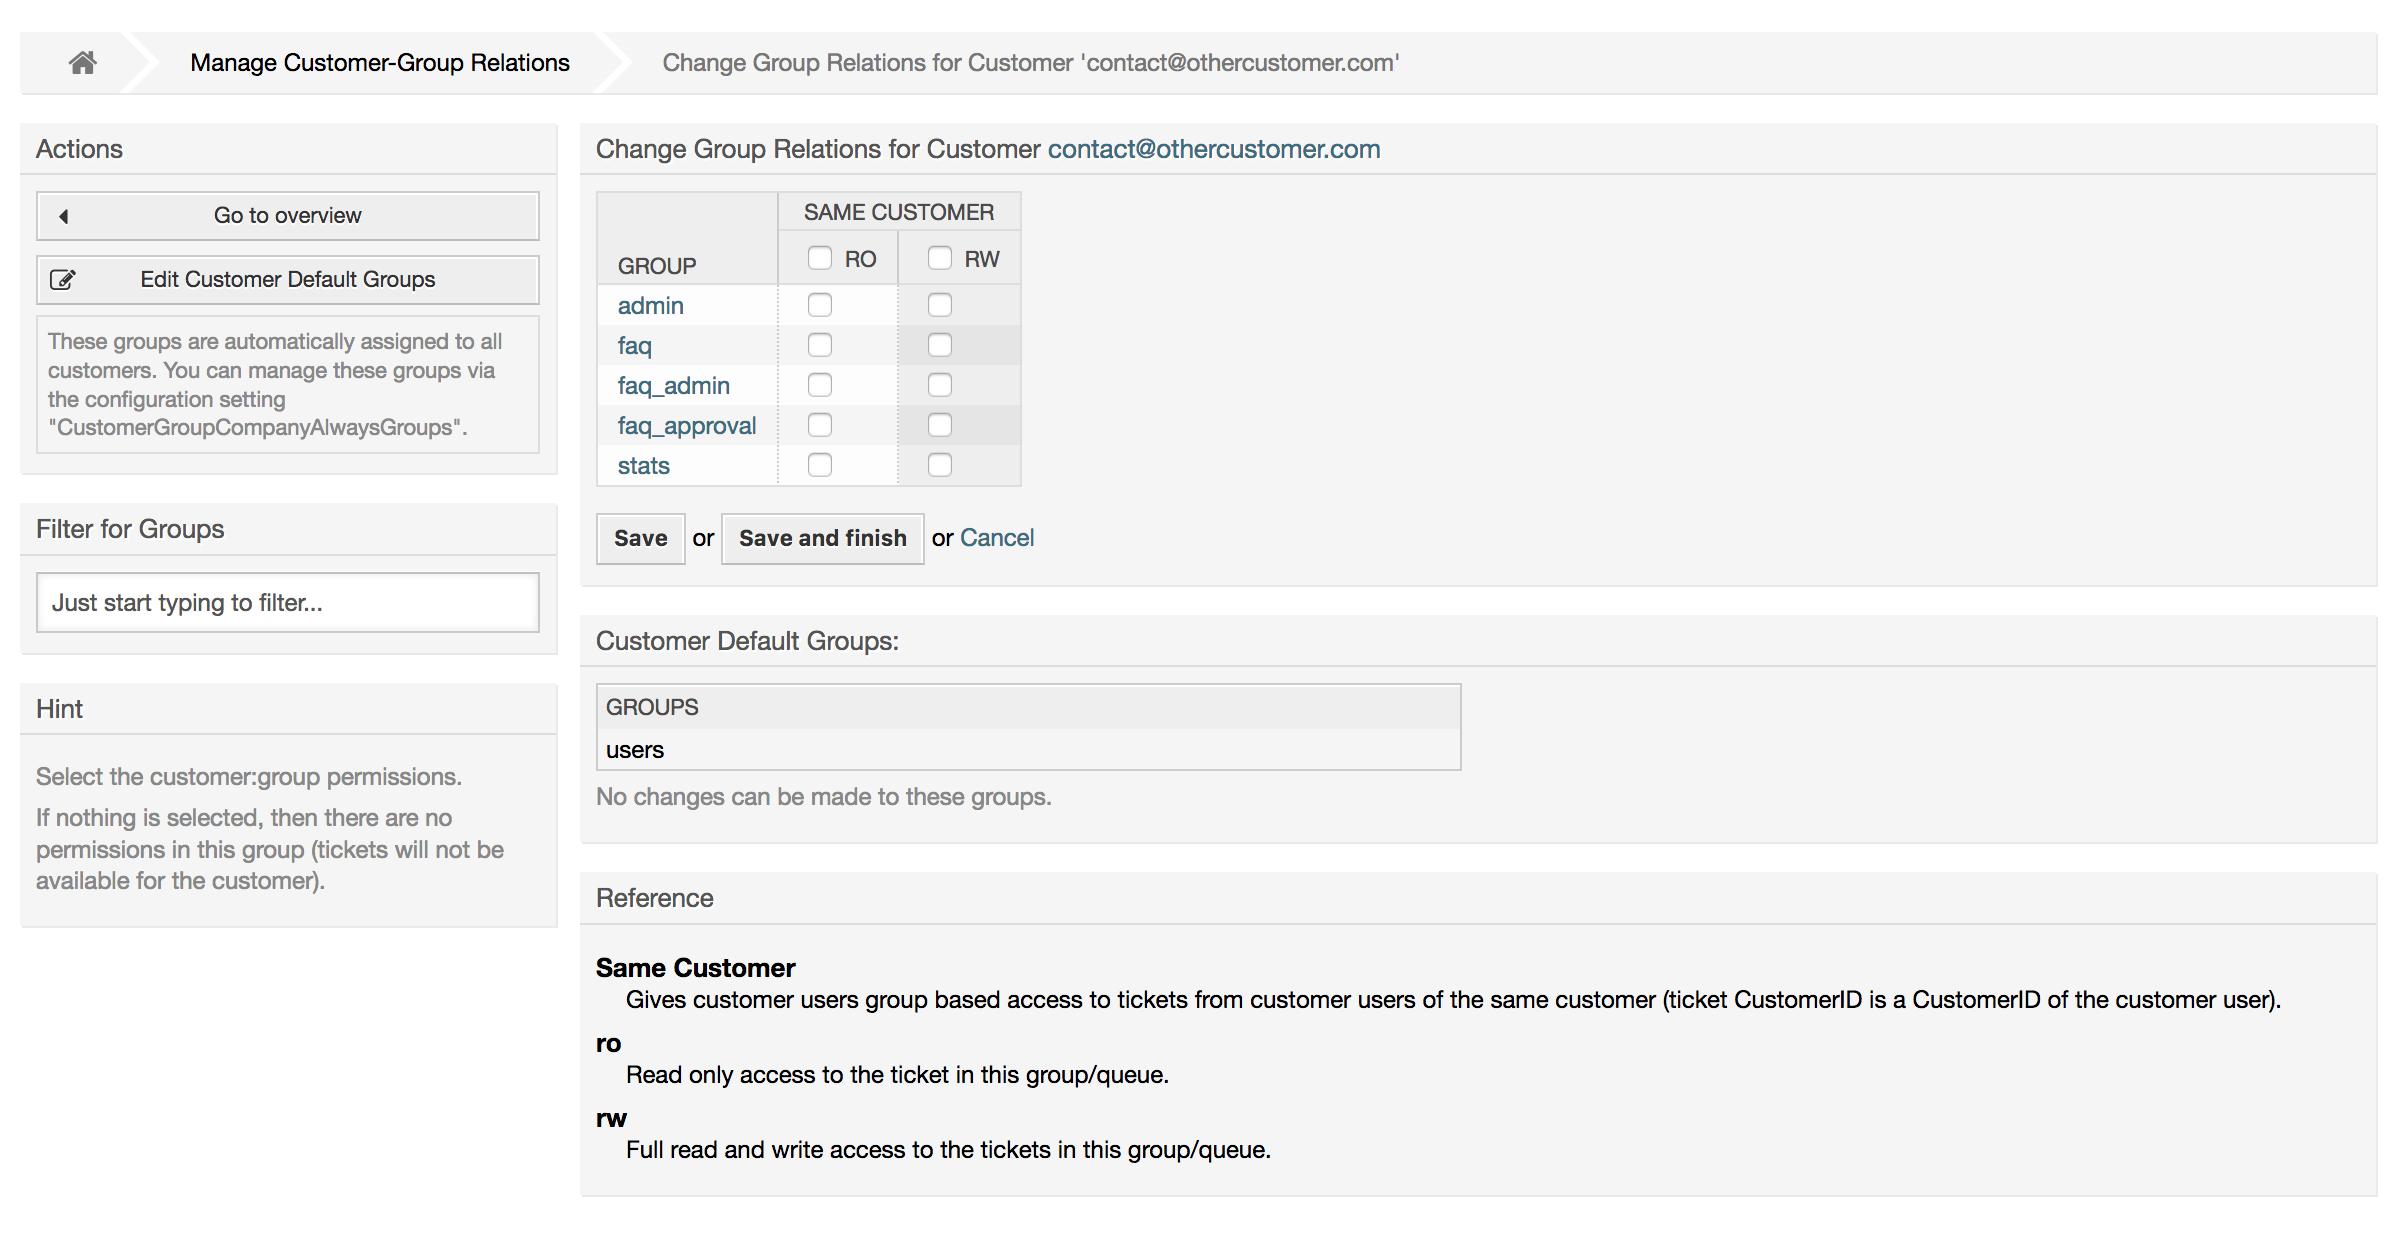
Additionally, go to Admin → Customer Users ↔ Groups frontend and assign a single customer user direct access to a group.
Diego Garcia
faq-emea → rw {3}
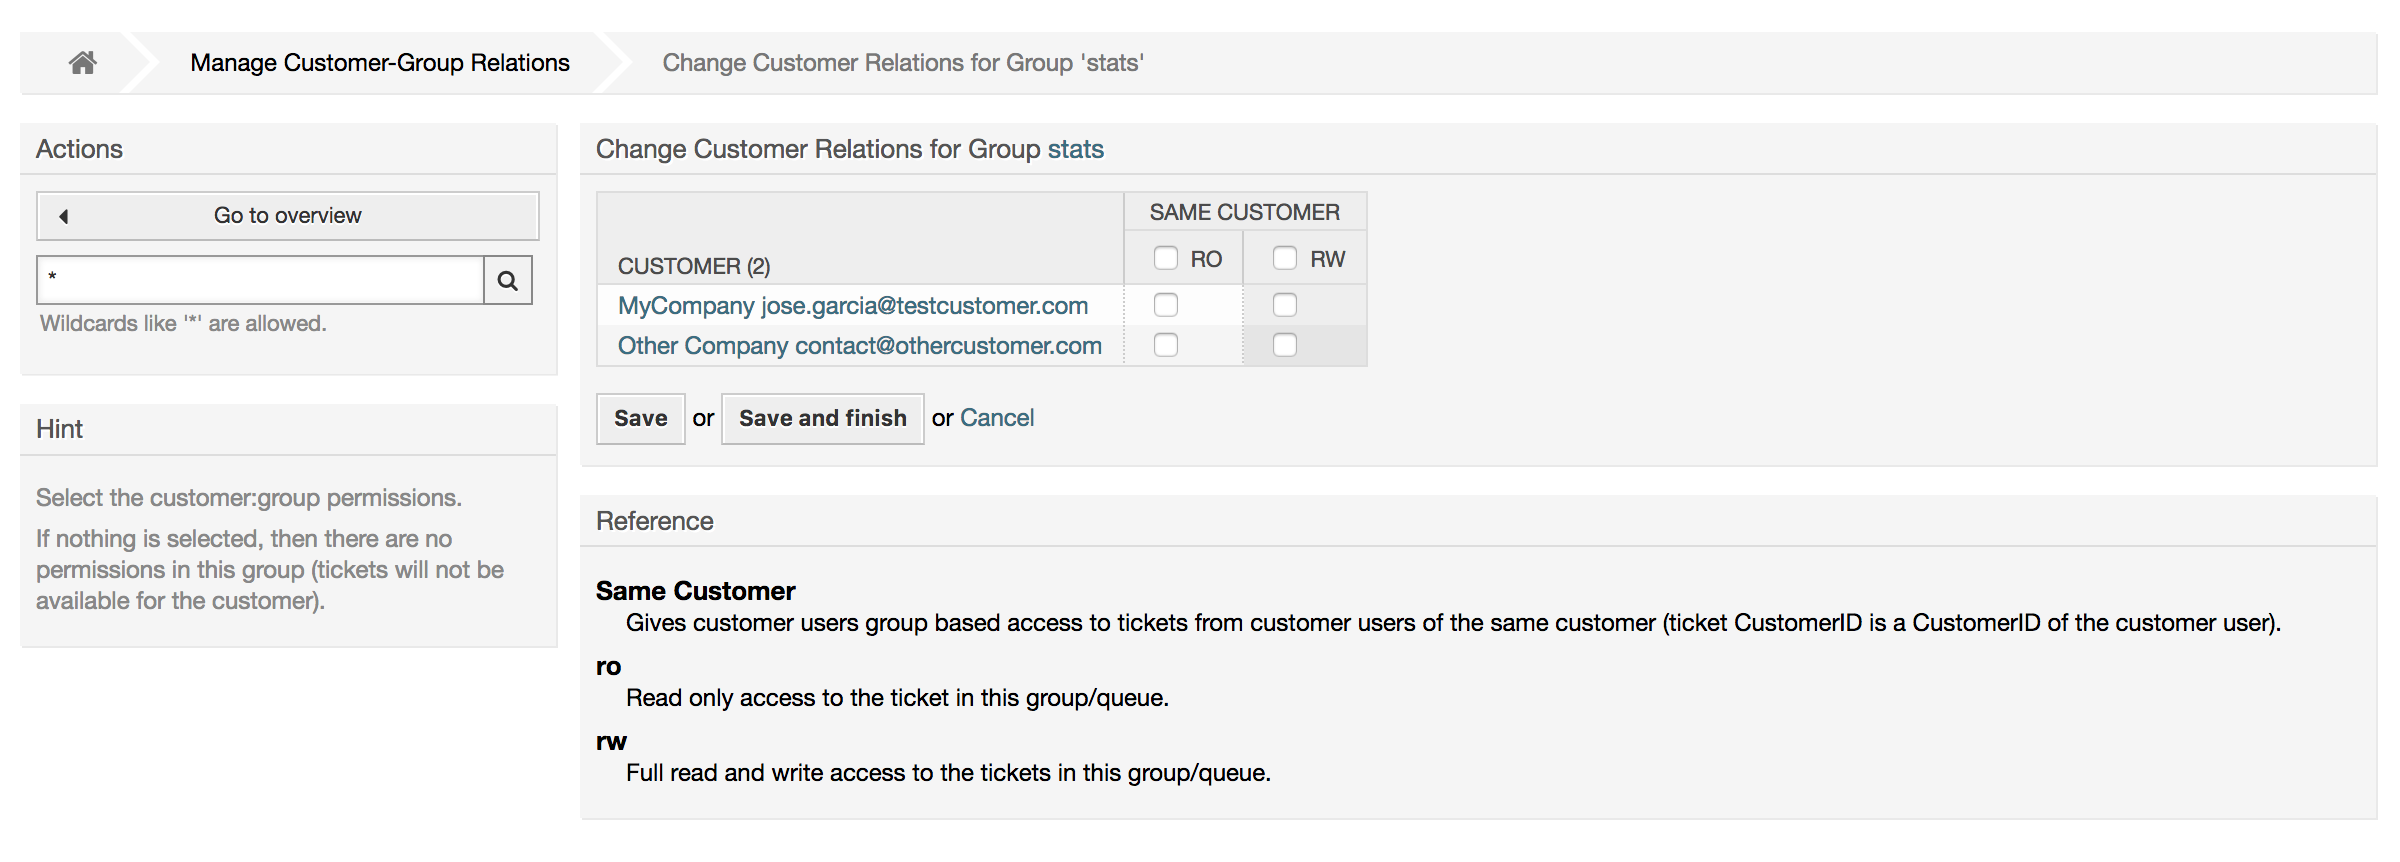
Now, go to Admin → Customers ↔ Groups frontend and assign customers to groups according to the matrix below. Be sure to select proper permission level for each group and company.
de Graubrot AG
Same Customer {4}
faq-amer → ro
faq-emea → ro
support-de → rw
support-mx → ro
mx Hernandex SA
Same Customer {5}
faq-amer → ro
faq-emea → ro
support-de → ro
support-mx → rw
Other Customers {6}
support-de → rw (this is intentional to demonstrate limitation to base permissions)
support-mx → rw
se Ericsson AB
Same Customer {7}
faq-amer → ro
faq-emea → ro
support-se → rw
us Farmers Inc.
Same Customer {8}
faq-amer → ro
faq-emea → ro
support-us → rw
Other Customers {9}
faq-amer → ro
For reference, please consult image below where all relationships are drawn as lines:
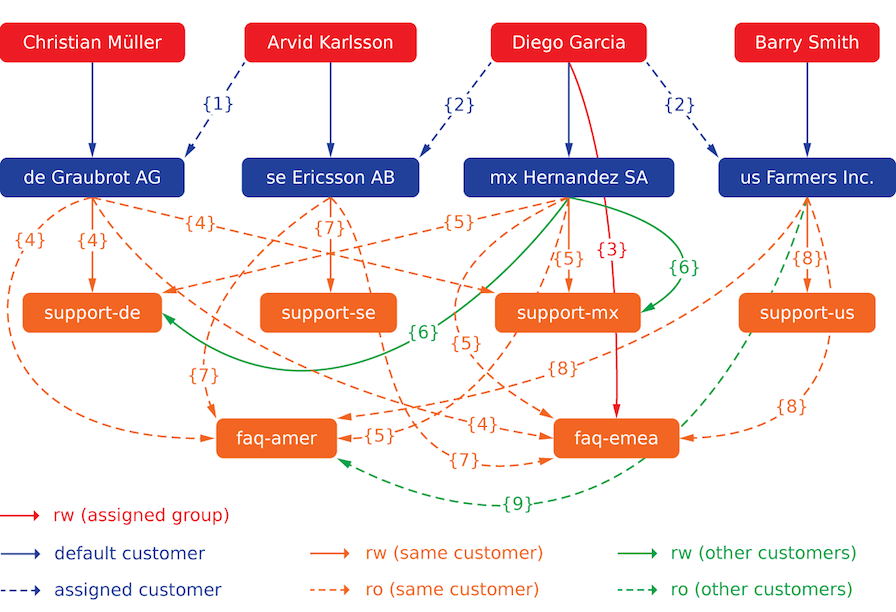
Finally, let's create some tickets. Go to New phone ticket frontend and create tickets, one each per customer user and queue (32 in total). By the way, this is possible in the agent frontend as the customer group restrictions are only active on the customer frontend.
For checking resulting access to the tickets, you can easily switch between
the customer users by activating SwitchToCustomer option
in SysConfig. Then just go to Admin → Customer Users
and click on corresponding Switch to customer link next
to the user's name.
You will be immediately logged in as that customer user and you can visit Tickets → Company Tickets screen for checking the ticket access. It should conform to the matrix below. Click on a ticket to check if corresponding permission level is honored: for ro permission level you should not see the Reply button.
This is the expected result for each customer user. The marker '{0}' refers to the location above where the corresponding setting was taken (this shows why the access is granted).
Resulting access for customer user Arvid Karlsson
Queue FAQ Germany: ro (via {7}) + Christian's Tickets ro (via {1})
Queue FAQ Mexico: ro (via {7}) + Christian's Tickets ro (via {1})
Queue FAQ Sweden: ro (via {7}) + Christian's Tickets ro (via {1})
Queue FAQ USA: ro (via {7}) + Christian's Tickets ro (via {1})
Queue Support Germany: rw (via {1→6}) + Christian's Tickets rw (via {1})
Queue Support Mexico: -
Queue Support Sweden: rw (via {7}) + Christian's Tickets rw (via {1})
Queue Support USA: -
Resulting access for customer user Barry Smith
Queue FAQ Germany: ro (via {8})
Queue FAQ Mexico: ro (via {8}) + Arvid's, Christian's, Diego's Tickets ro (via {9})
Queue FAQ Sweden: ro (via {8})
Queue FAQ USA: ro (via {8}) + Arvid's, Christian's, Diego's Tickets ro (via {9})
Queue Support Germany: -
Queue Support Mexico: -
Queue Support Sweden: -
Queue Support USA: rw (via {8})
Resulting access for customer user Christian Müller
Queue FAQ Germany: ro (via {4})
Queue FAQ Mexico: ro (via {4})
Queue FAQ Sweden: ro (via {4})
Queue FAQ USA: ro (via {4})
Queue Support Germany: rw (via {4})
Queue Support Mexico: ro (via {4})
Queue Support Sweden: -
Queue Support USA: -
Resulting access for customer user Diego Garcia
Queue FAQ Germany: rw (via {3}) + Arvid's, Barry's Tickets rw (via {2})
Queue FAQ Mexico: ro (via {5}) + Arvid's, Barry's Tickets ro (via {2}) + Christian's Tickets ro (via {2→9})
Queue FAQ Sweden: rw (via {3}) + Arvid's, Barry's Tickets rw (via {2})
Queue FAQ USA: ro (via {5}) + Arvid's, Barry's Tickets ro (via {2}) + Christian's Tickets ro (via {2→9})
Queue Support Germany: ro (via {5}) + Arvid's, Barry's Tickets ro (via {2}) + Christian's Tickets ro (via {6})
Queue Support Mexico: rw (via {5}) + Arvid's, Barry's Tickets rw (via {2}) + Christian's Tickets rw (via {6})
Queue Support Sweden: rw (via {2→4}) + Arvid's, Barry's Tickets rw (via {2})
Queue Support USA: rw (via {2→5}) + Arvid's, Barry's Tickets rw (via {2})
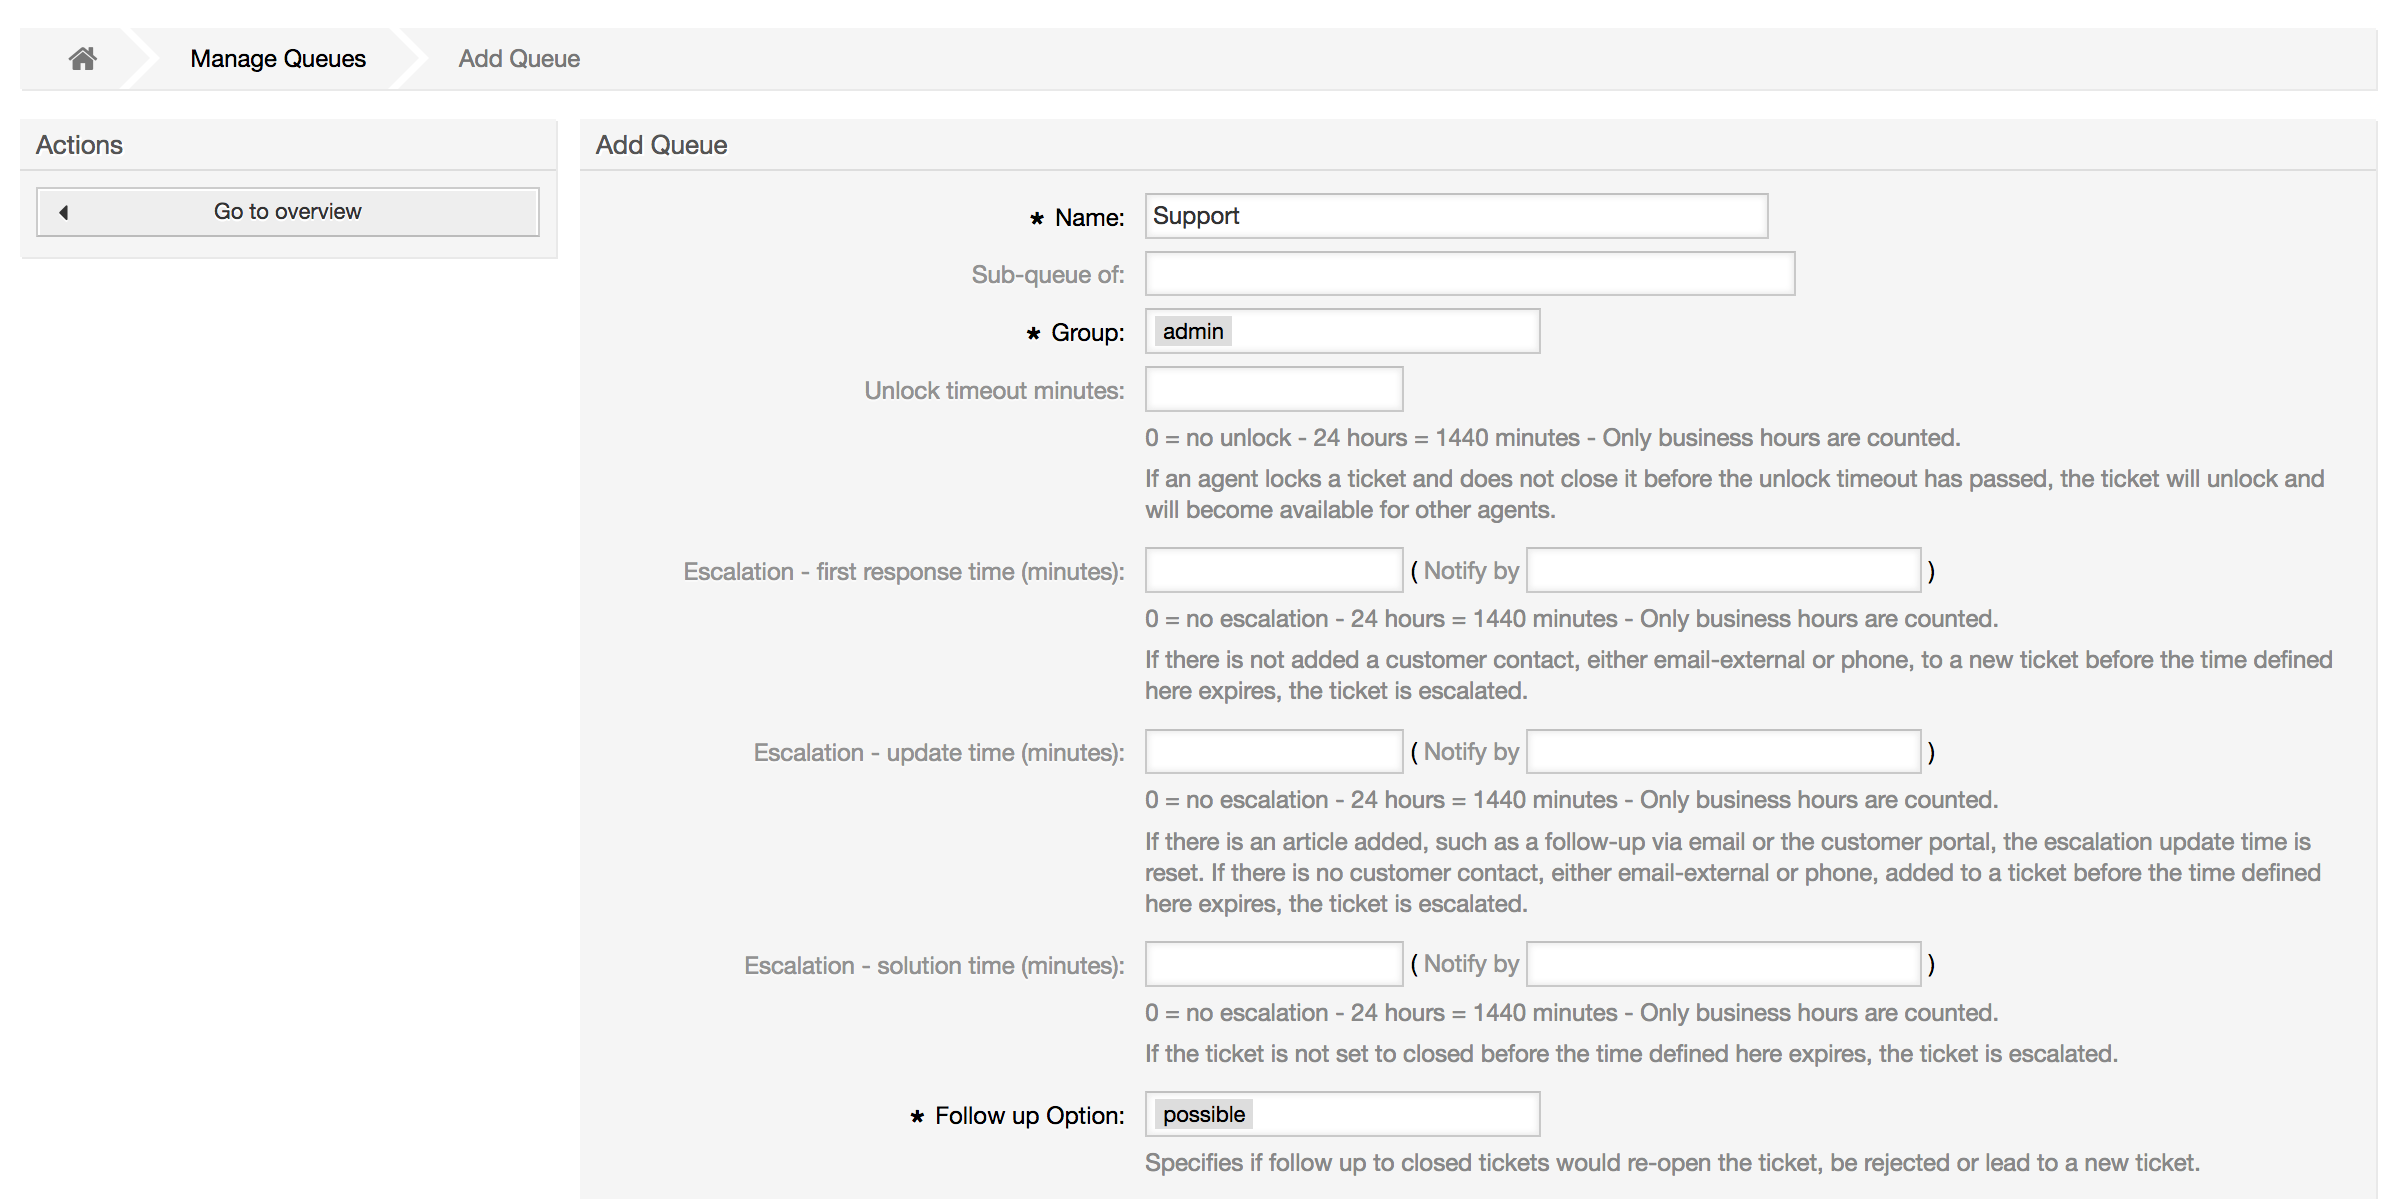
Clicking on the link "Queues" of the Admin page, you can manage the queues of your system (see figure below). In a new OTRS installation there are 4 default queues: Raw, Junk, Misc and Postmaster. All incoming messages will be stored in the "Raw" queue if no filter rules are defined. The "Junk" queue can be used to store spam messages.

Here you can add queues (see figure below) and modify them. You can specify the group that should use the queue. You can also set the queue as a sub-queue of an existing queue.
Wurde ein Ticket von einem Agenten gesperrt, so können Sie mit Hilfe des Freigabezeit-Intervalls festlegen, wann ein Ticket wieder automatisch vom System freigegeben werden soll. So können auch die anderen Mitarbeiter wieder auf dieses Ticket zugreifen und es bearbeiten.
Drei Arten von Eskalationszeiten können pro Queue eingestellt werden:
Eskalation - Zeit für die erste Reaktion
Nach der Erstellung wird dieses Ticket eskalieren, wenn die hier definierte Zeit verstreicht, ohne dass eine Kommunikation zum Kunden per E-Mail oder Telefonanruf stattgefunden hat.
Eskalation - Aktualisierungszeit
If there is a customer followup either via e-mail or the customer portal, that is recorded in the ticket, the escalation update time is reset. If there is no customer contact before the time defined here expires, the ticket is escalated.
Eskalation - Lösungszeit
Wenn das Ticket nicht innerhalb der definierten Zeitdauer geschlossen werden kann, eskaliert es.
Weiterhin können Sie festlegen, dass bei einem Follow-Up auf ein Ticket wieder der Mitarbeiter Eigentümer dieses Tickets wird, der zuletzt als Eigentümer im System für dieses Ticket vermerkt war. Dies stellt sicher, dass die Nachfrage eines Kunden zuerst bei demselben Mitarbeiter landet, der sich zuletzt um dieses Ticket gekümmert hat.
Der Parameter für die Systemadresse legt fest, mit welcher Absenderadresse Mails aus dieser Queue versendet werden sollen. Mit Hilfe der Parameter für Anrede und Signatur kann eingestellt werden, welche Vorgaben hier standardmäßig bei Antworten auf Tickets in dieser Queue genutzt werden. In den Abschnitten E-Mail-Adressen, Anreden und Signaturen erfahren Sie mehr über die Einrichtung dieser Parameter.
Anmerkung
In OTRS können Queues deaktiviert, aber nicht gelöscht werden. Sie können eine Queue deaktivieren, indem Sie den Wert für "Gültig" auf "ungültig" oder "ungültig-temporär" setzen.
A salutation is a text module for a template. Salutations can be linked to one or more queues, as described in the section about queues. A salutation is used only if a ticket from a queue the salutation is linked to, is answered. To manage the different salutations of your system, use the "Salutations" link of the admin area (see figure below).
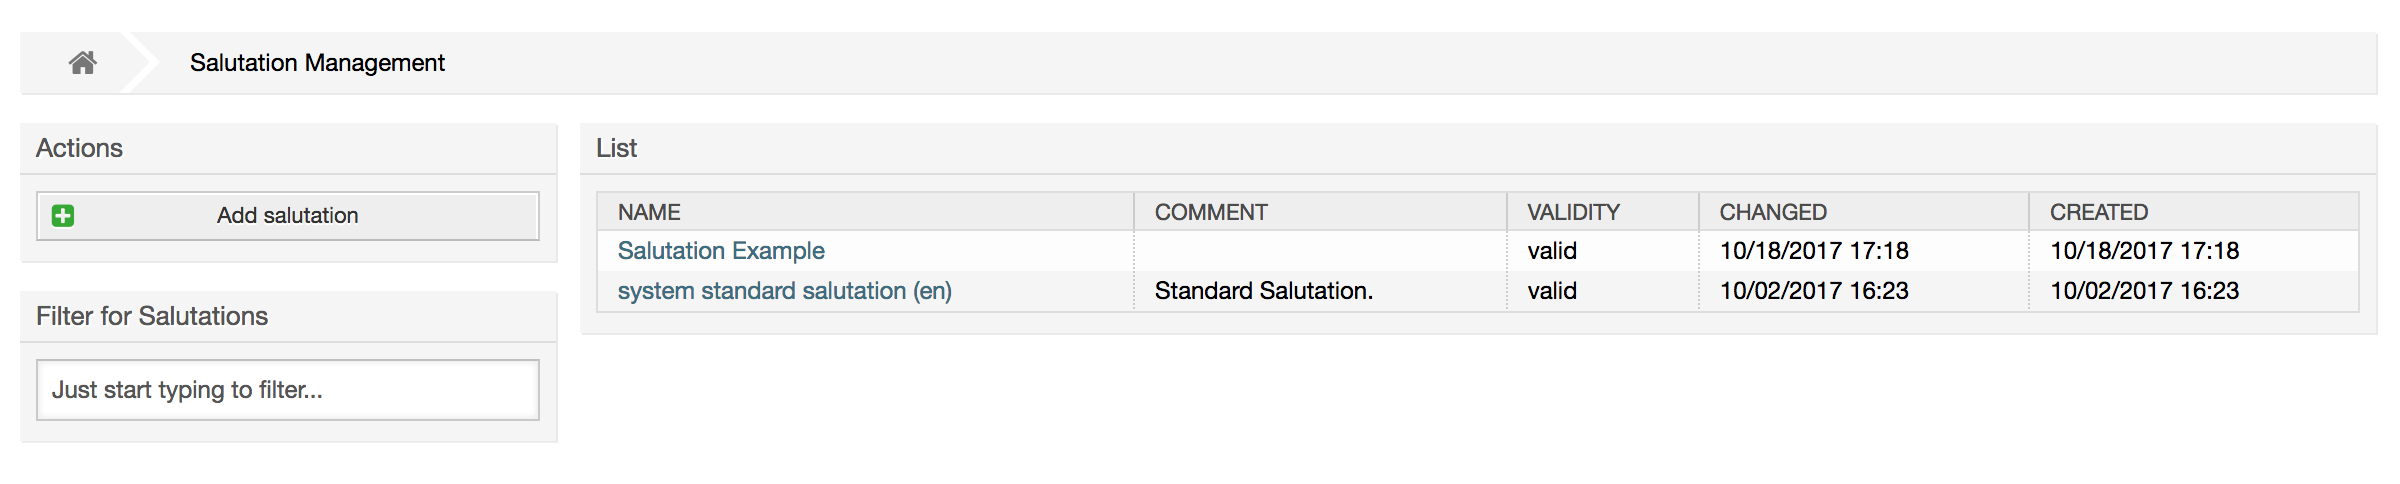
Nach einer Standardinstallation von OTRS sind bereits eine Anrede im System gespeichert, "system standard salutation (en)".
To create a new salutation, press the button Add
salutation, provide the required data and submit it (see figure
below).
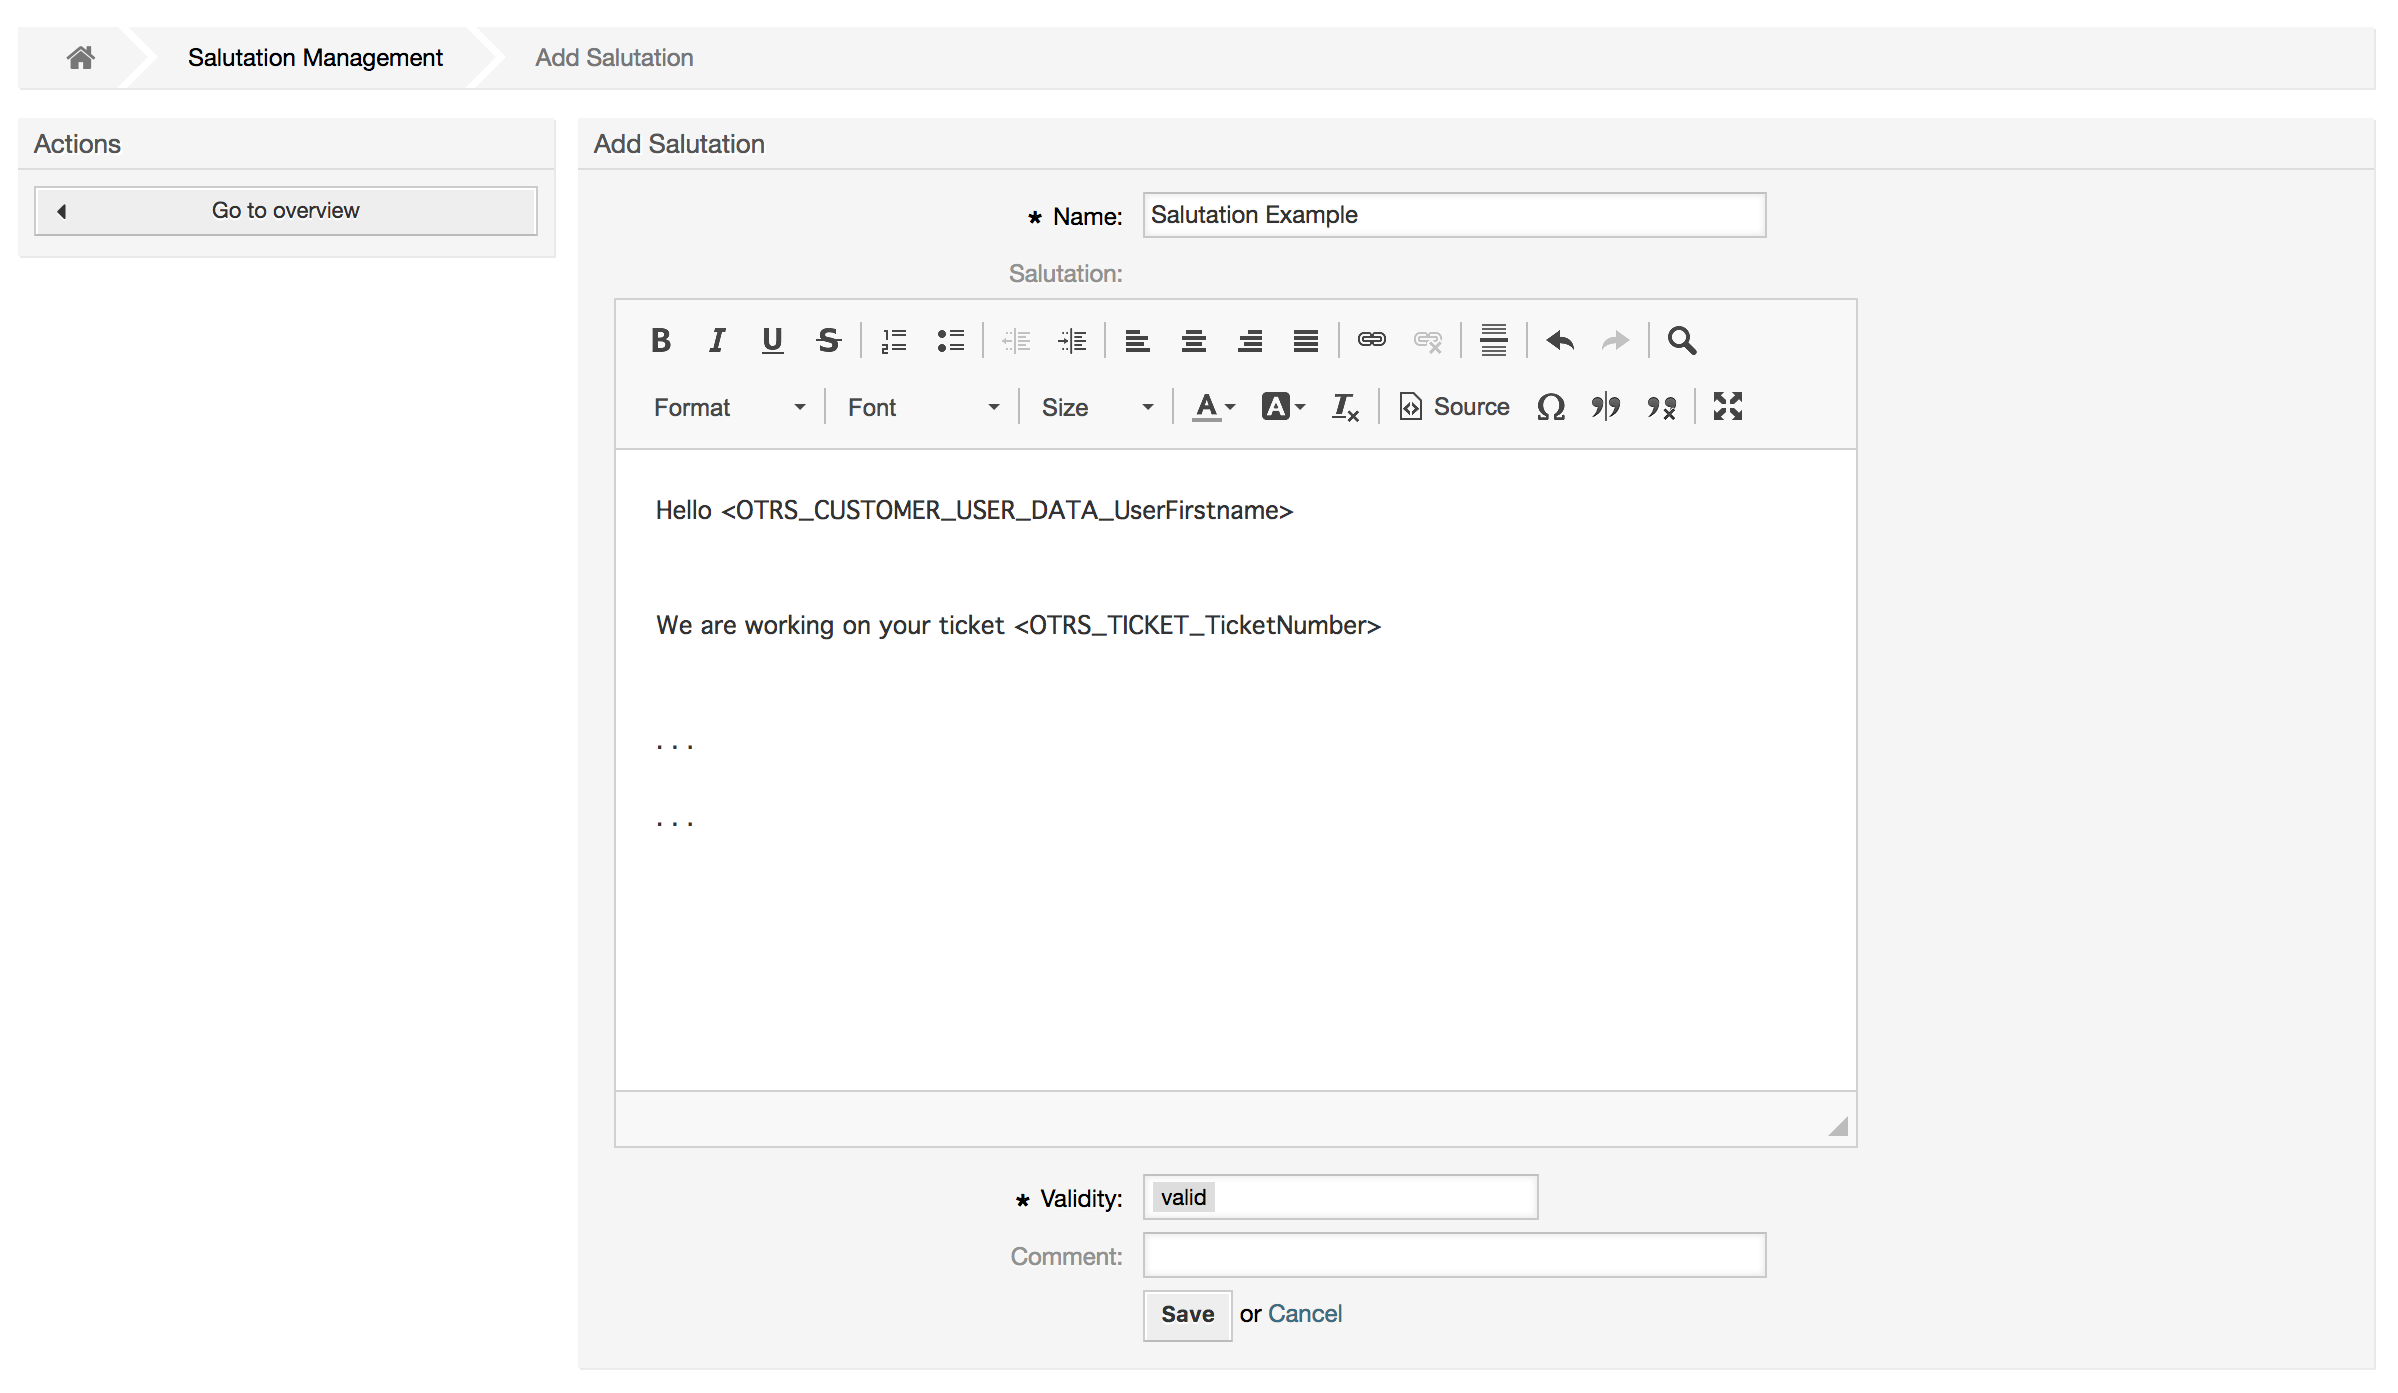
In Anreden können Variablen verwendet werden. Wenn Sie auf ein Ticket antworten, werden die Variablennamen durch die zugehörigen Werte ersetzt.
The different variables you can use in templates are listed in the lower part of the salutation screen. If you use, for example, the variable <OTRS_LAST_NAME> the last name of the ticket's sender will be included in your reply.
Anmerkung
In OTRS können Anreden deaktiviert, aber nicht gelöscht werden. Sie können eine Anrede deaktivieren, indem Sie den Wert für "Gültig" auf "ungültig" oder "ungültig-temporär" setzen.
Another text module for a template is the signature. Signatures can be linked to a queue, as described in the section about the queues. Please note that a signature will only be appended to a template text, if it has previously been linked to a queue. You can manage the signatures in your system by accessing the "Signatures" link of the Admin page, (see figure below).
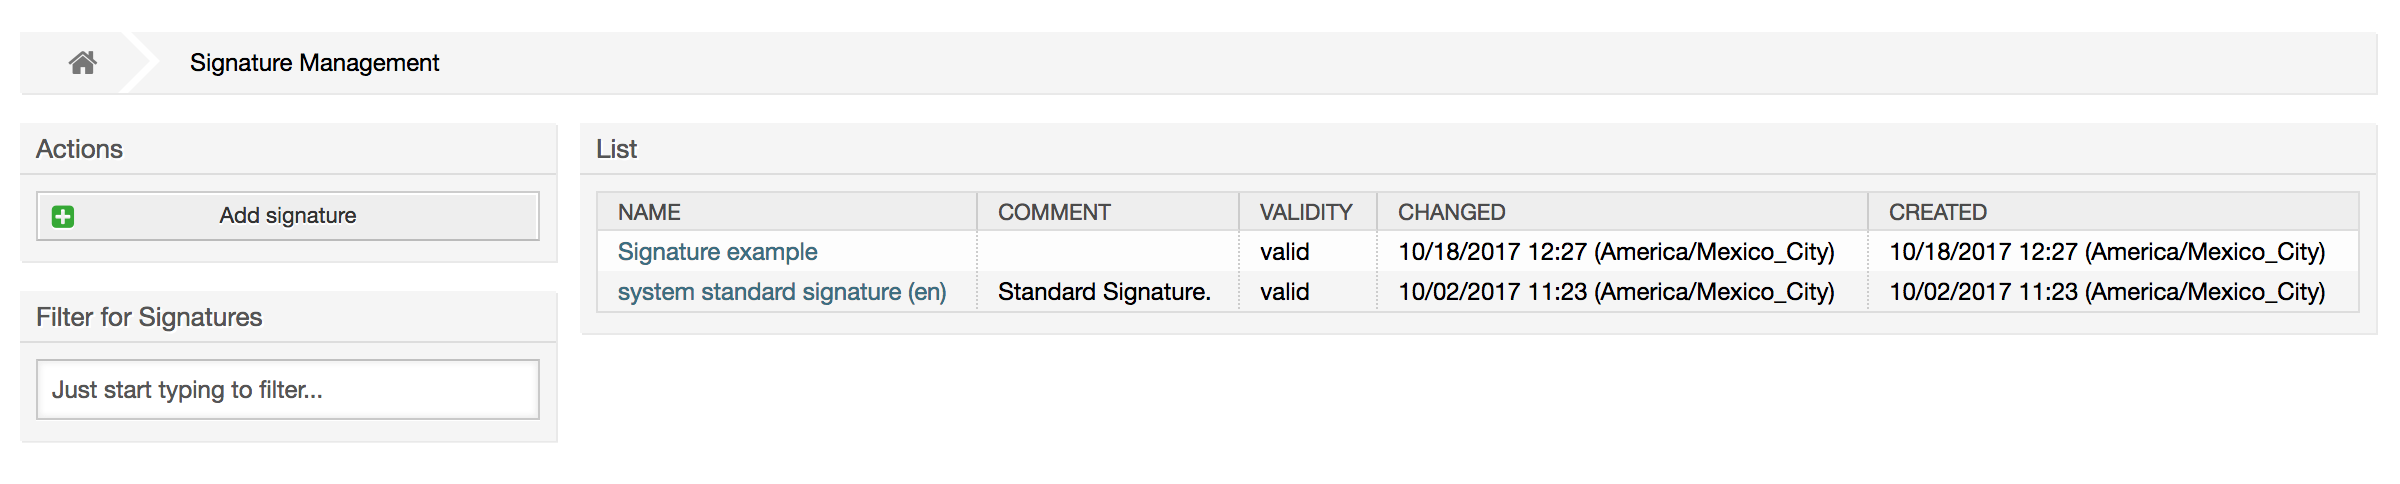
Nach einer Standardinstallation von OTRS ist bereits eine Signatur im System vorhanden, "system standard signature (en)".
To create a new signature, press the button Add
signature, provide the needed data and submit it (see figure
below).
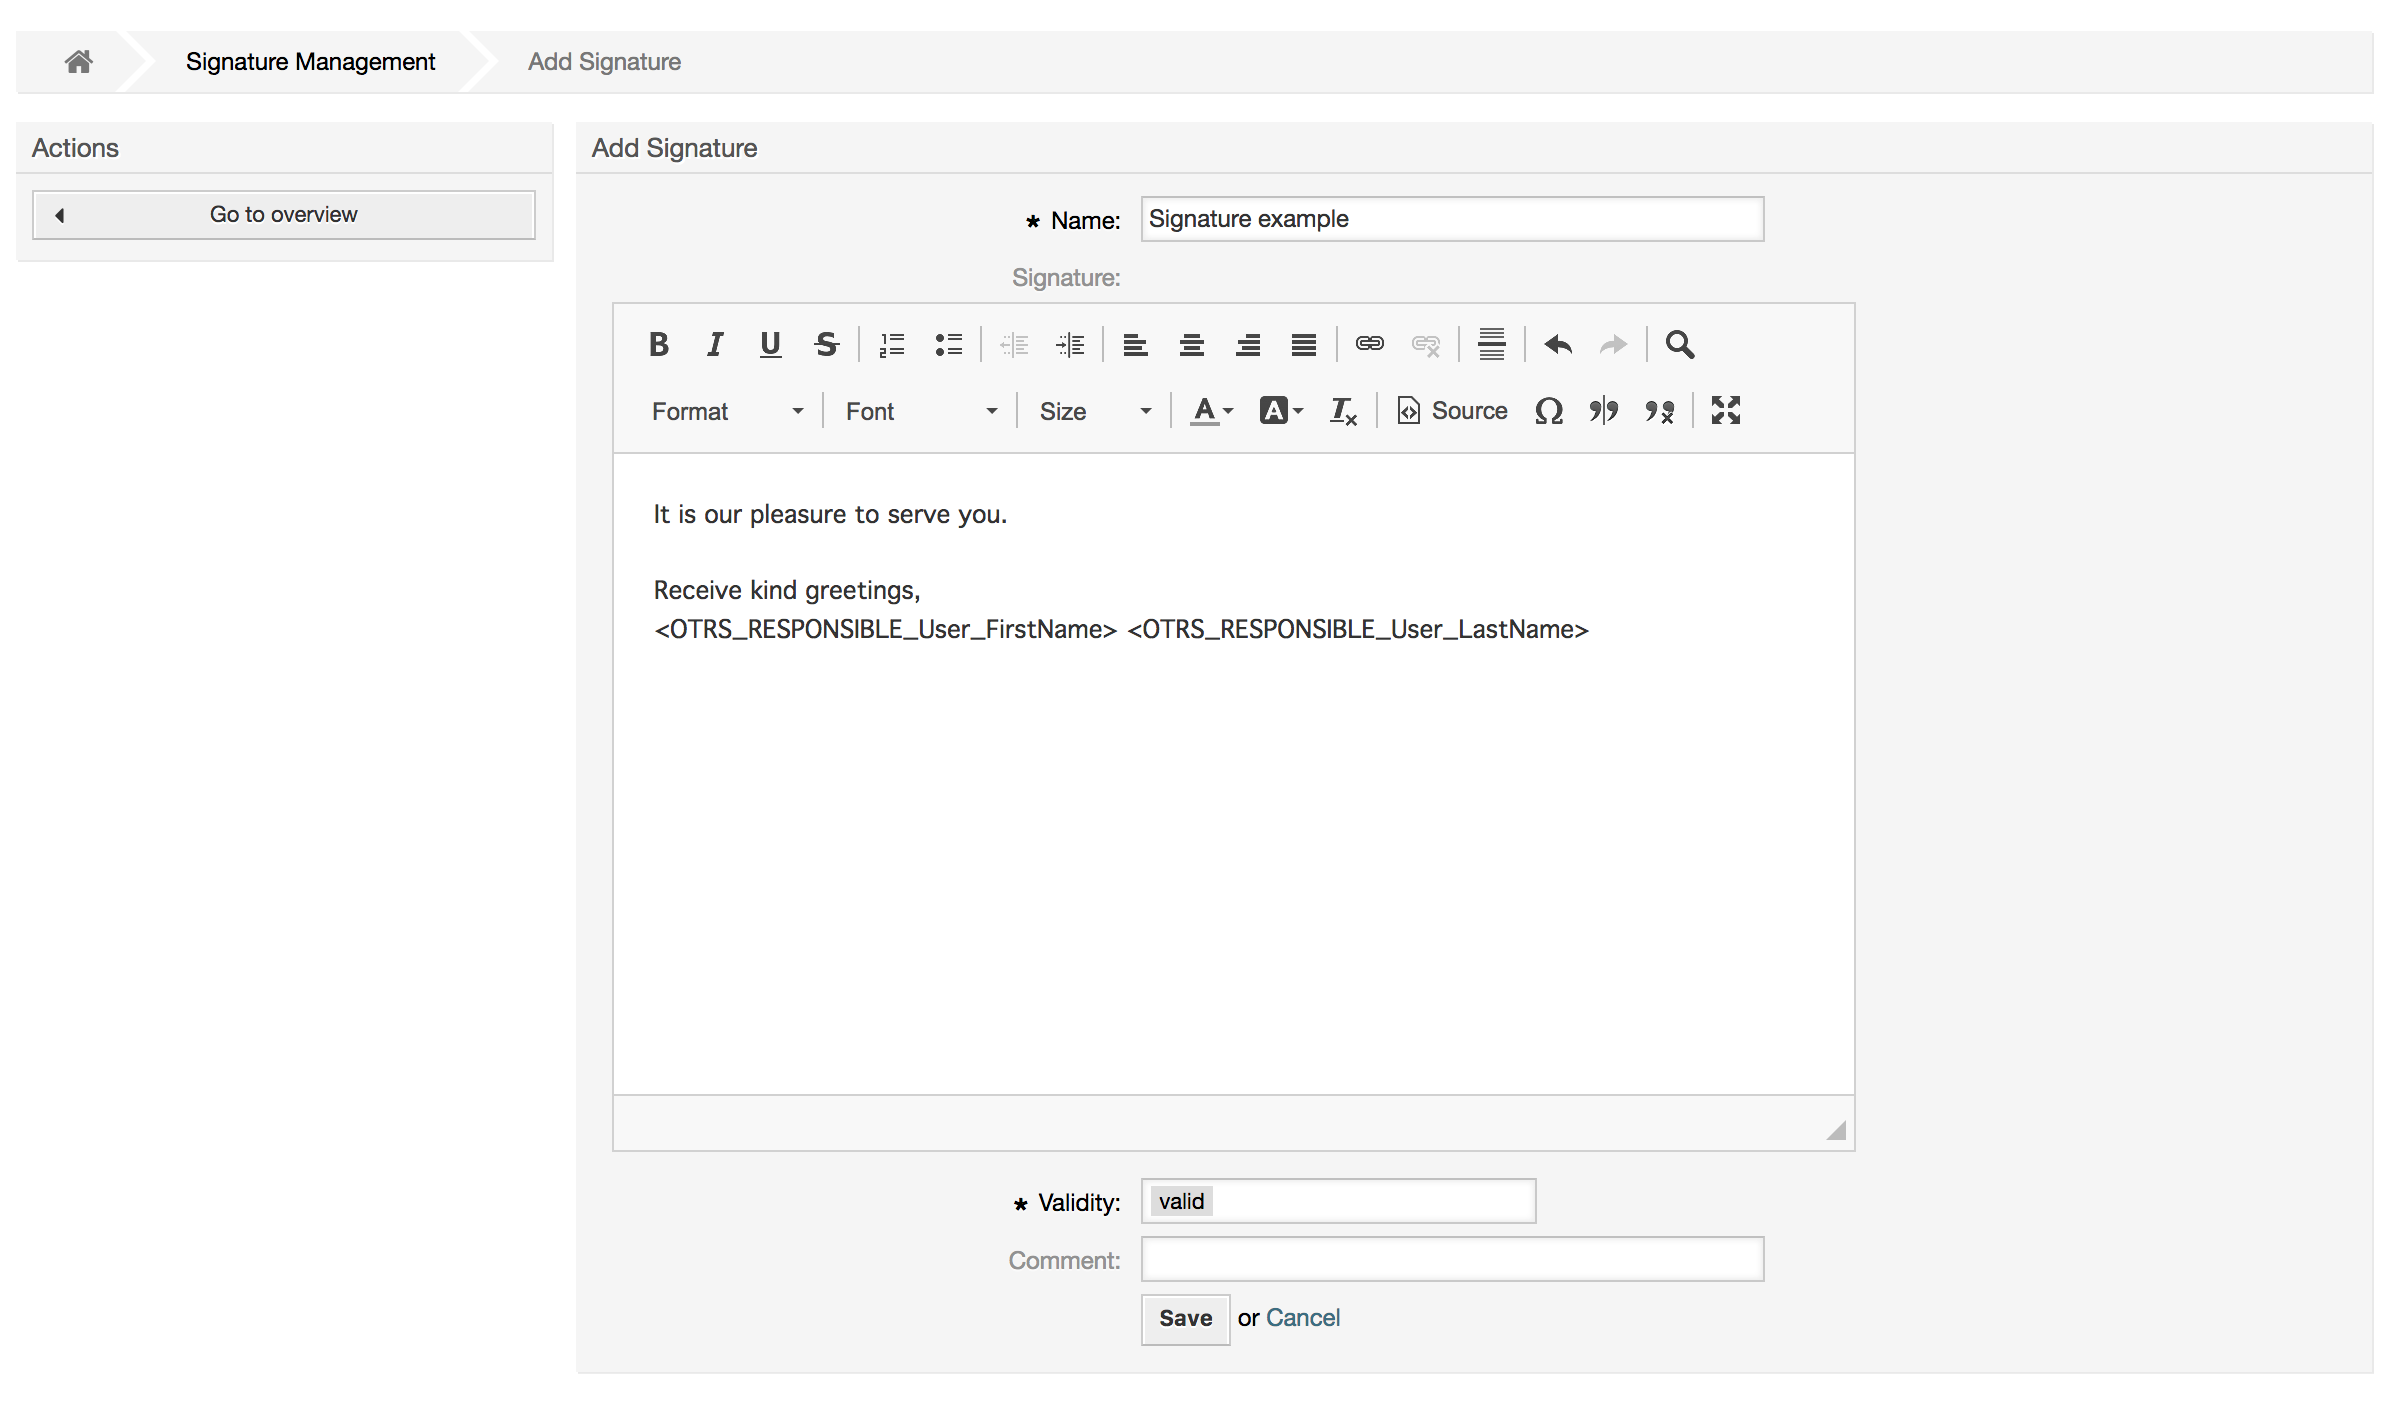
Auch in Anreden und Signaturen können dynamische Inhalte eingebaut werden, wie etwa Vor- und Nachname des Agenten. Dies geschieht, genauso wie bei den Anreden, mit Hilfe verschiedener OTRS-Variablen, die in den Text der Signatur integriert werden können. Wenn Sie zum Beispiel die Variable lt;OTRS_LAST_NAME> in einer Signatur hinzufügen, wird der Name des Mitarbeiters angezeigt, der das Ticket beantwortet hat.
Anmerkung
In OTRS können Signaturen deaktiviert, aber nicht gelöscht werden. Sie können eine Signatur deaktivieren, indem Sie den Wert für "Gültig" auf "ungültig" oder "ungültig-temporär" setzen.
You can also optionally add one or more attachments to a template. If the template is selected, the attachments will be attached to the message composition window. If necessary, the agent can remove the attachment from an individual template before sending it to the customer.
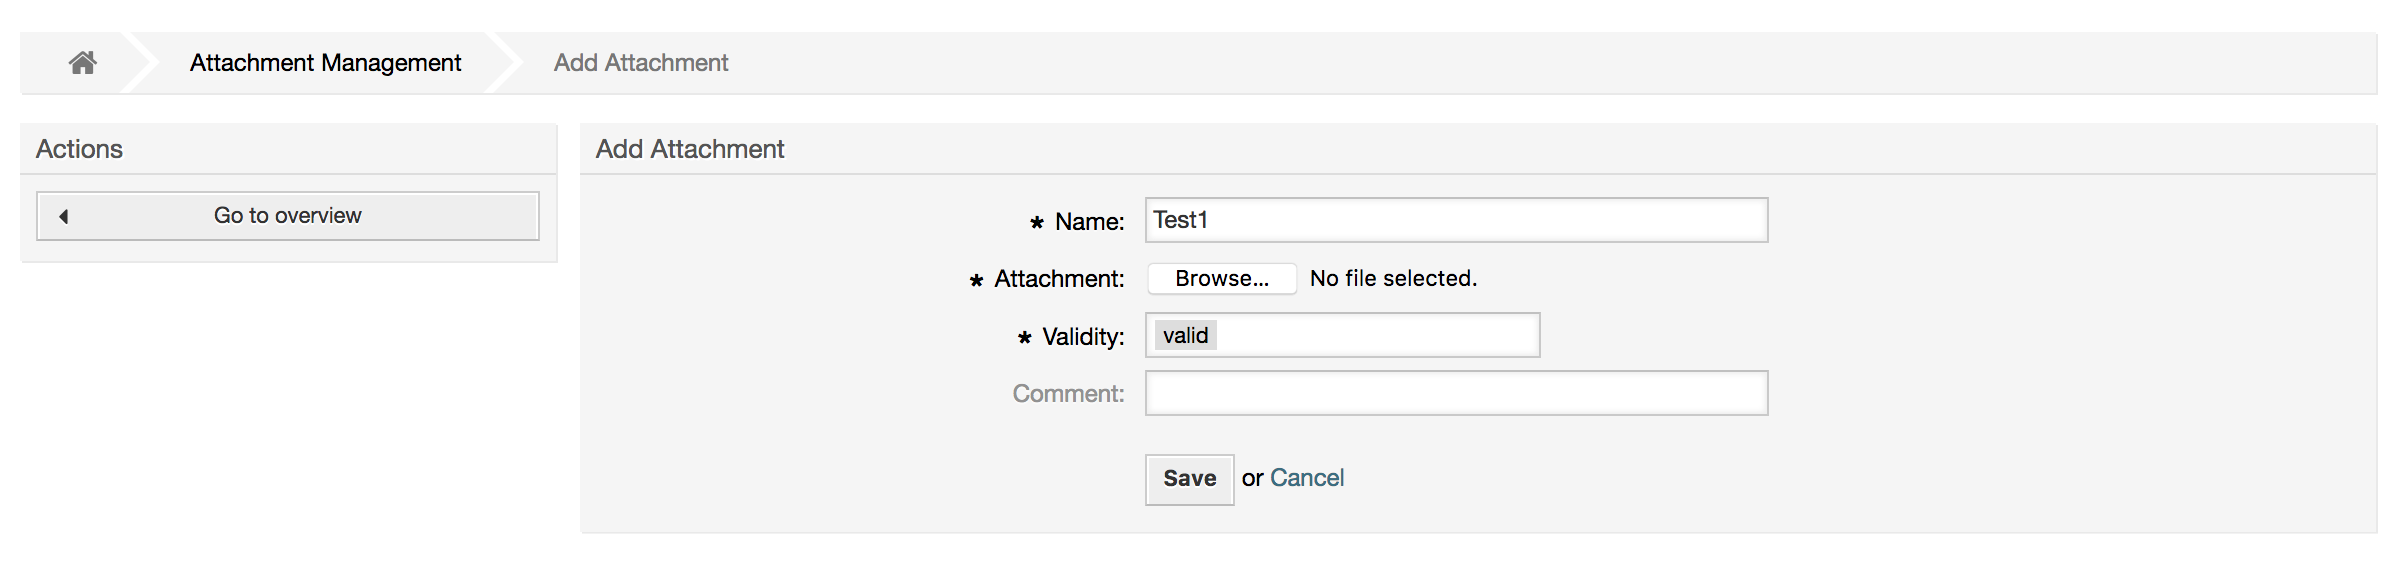
Through the "Attachment" link of the Admin page, you can load the attachments into the database of the system (see figure below).
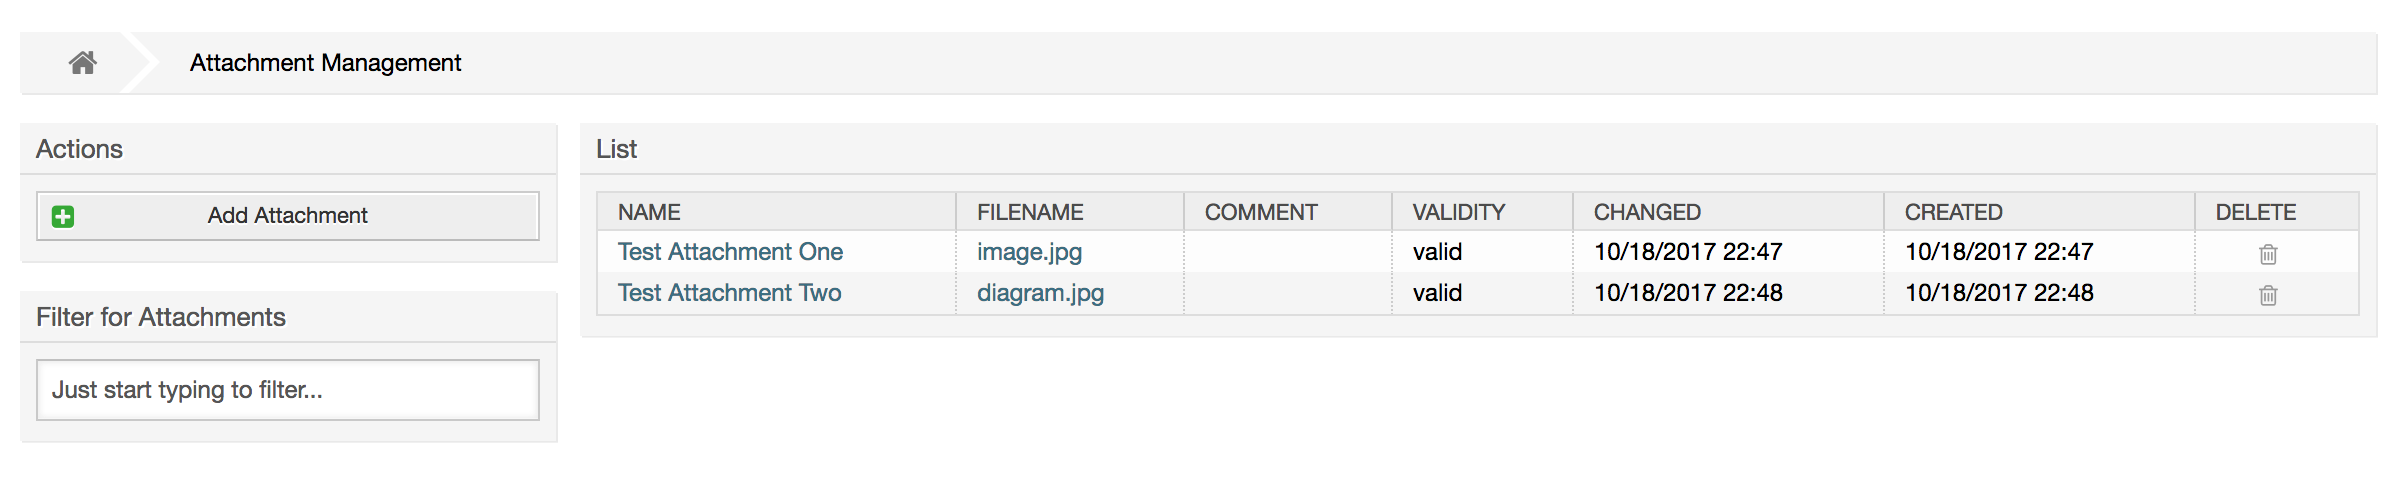
To create a new attachment, press the button Add
attachment, provide the required data and submit it (see figure
below).
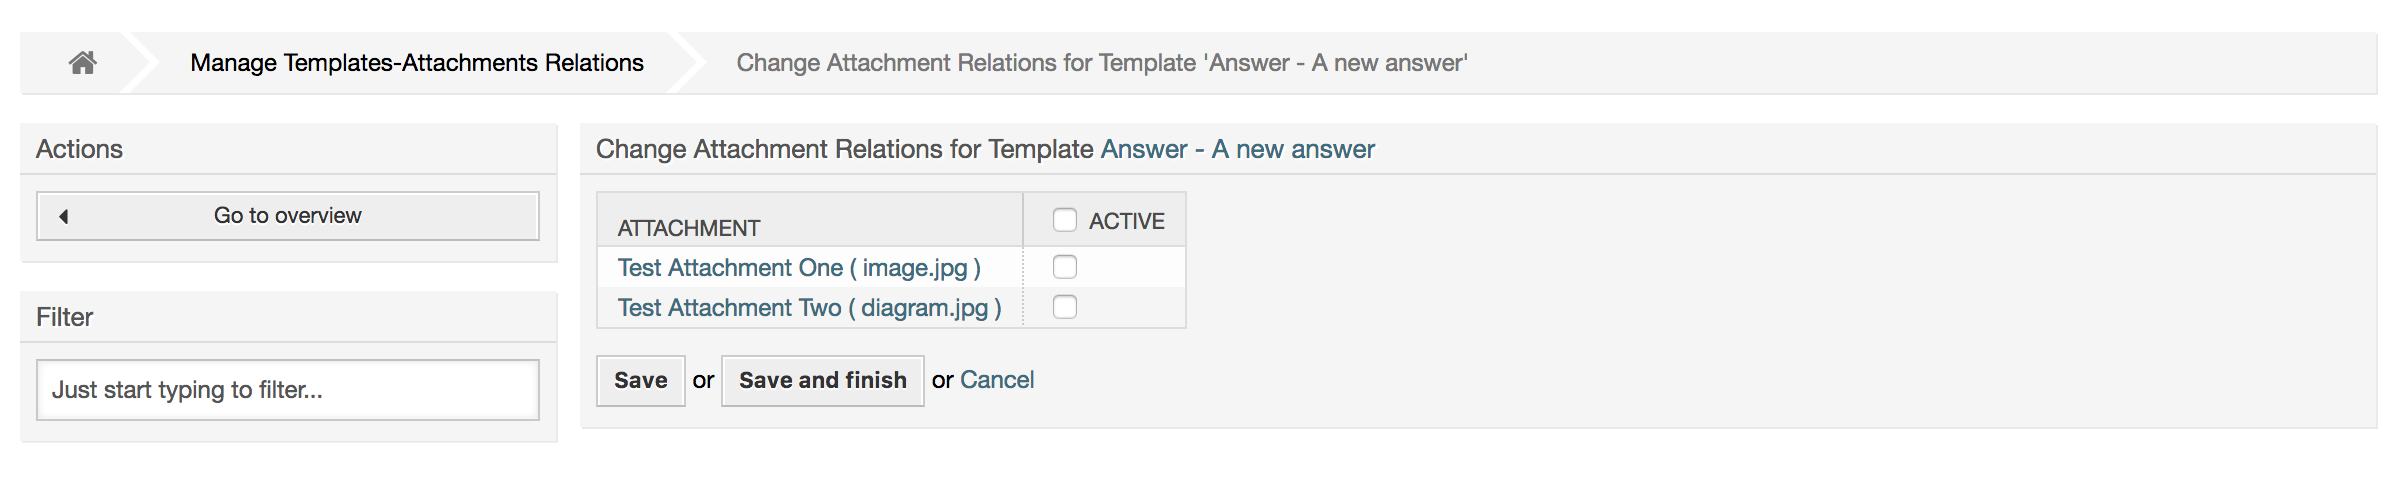
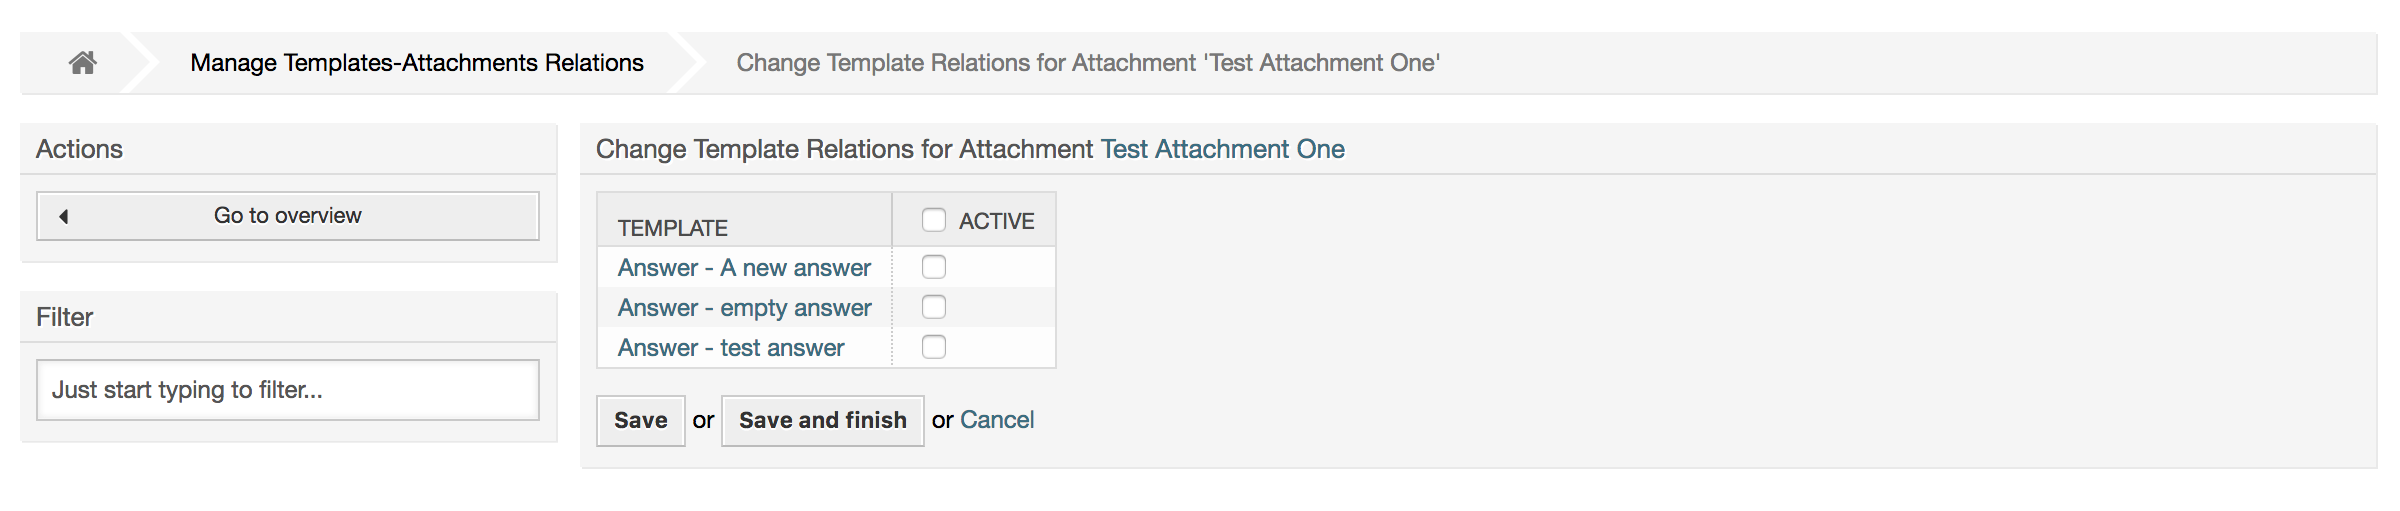
If an attachment is stored it can be linked to one or more templates. Click
on the Attachment <-> Templates link of the Admin
page (see figure below).
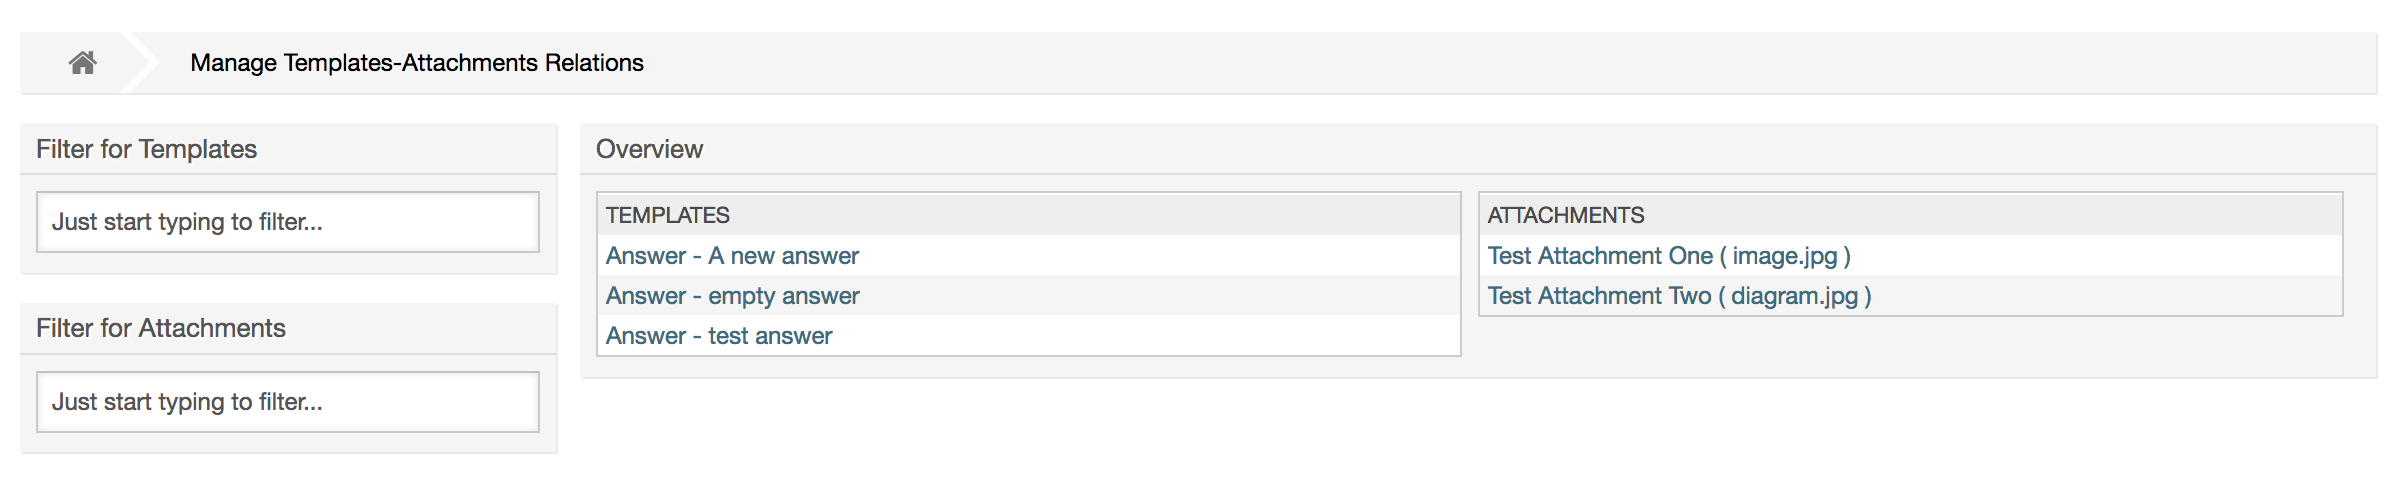
To associate different attachments with a specific template and vice versa, click on the corresponding template name or attachment (see below the Figures 4.29 and 4.30, respectively).
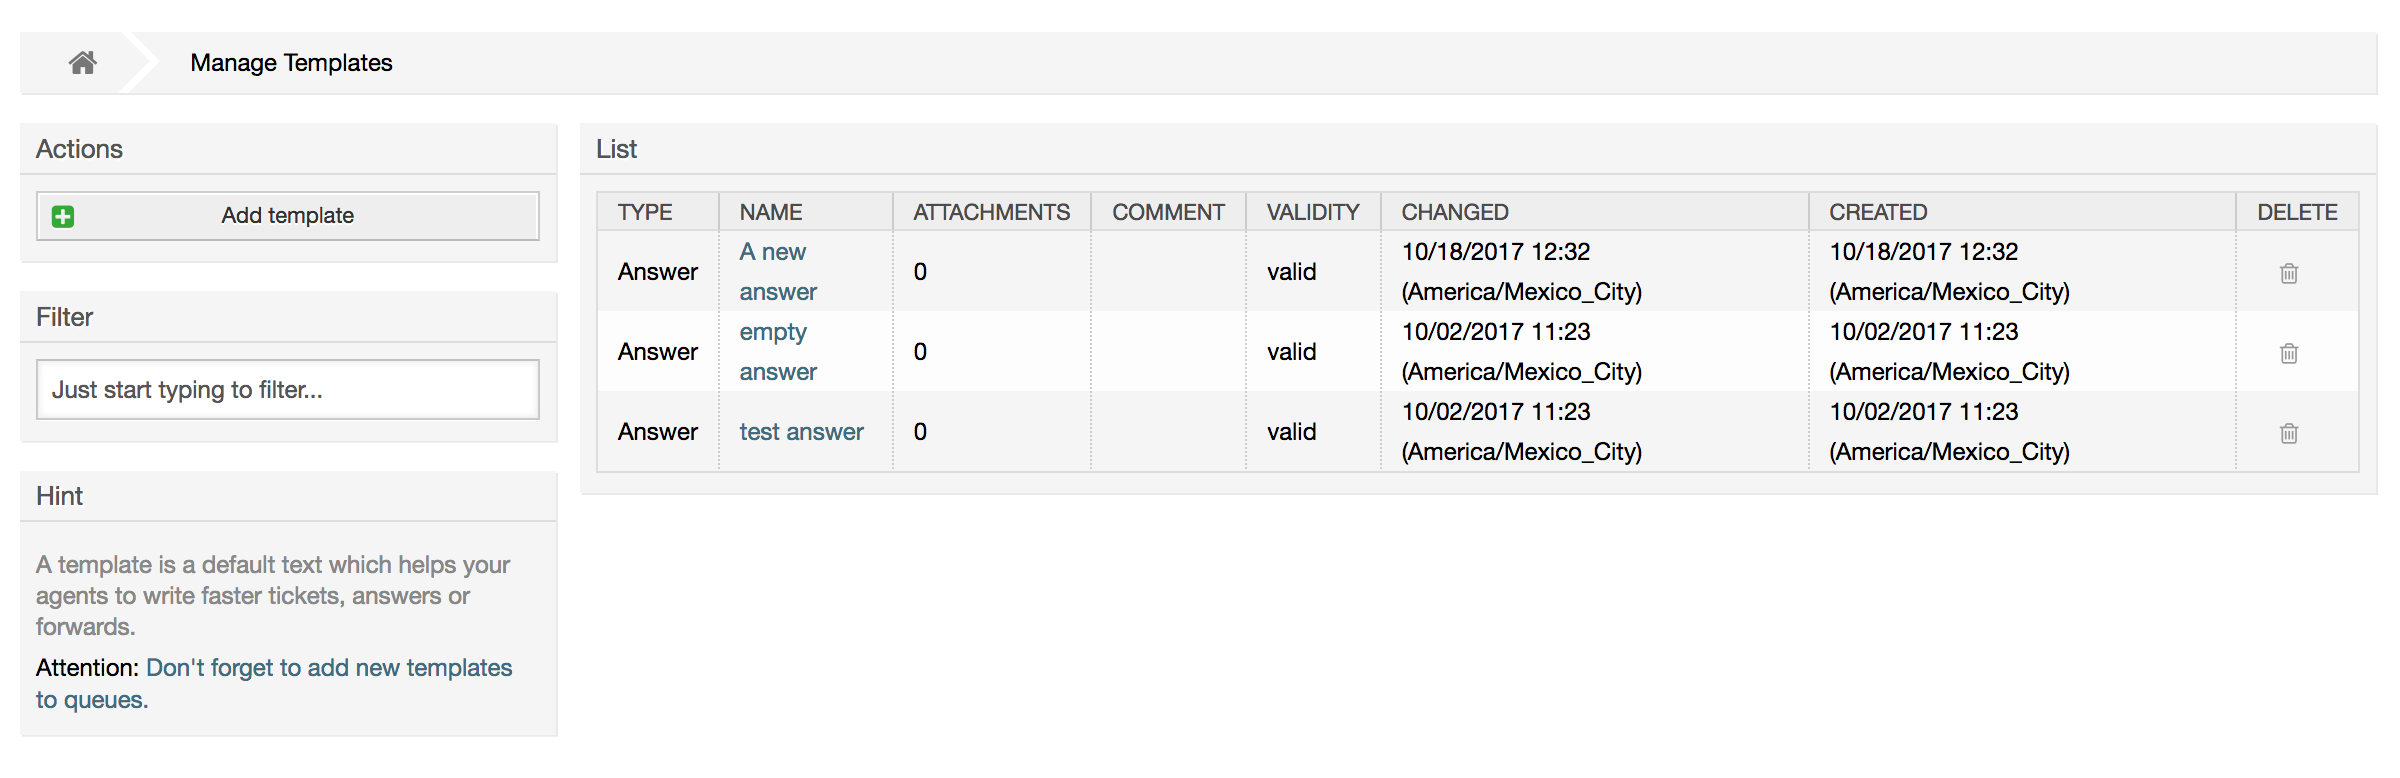
To speed up ticket processing and to standardize the look of answers, you can define templates in OTRS. A template can be linked to one or more queues and vice versa.
There are different kind of templates that are used in different parts of OTRS and they have its own purpose, the following is the list of possible template types:
Antwort: Als Ticketantwort oder Rückantwort verwendet.
Erstellen: In neuen Telefon- oder E-Mailtickets verwendet.
Weiterleiten: Verwendet um einen Artikel an jemand Anderen weiterzuleiten.
Telefonanruf: In Telefonanruf eingehend und ausgehend verwendet.
Answer templates can be accessed in two ways, from the ticket zoom screen in the article menu, or on a quicker way: from any ticket overview large screen such as Status View or Ticket View. For a fresh OTRS installation, the "empty answer" template (Answer) is set as the default for every queue.
As soon as Forward templates are added and assigned to queues, the "Forward" button in ticket zoom (that normally leads to a empty text forward screen) will change into a selection control, the selection is filled with the added Forward templates, by choosing one of the templates, the forward screen will be shown prefilled with the template text and attachments (similar to the reply selection box with the Answer templates).
Creating templates of type Create and PhoneCall will make visible the "Text Template" selection box in their respective screens, choosing a template for the list will populate the "Text" and "Attachment" fields (if available in the template). Notice that any previous change in the Text or attachments will be overwritten by selecting a template.
Clicking the "Templates" link on the Admin page brings you to the Template management screen (see figure below).
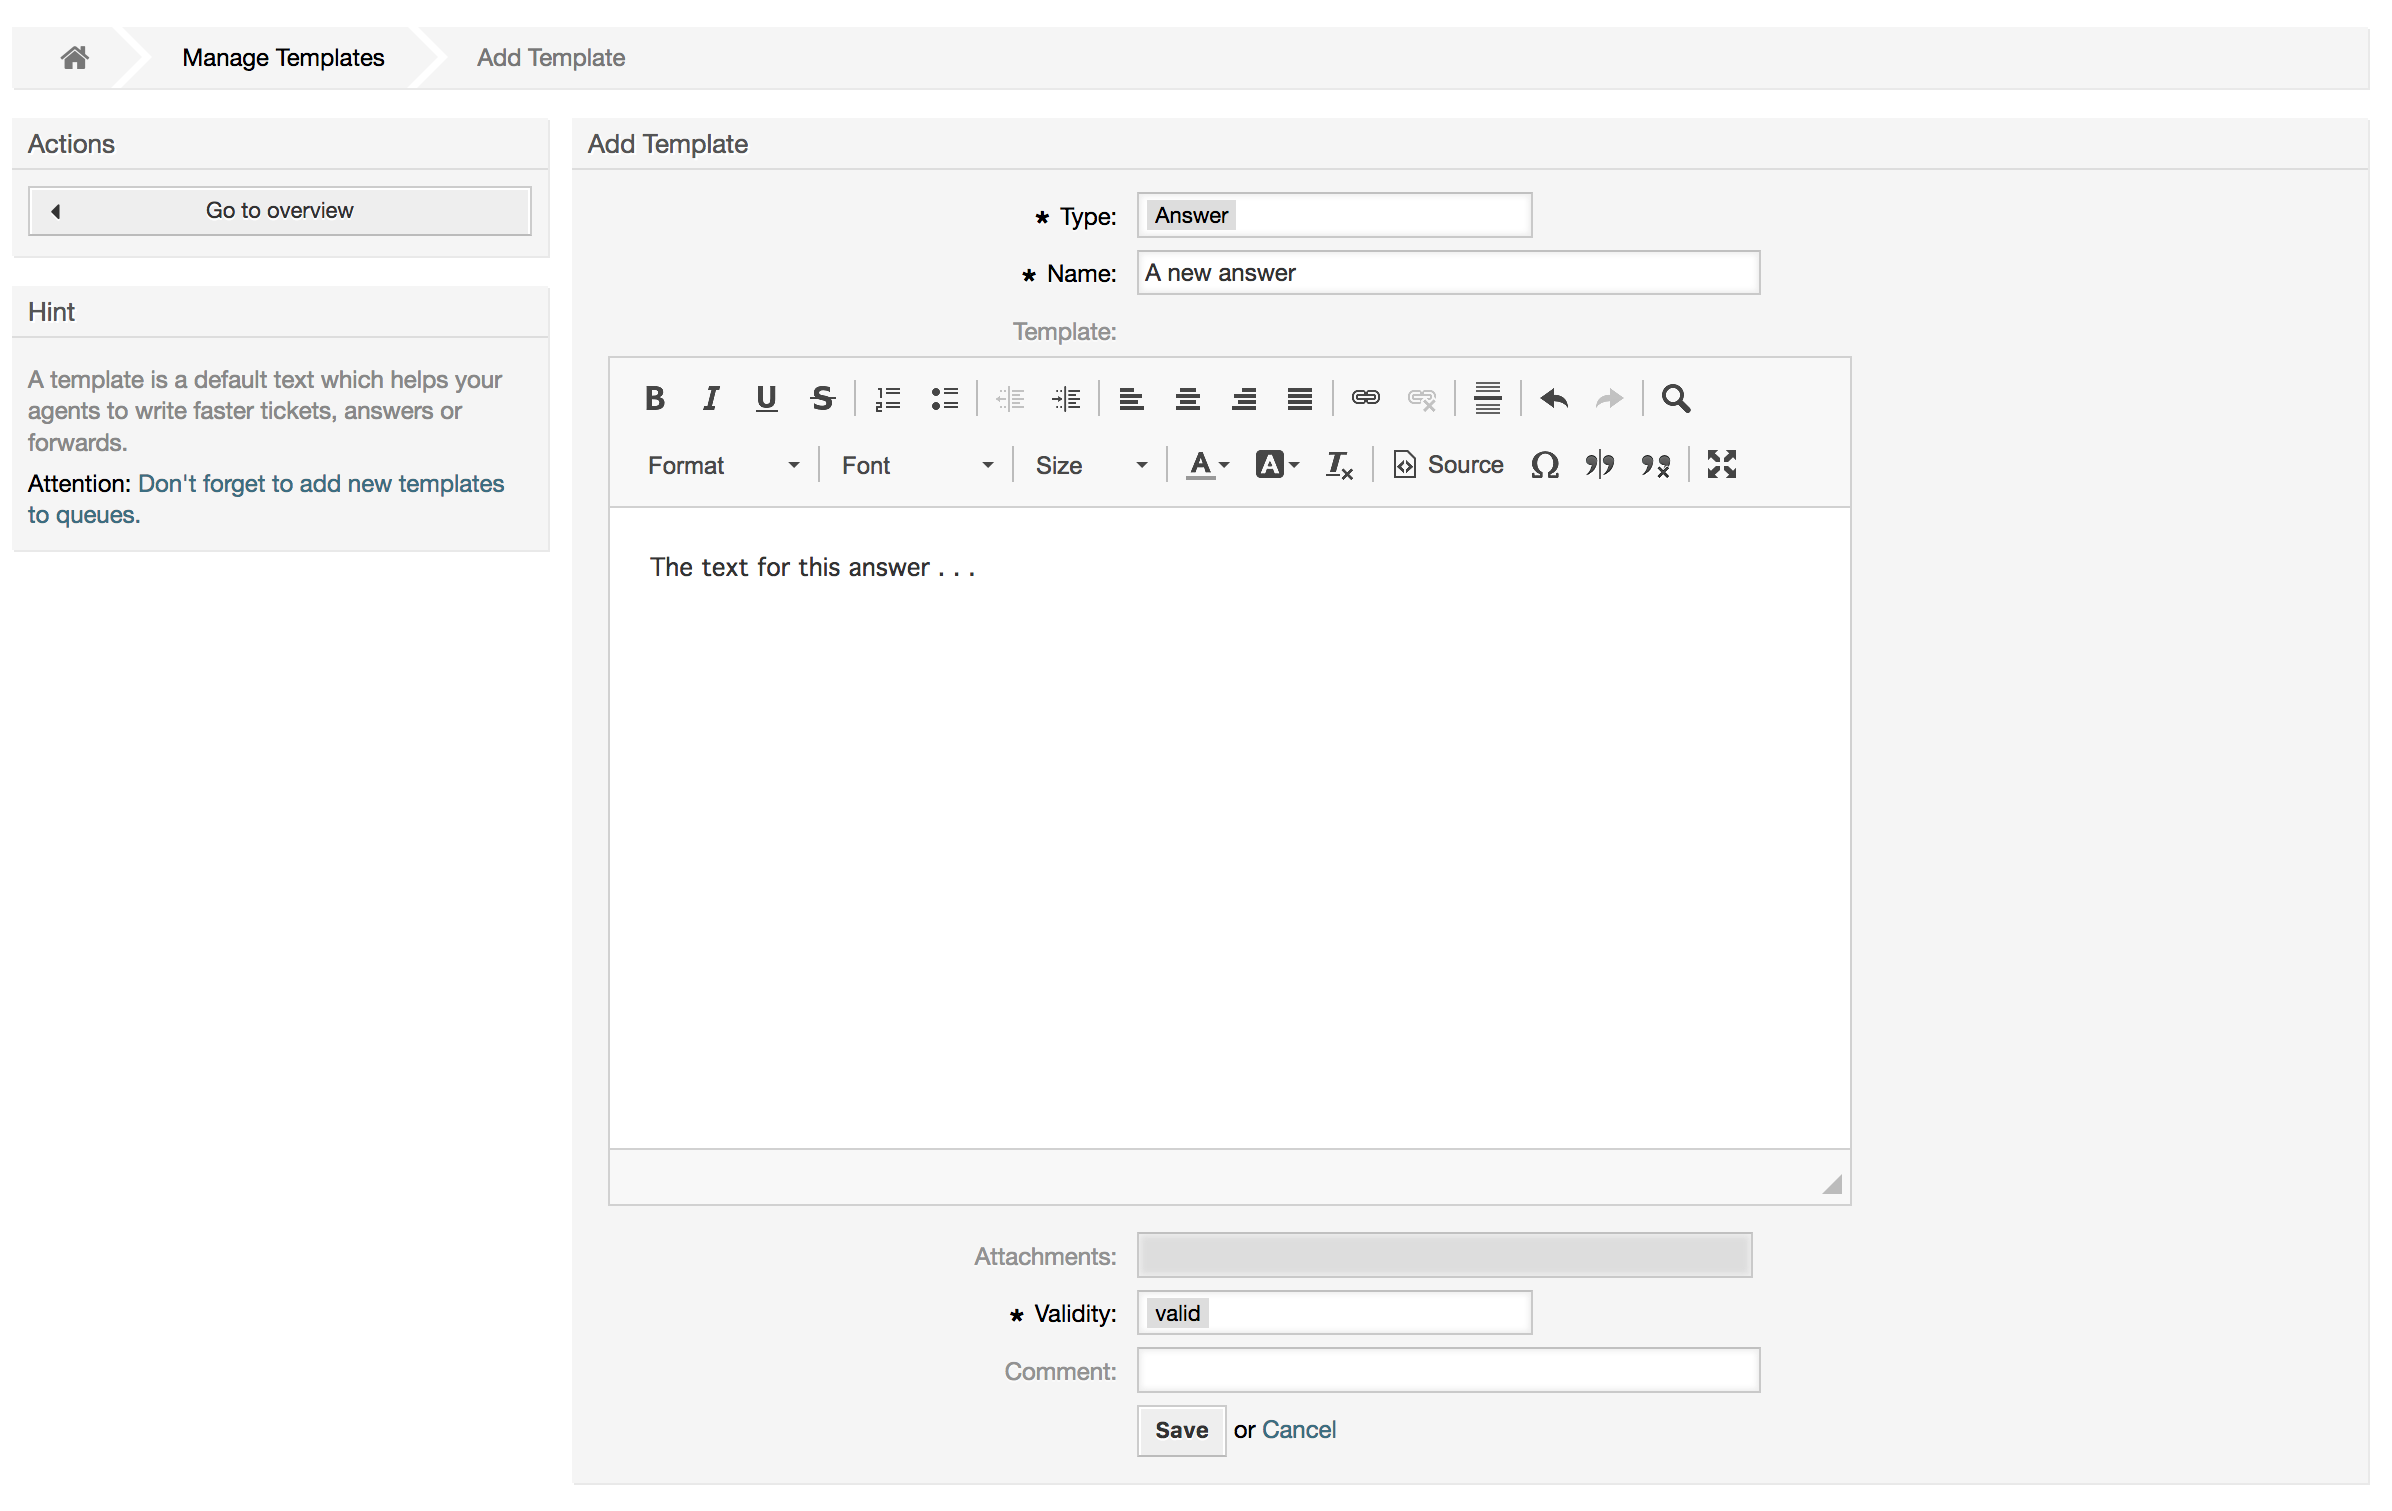
To create a new template, click on the Add template
button, provide the required data (make sure to select the appropriate
template type) and submit it (see figure below).
To add/remove templates to one or more queues, click on the "Templates <-> Queues" link on the Admin page (see figure below). You can also use filters to get information regarding a specific entity.
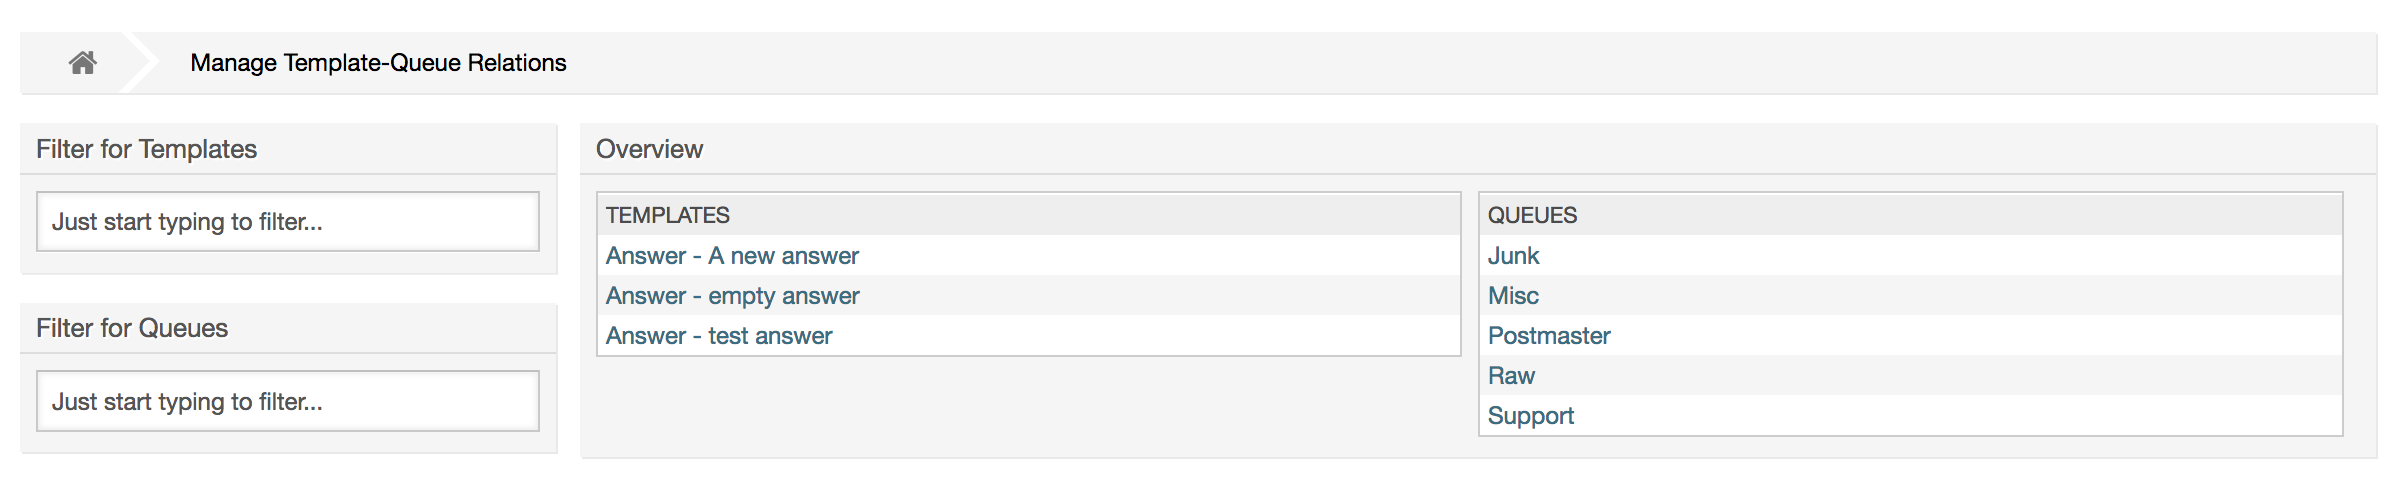
To define the different templates that will be available for a queue and vice versa, click on the corresponding template or queue (see below the Figures 5.32 and 5.33, respectively).

When choosing a template, additional information could be added to the template text, this depends on the template type:
PhoneCall and Create templates does not add any content to the template text, however New Email Ticket screen adds the queue assigned signature to the resulting email body (this screen has a separated box to visualize the signature).
Answer templates text when selected also included the salutation associated with the queue, then the text of the template, then the quoted ticket text, and finally the signature associated with the queue.
Die Weiterleiten Vorlagen sind ähnlich zu den Antwort Vorlagen, enthalten aber keine Anrede.
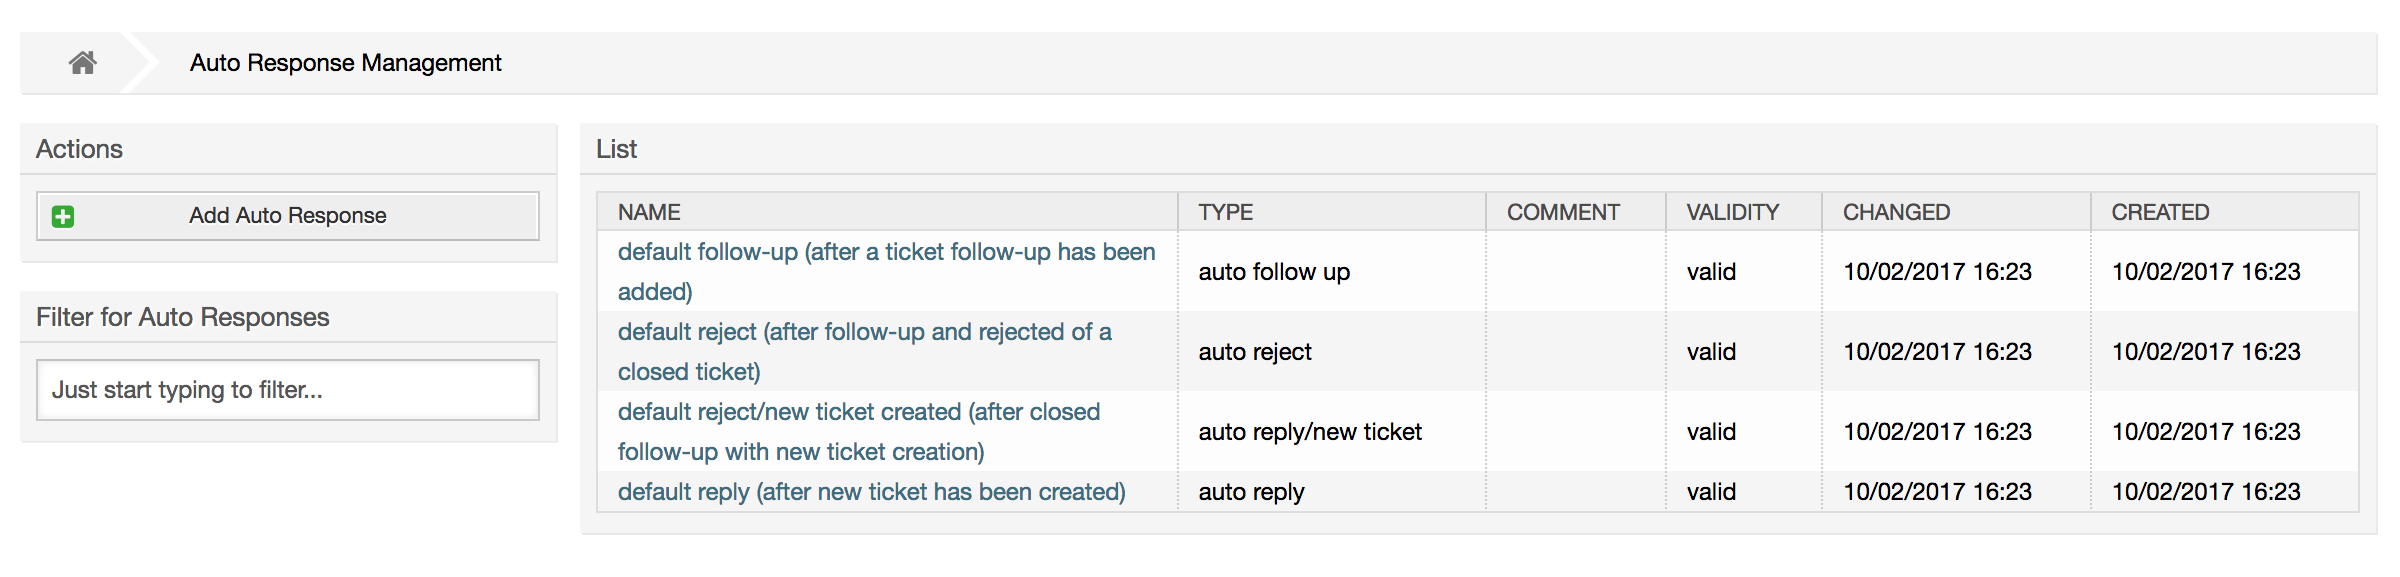
OTRS allows you to send automatic responses to customers based on the occurrence of certain events, such as the creation of a ticket in a specific queue, the receipt of a follow-up message in regards to a ticket, the closure or rejection of a ticket, etc. To manage such responses, click the link "Auto responses" on the Admin page (see figure below).
To create an automatic response, click on the button Add auto
response, provide the needed data and submit it (see figure
below).
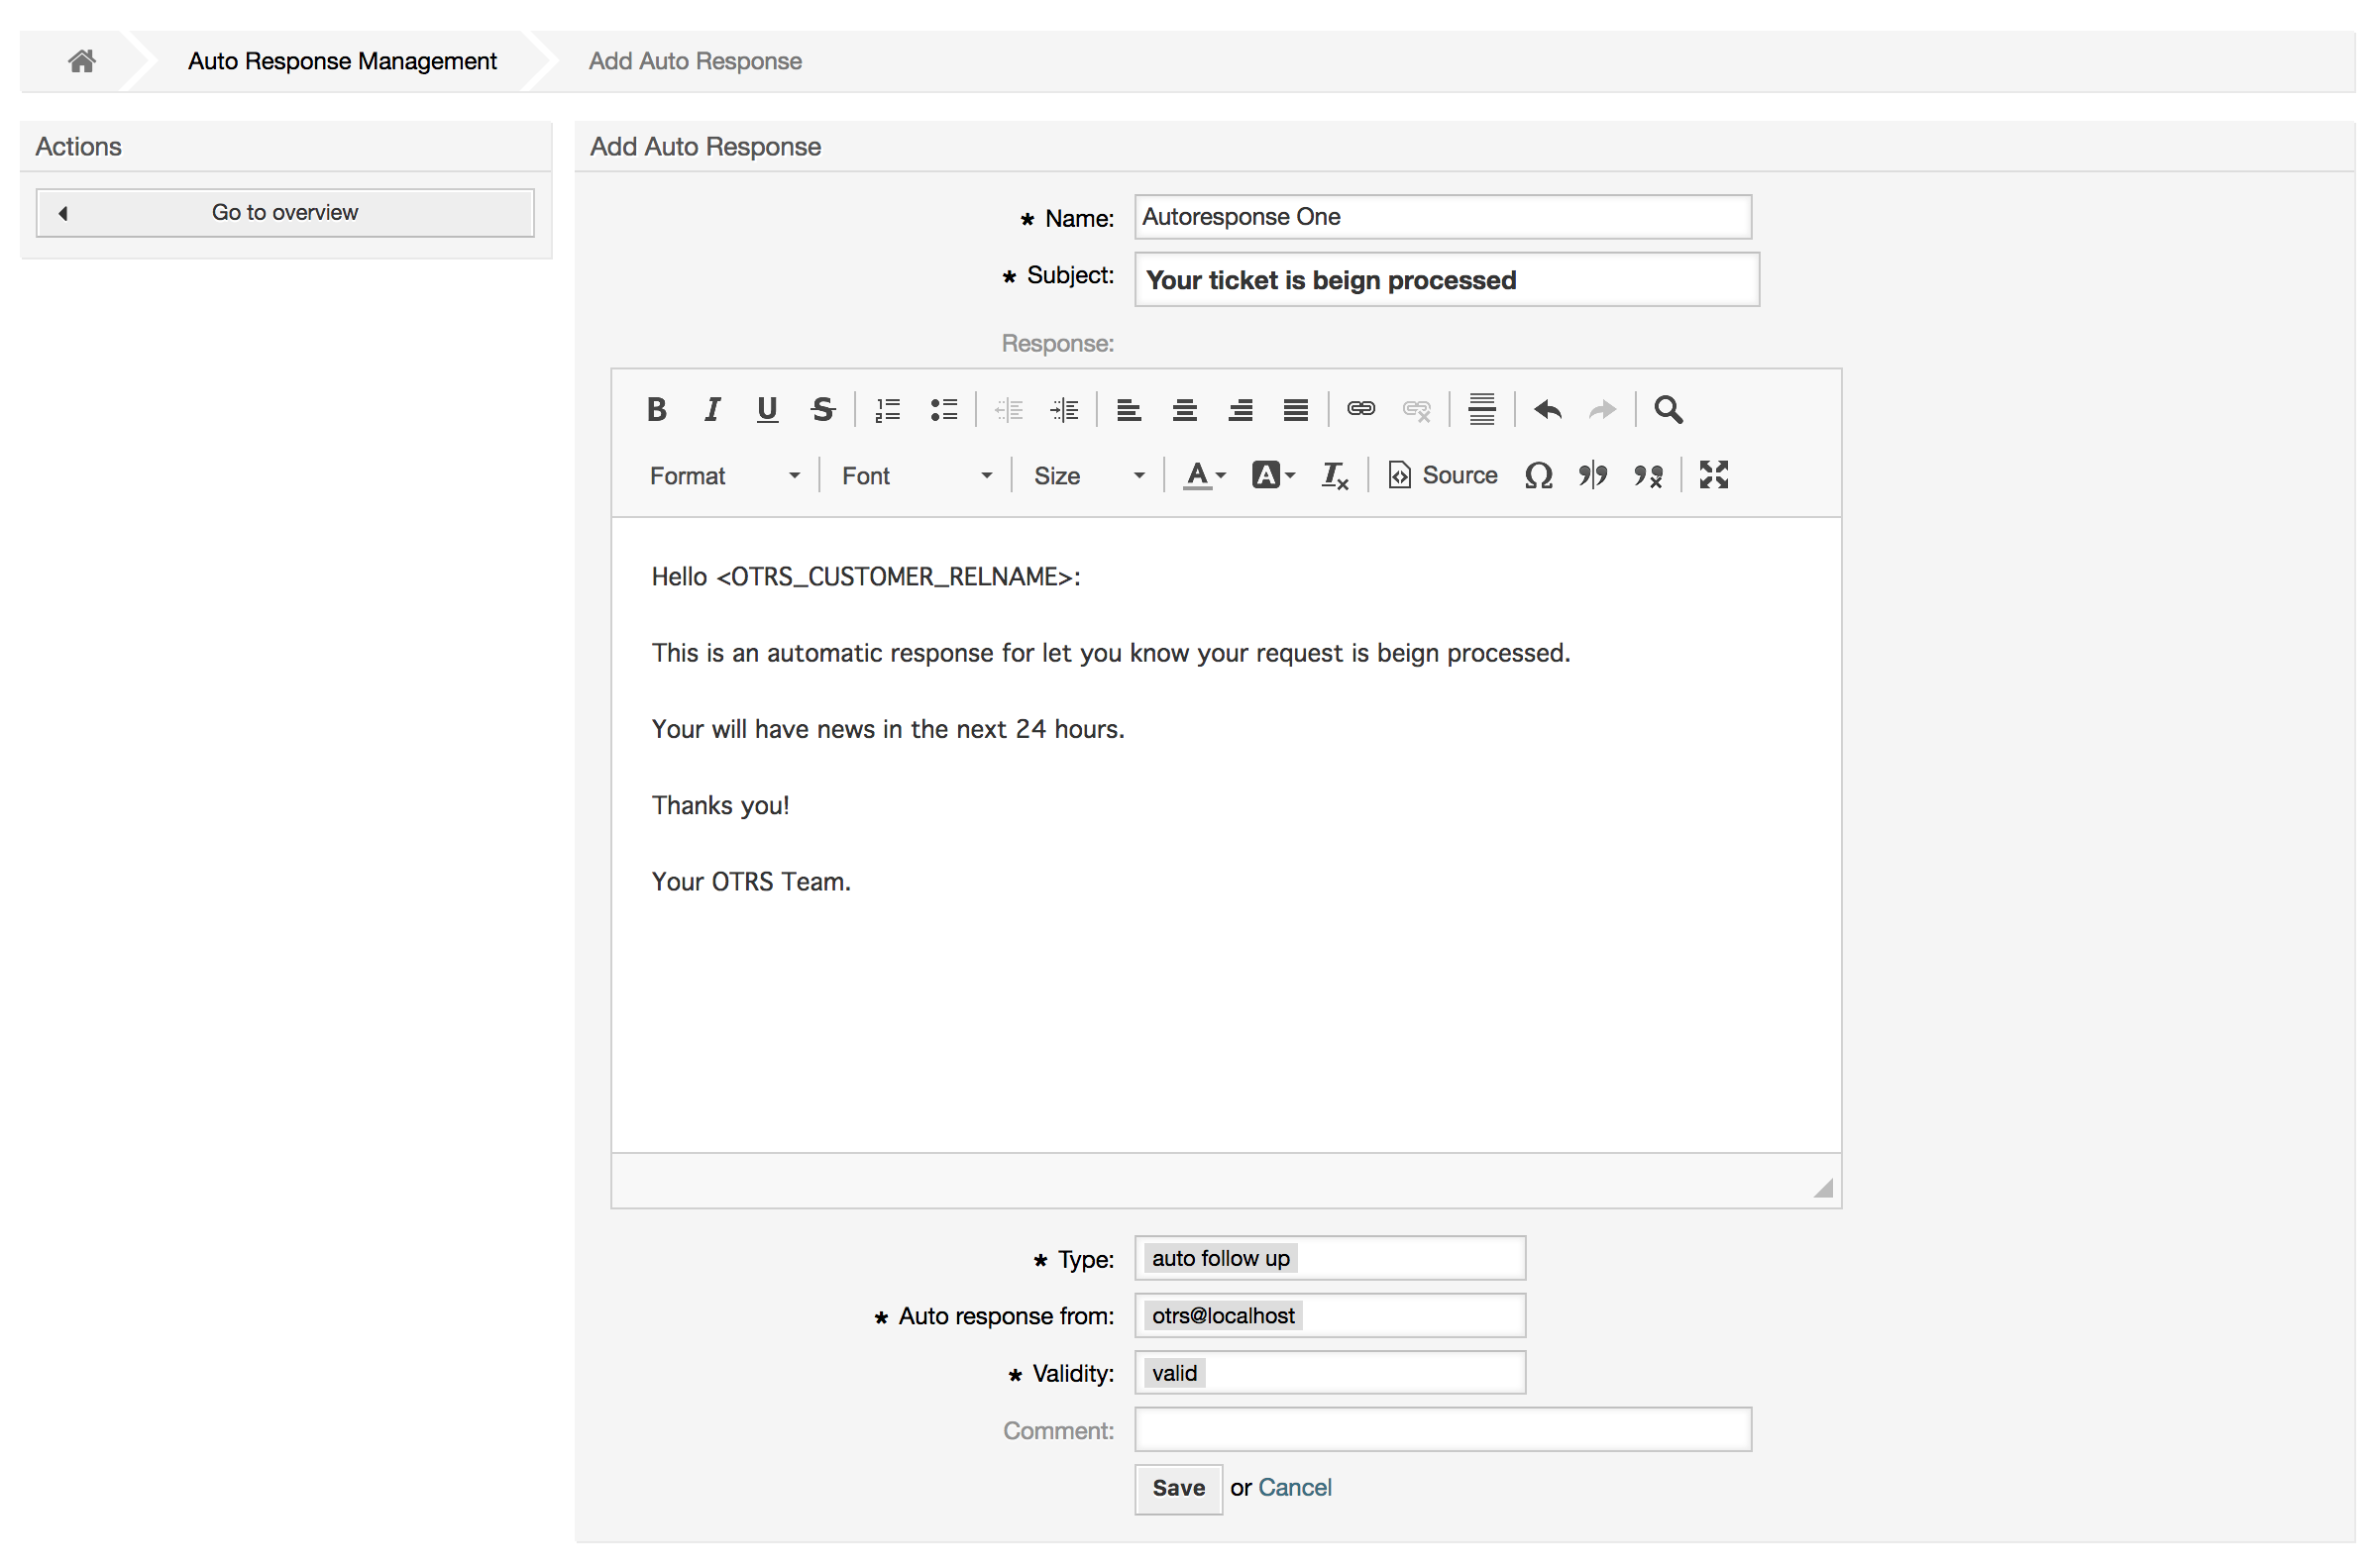
Für die Betreffzeile und den Text von automatischen Antworten kann genauso wie bei Signaturen oder Anreden, der Inhalt mit Hilfe von OTRS-Variablen dynamisch erzeugt werden. So werden über die Variable <OTRS_CUSTOMER_EMAIL[5]> die ersten 5 Zeilen der an das System gesendeten E-Mail in die automatische Antwort eingefügt, oder durch <OTRS_CUSTOMER_FROM> die From-Zeile. Die Anmerkungen im unterem Bereich der Bildschirmmaske zur Verwaltung der automatischen Antworten listen alle OTRS-Variablen auf, die verwendet werden können.
For every automatic answer, you can specify the event that should trigger it. The system events that are available after a default installation are described in the Table 4-4.
Tabelle 4.4. Events for auto responses
| Name | Beschreibung |
|---|---|
| auto reply | Dieses Ereignis tritt ein, wenn ein neues Ticket in einer Queue angelegt wird. |
| auto reply/new ticket | Dieses Ereignis tritt ein, wenn ein bereits geschlossenes Ticket, z. B. durch die Antwort eines Kunden, mit einer neuen Ticketnummer erneut geöffnet wird. |
| auto follow up | Dieses Ereignis tritt ein, wenn ein Follow up für ein bereits vorhandenes Ticket eintrifft. |
| auto reject | Dieses Ereignis tritt ein, wenn ein Ticket vom System zurückgewiesen wird. |
| auto remove | Dieses Ereignis tritt ein, wenn ein Ticket vom System entfernt wird. |
Anmerkung
As with other OTRS entities, auto responses too cannot be deleted, only deactivated, by setting the Valid option to invalid or invalid-temporarily.
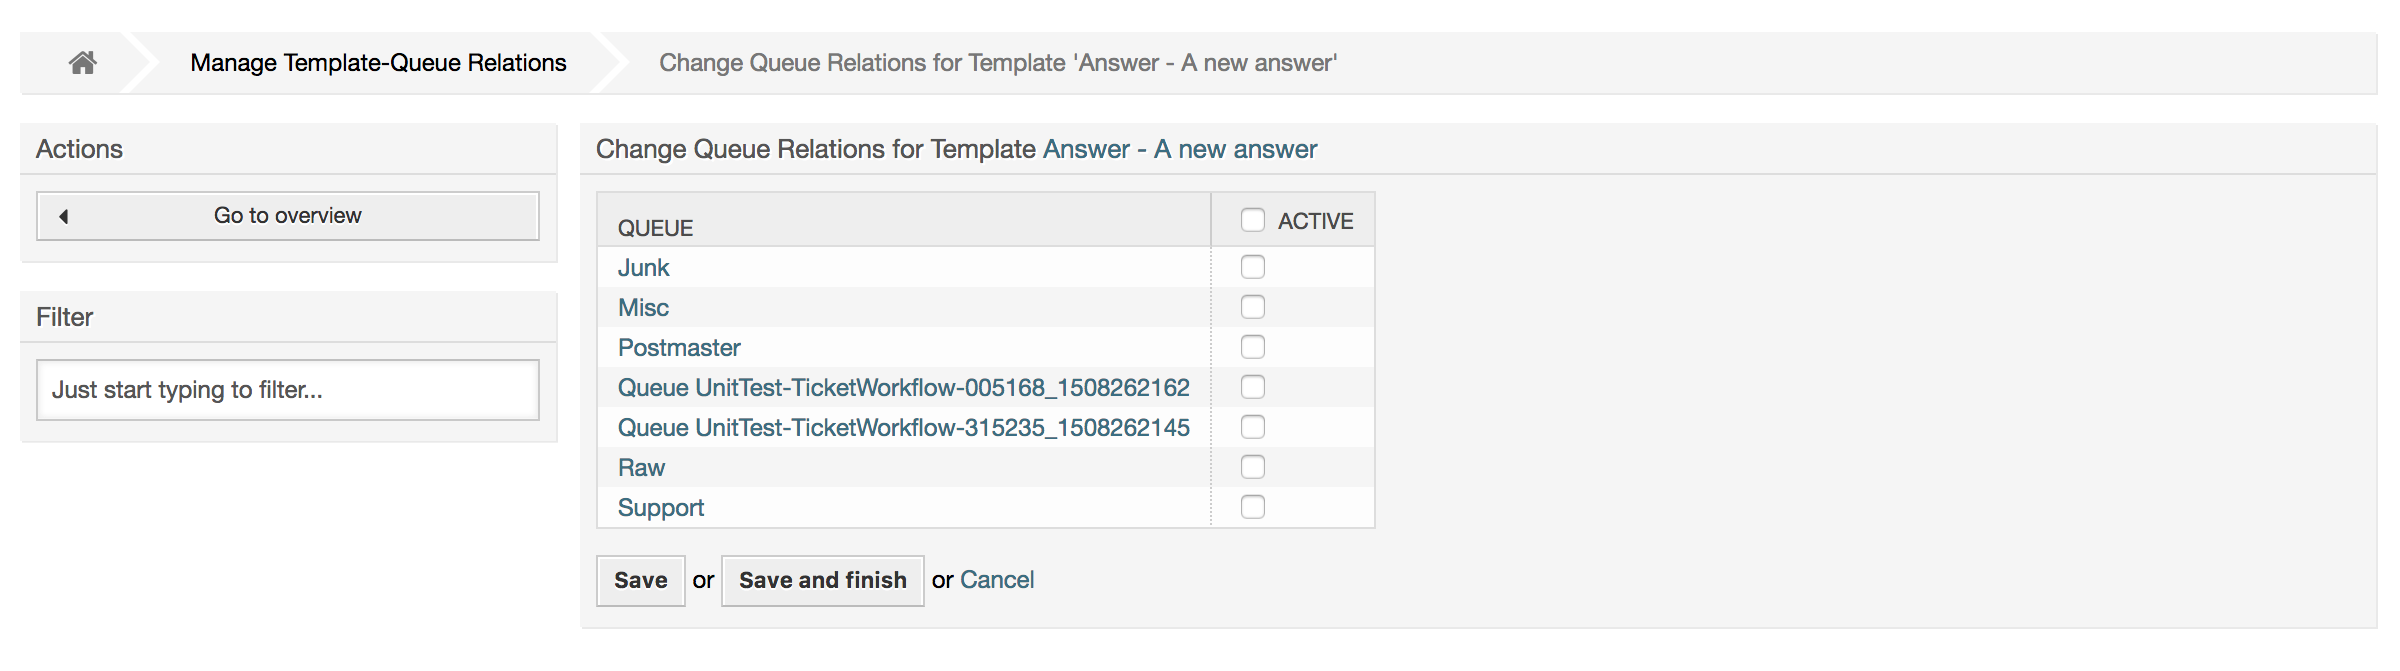
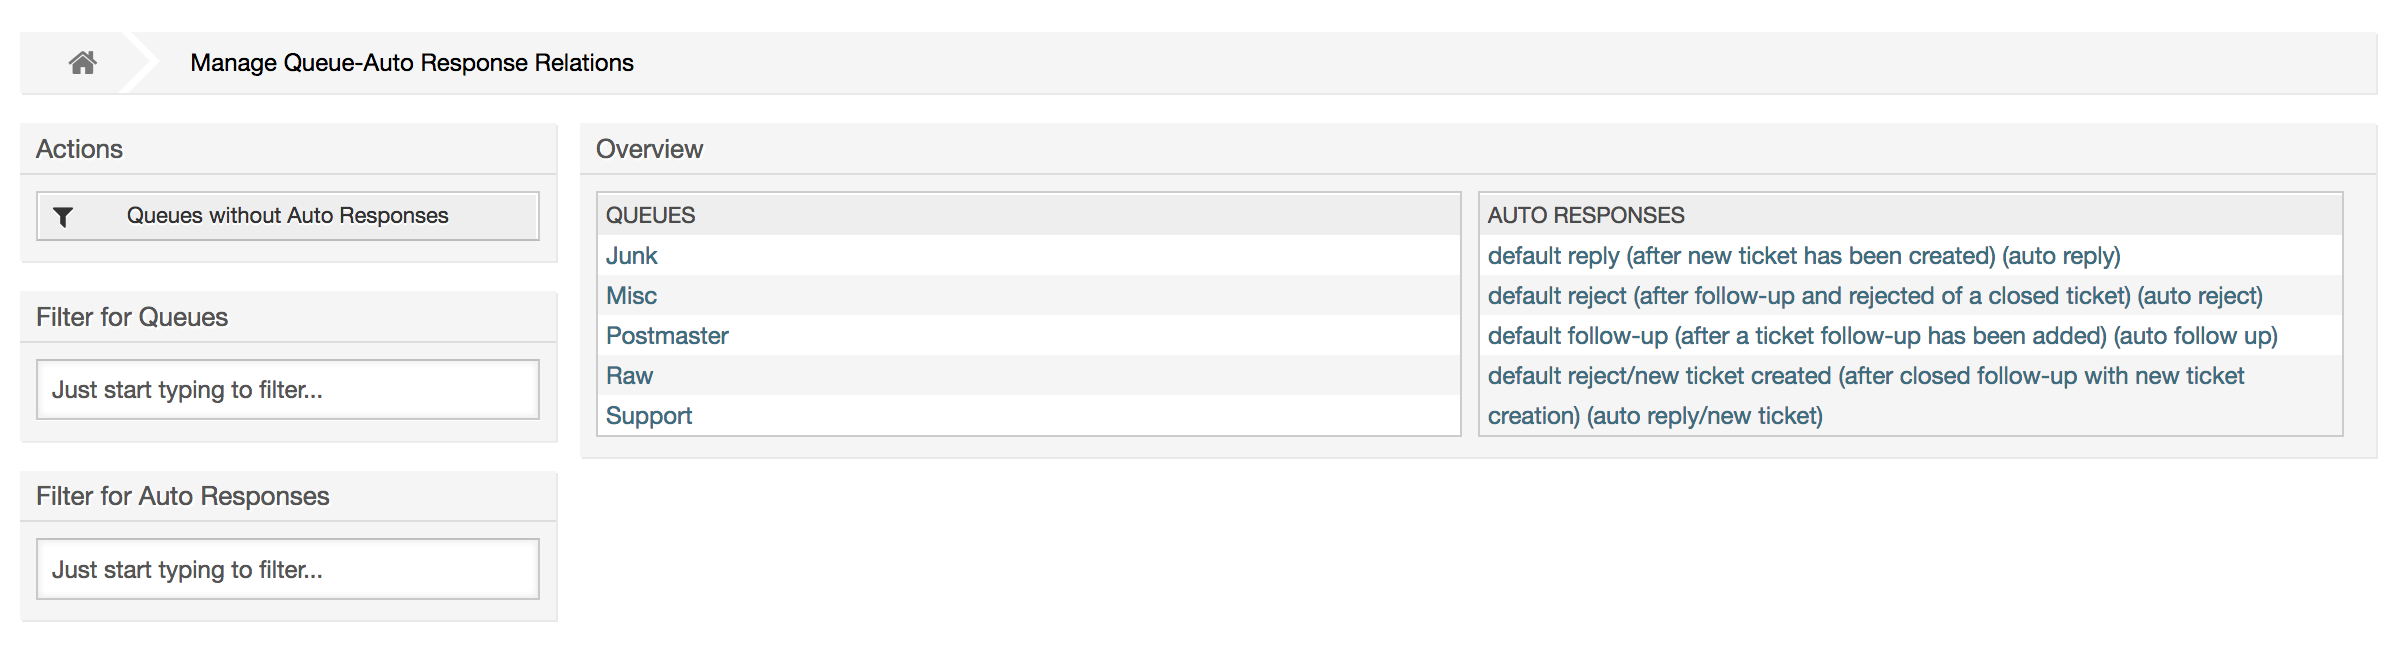
To add an auto response to a queue, use the "Auto Response <-> Queues" link on the Admin page (see figure below). All system events are listed for every queue, and an auto answer with the same event can be selected or removed via a listbox.

To define the different auto responses that will be available for a queue, click on the corresponding queue name (see figure below). It is also possible to edit an existing auto response - to do so, click on the response and edit in the same manner as editing a new auto response.
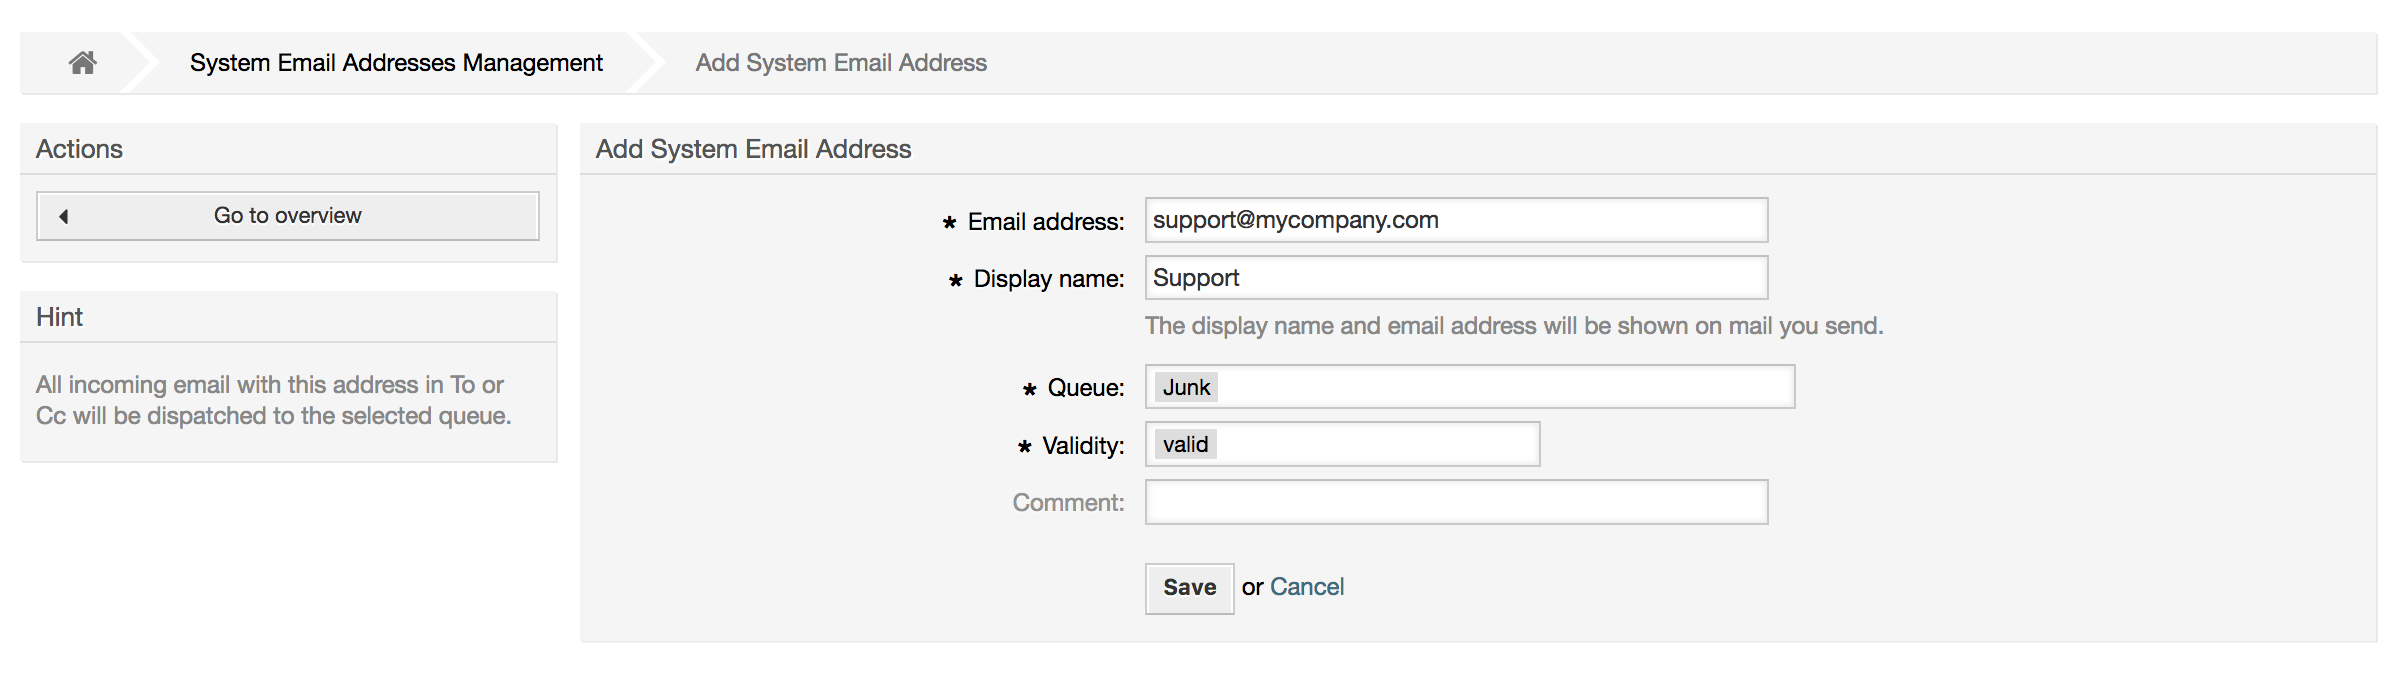
To enable OTRS to send emails, you need a valid email address to be used by the system. OTRS is capable of working with multiple email addresses, since many support installations need to use more than one. A queue can be linked to many email addresses, and vice versa. The address used for outgoing messages from a queue can be set when the queue is created. Use the "Email Addresses" link from the Admin page to manage all email addresses of the system (see figure below).
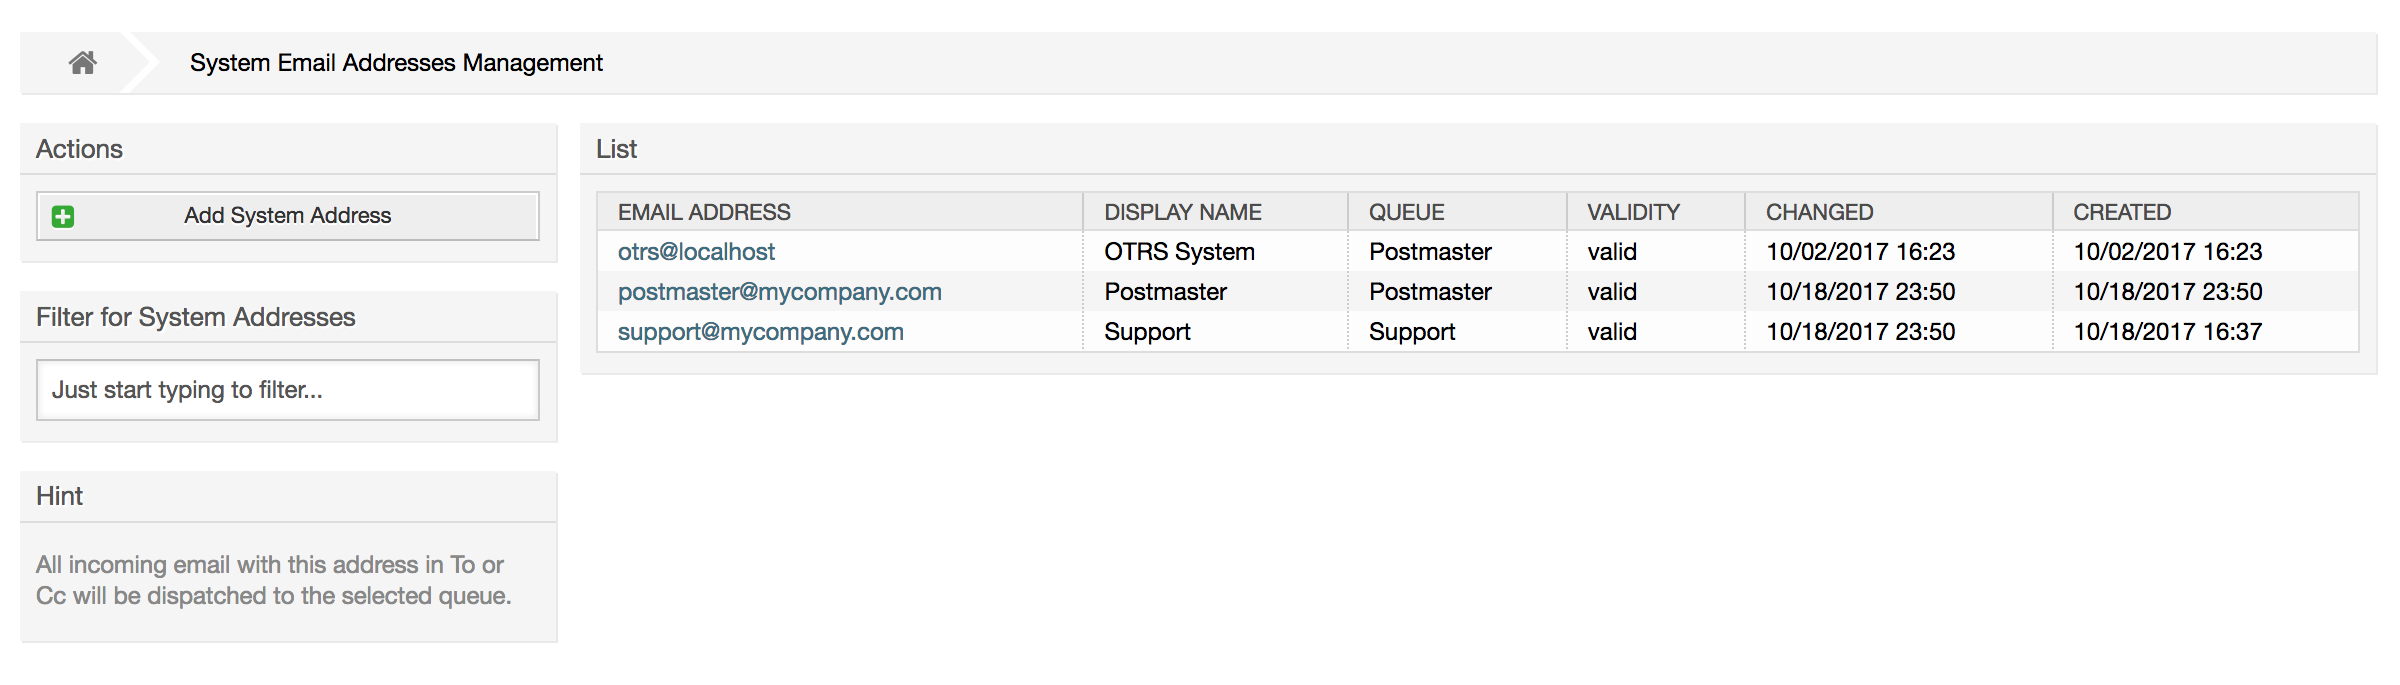
If you create a new mail address (see figure below),you can select the queue or sub queue to be linked with it. This link enables the system to sort incoming messages via the address in the To: field of the mail into the right queue.
Anmerkung
In OTRS können E-Mail-Adressen deaktiviert, aber nicht gelöscht werden. Sie können eine Adresse deaktivieren, indem Sie den Wert für "Gültig" auf "ungültig" oder "ungültig-temporär" setzen.
OTRS allows ticket notifications to be sent to agents and customers, based on the occurrence of certain events. Agents can customize their ticket notification settings via the preferences link.
Through the "Ticket Notifications" link on the Admin page, you can manage the ticket notifications of your system (see figure below). OTRS comes with a set of predefined notifications that cover a wide range of use cases.

You can customize many aspects of the notifications. Click on the notification you want to change, and its content will be loaded for editing (see figure below).
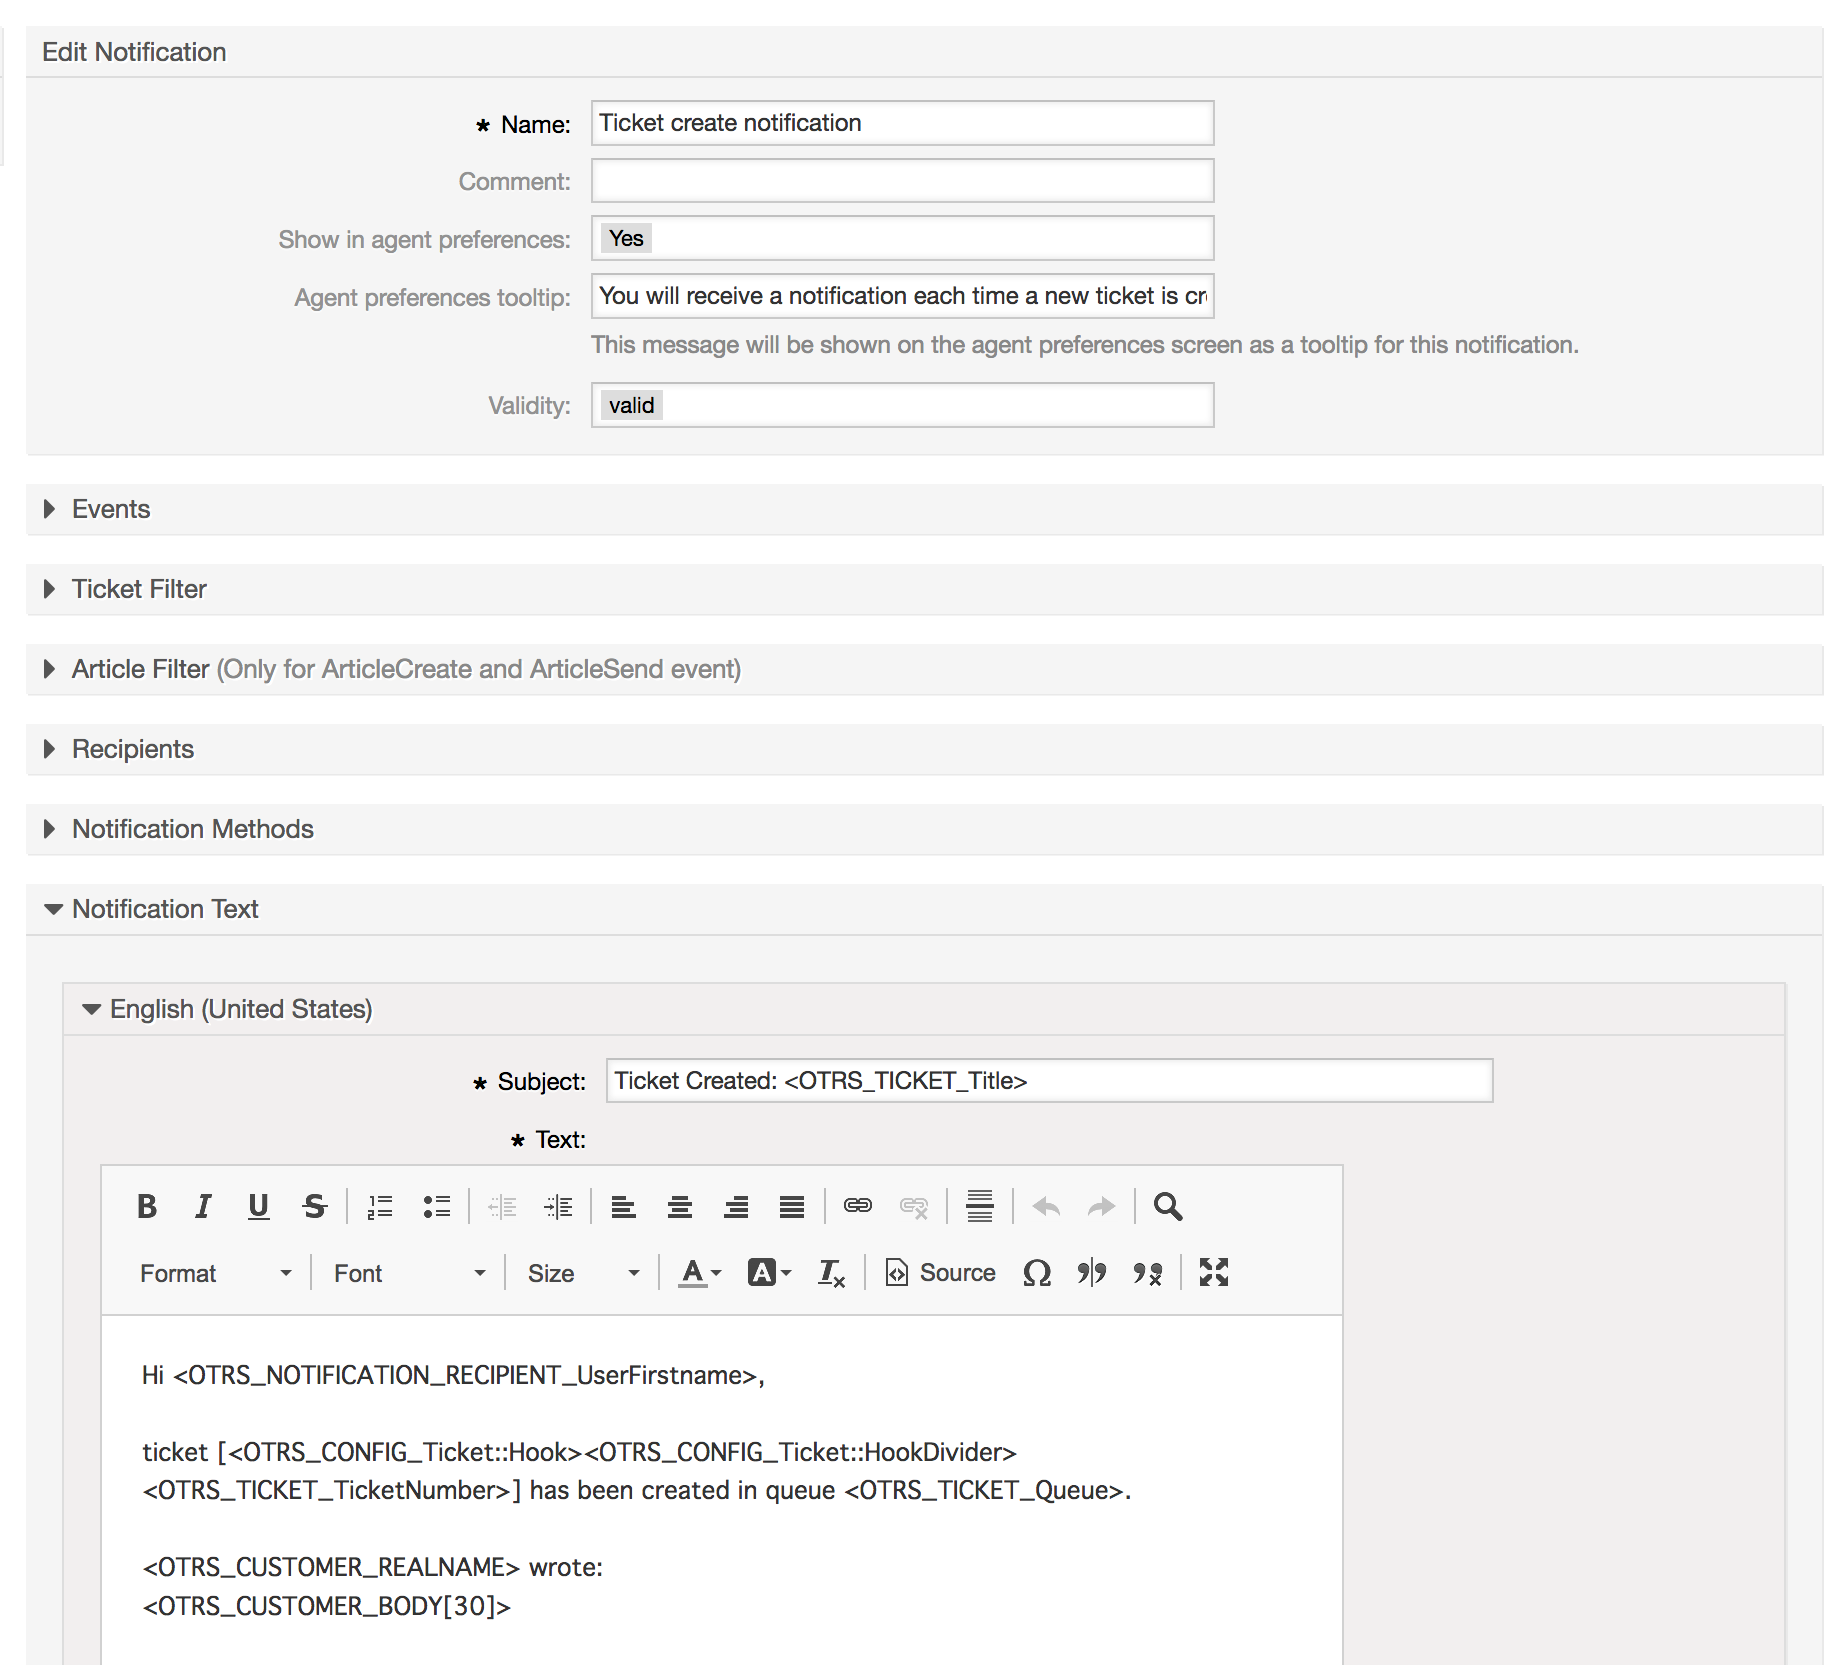
You can edit the basic data of this notification such as name and comment, and control if the agents may choose to receive this notification (per transport method). For every language, a subject and body can be added/edited to configure what will actually be sent as the notification content.
Just as with signatures and salutations, it is possible to dynamically create the content of a notification by using special variables. You can find a list of variables at the bottom of the screen.
You can choose which events should trigger this notification, and limit it to tickets which match certain criteria (ticket and/or article filter). This makes it possible to create different notifications for different queues, priorities or other criteria that might be relevant for your system.
The recipients of the notification can be configured according to different criteria (groups, roles, individual agents etc.). All configured recipients will receive the notification.
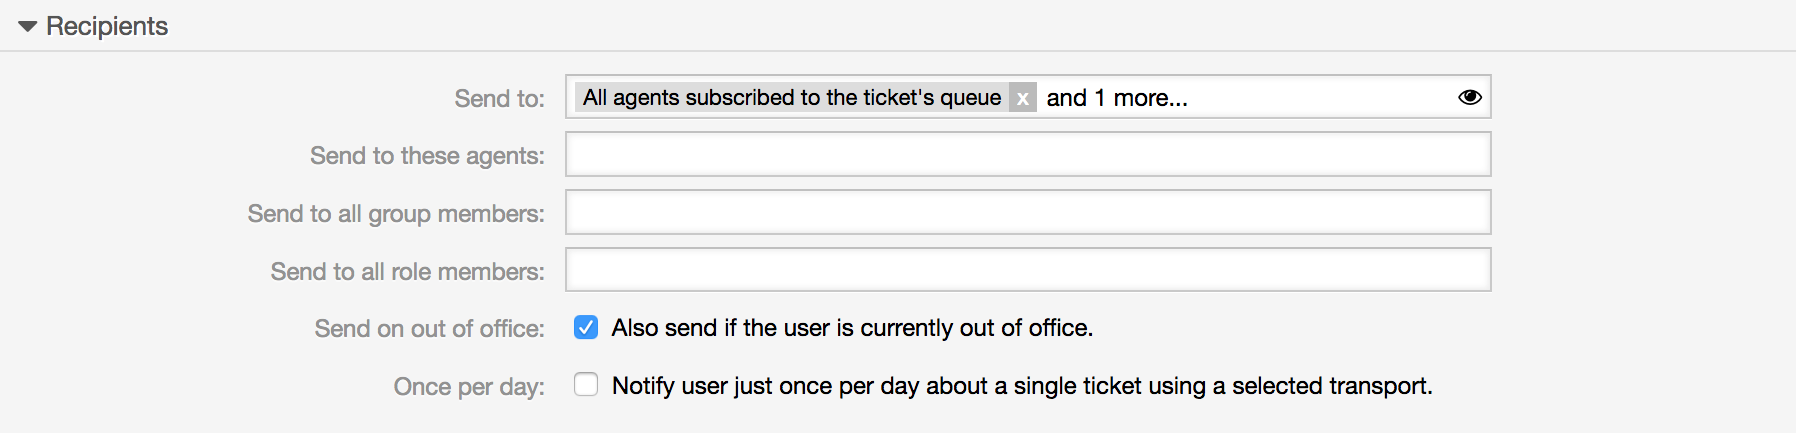
Additionally, you can specify if the notification should be sent to agents who are out of office, and limit the sending to once per day and ticket (e. g. pending reminder notification).
Notifications can be sent with different notification methods. The "Email" notification method is available in OTRS Free, with OTRS Business Solution™ you also get the possibility to store and view the notifications in the database (so that no email client is needed to use OTRS) as well as to send them via SMS (e. g. for very important notifications).
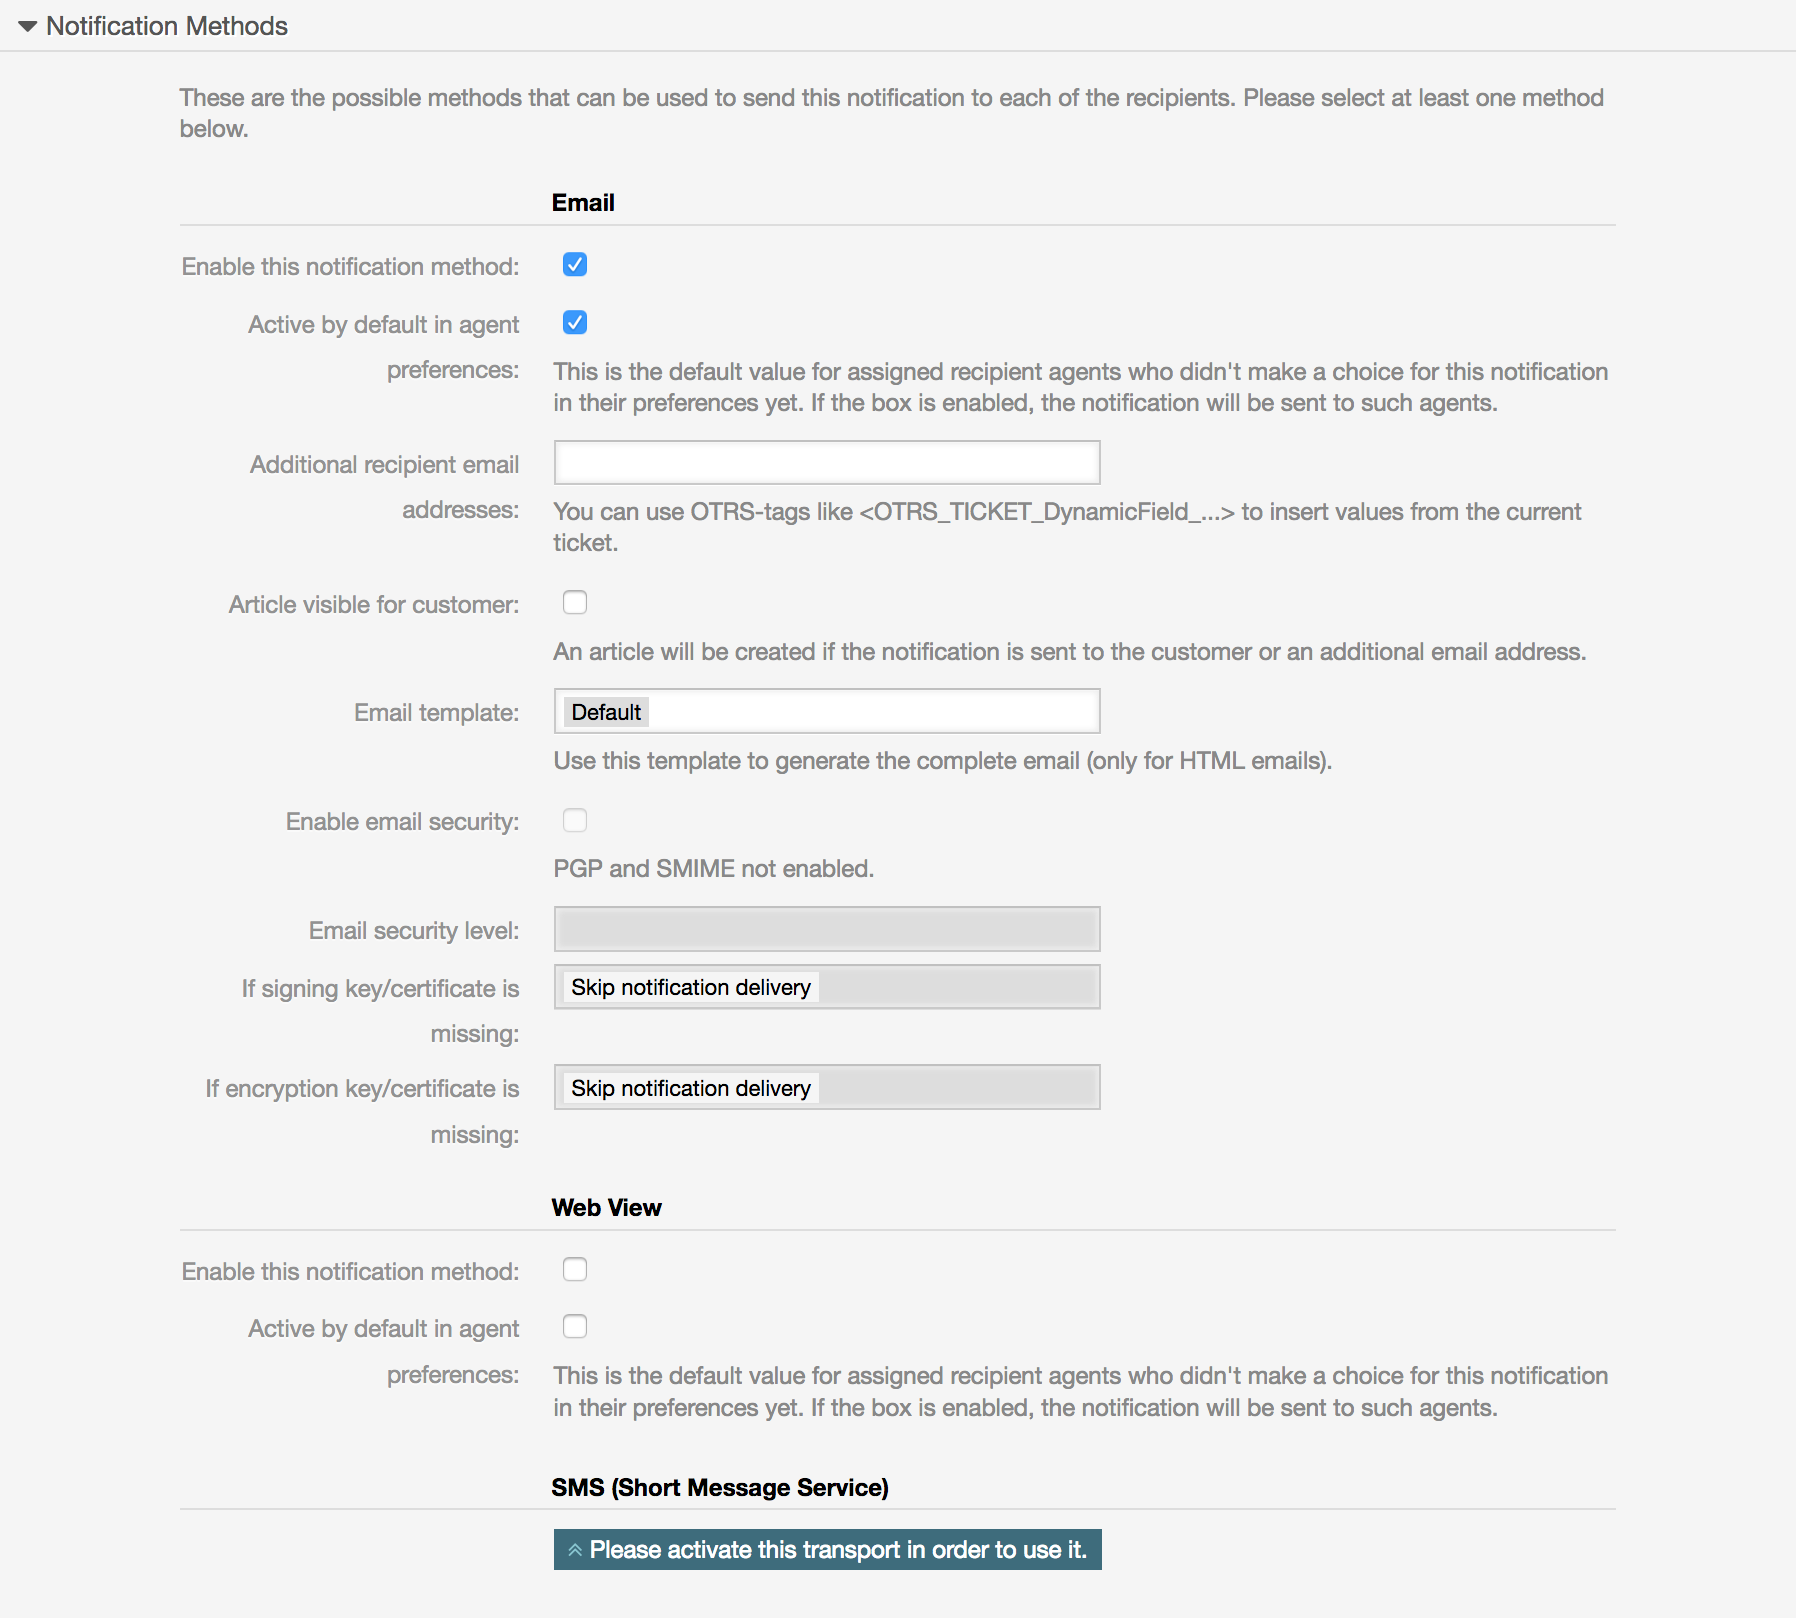
The field 'Additional recipient email addresses' provides the possibility to use OTRS-tags like <OTRS_TICKET_DynamicField_...> to insert values from the current ticket. The according SMS field (only available in OTRS Business Solution™) also has this feature.
Since OTRS 5s Email transport contains security options for each notification, that includes signing and encrypting possibilities with PGP and S/MIME and the opportunity to decide what to do in case of missing key or certificate.
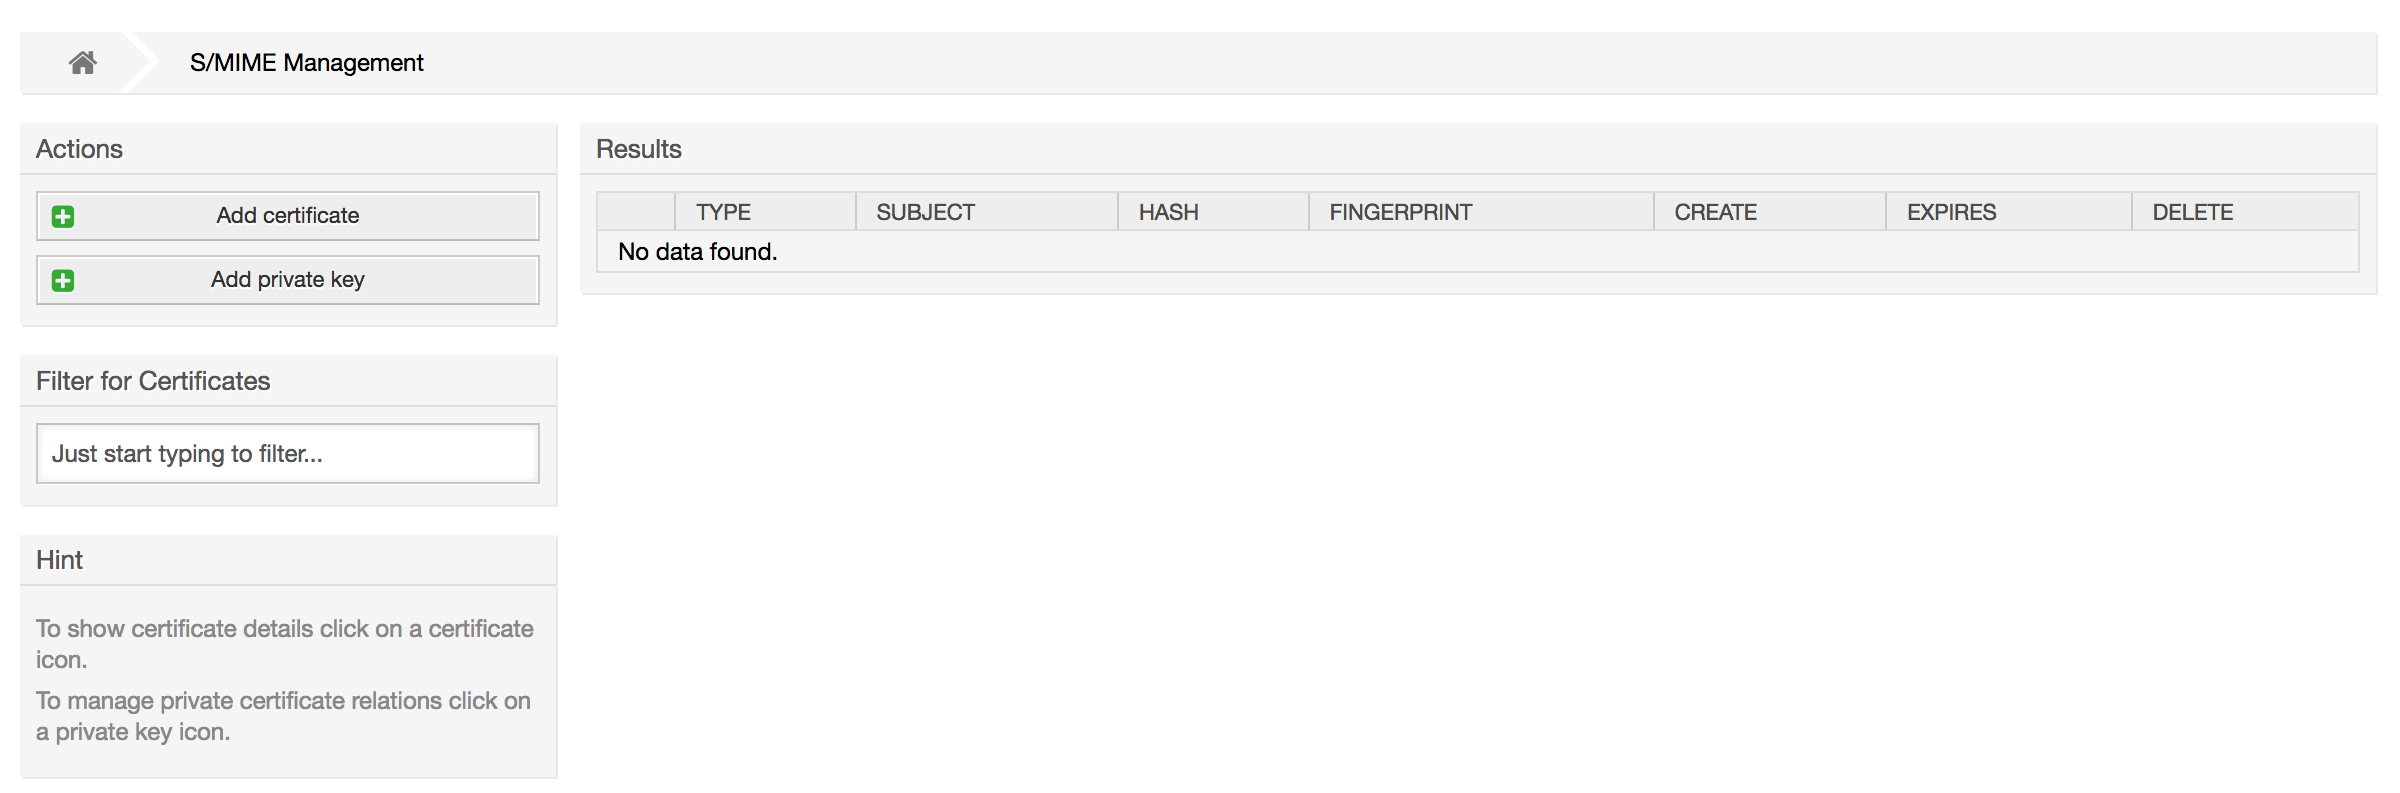
OTRS can process incoming S/MIME encoded messages and sign outgoing mails. Before this feature can be used, you need to activate it and change some configuration parameters in the SysConfig.
The "S/MIME Certificates" link on the Admin page allows you to manage your S/MIME certificates (see figure below). You can add or remove certificates, and also search through the SMIME data.
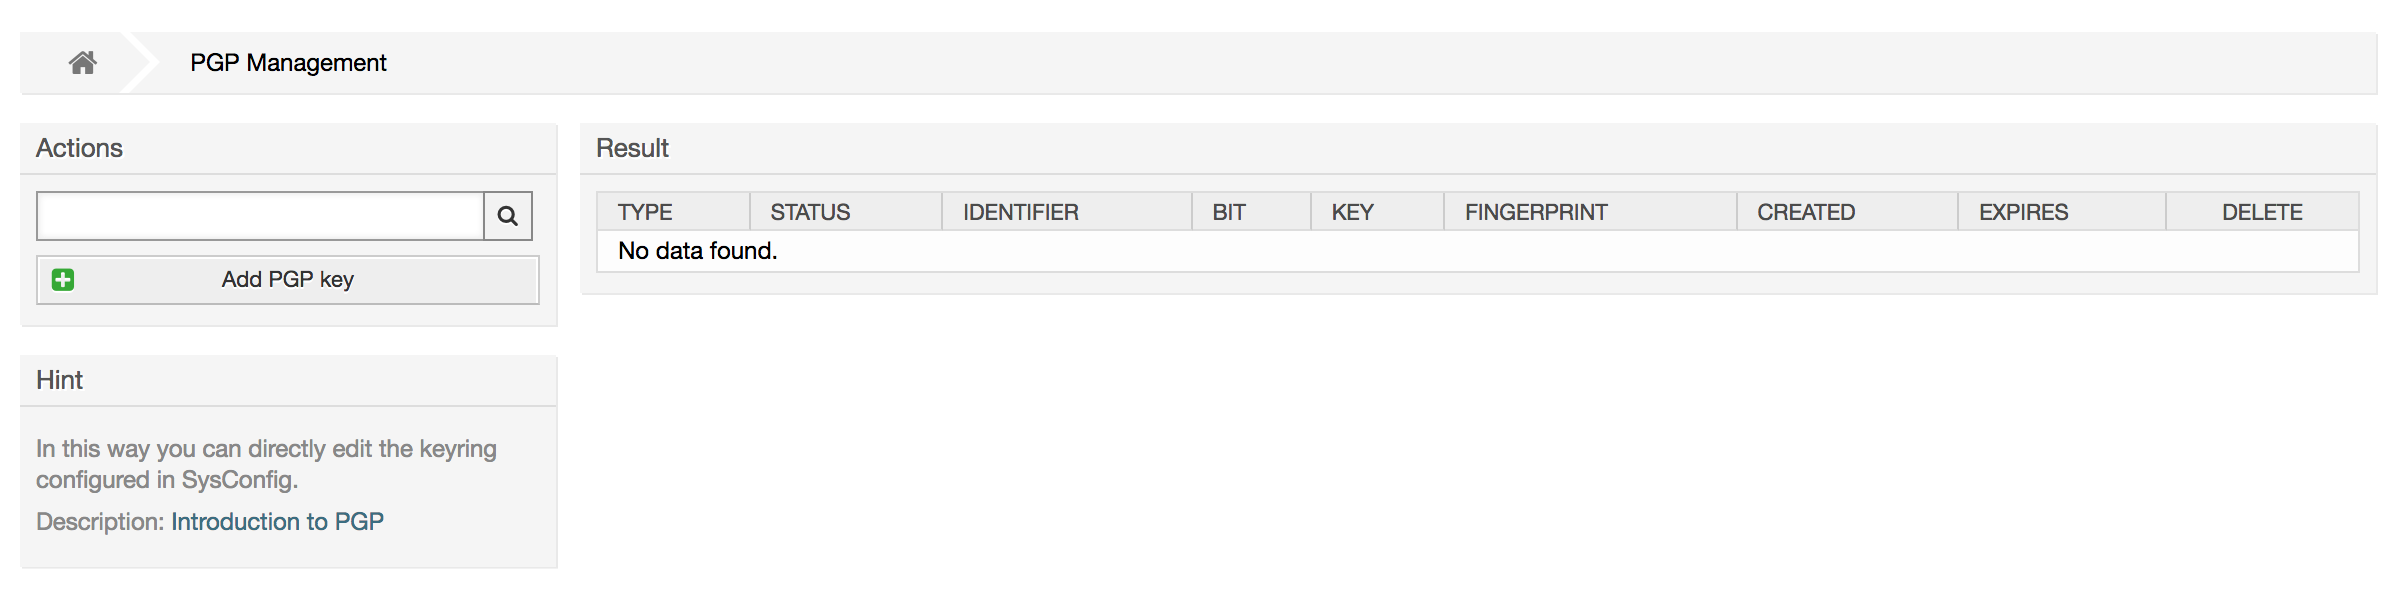
OTRS handles PGP keys, which allows you to encrypt/decrypt messages and to sign outgoing messages. Before this feature can be used, you need to activate it and change some configuration parameters in the SysConfig.
Through the "PGP Keys" link on the Admin page, it is possible to manage the key ring of the user who shall be used for PGP with OTRS (see figure below), e.g. the local OTRS user or the web server user. It is possible to add and remove keys and signatures, and you can search through all data in your key ring.
Through the "States" link on the Admin page, you can manage the different ticket states you want to use in the system (see figure below).
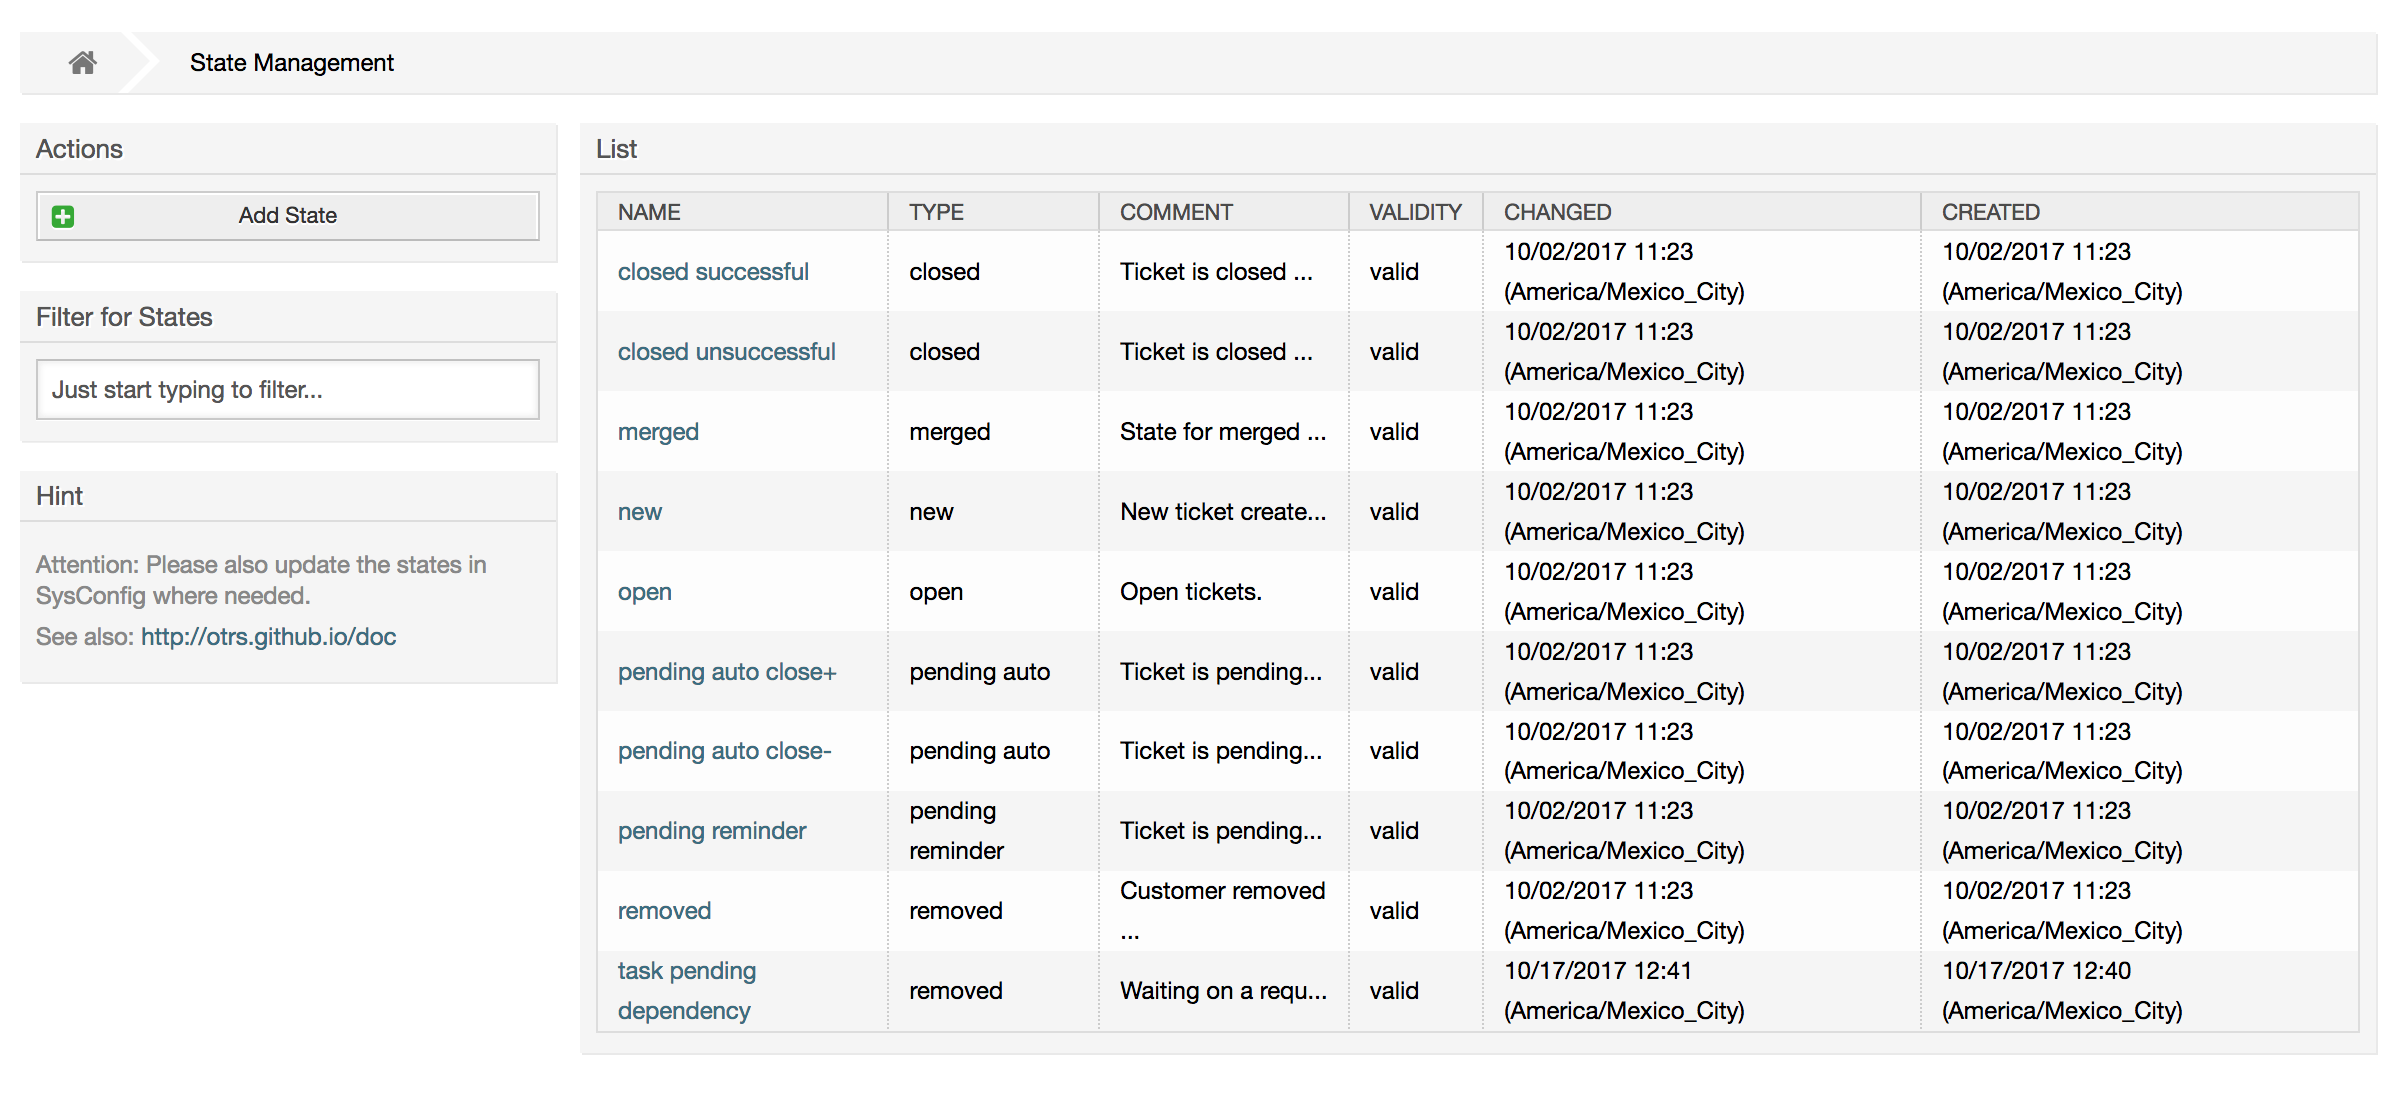
In einer Standardinstallation sind folgende Status definiert:
erfolgreich geschlossen
erfolglos geschlossen
zusammengefasst
neu
öffnen
warten auf erfolgreich schließen
warten auf erfolglos schließen
warten zur Erinnerung
entfernt
Jeder Status ist mit einem Typ verküpft. Auch bei dem Neuanlegen eines Status muss ein Typ angegeben werden. Die standardmäßig verfügbaren Status-Typen sind:
geschlossen
zusammengefasst
neu
öffnen
warten auto
warten zur Erinnerung
entfernt
The System Configuration link leads to the section where many OTRS configuration options are maintained.
The system configuration link on the admin page loads the graphical user interface for the system configuration (see figure below). You can upload your own configuration files for the system, as well as backup all current settings into a file. Almost all configuration parameters of the OTRS framework and any installed extensions can be viewed and changed using this interface. All configuration parameters are part of a certain group, which makes it possible to navigate quickly through the vast number of existing parameters. It is also possible to perform a full-text search over all parameters.
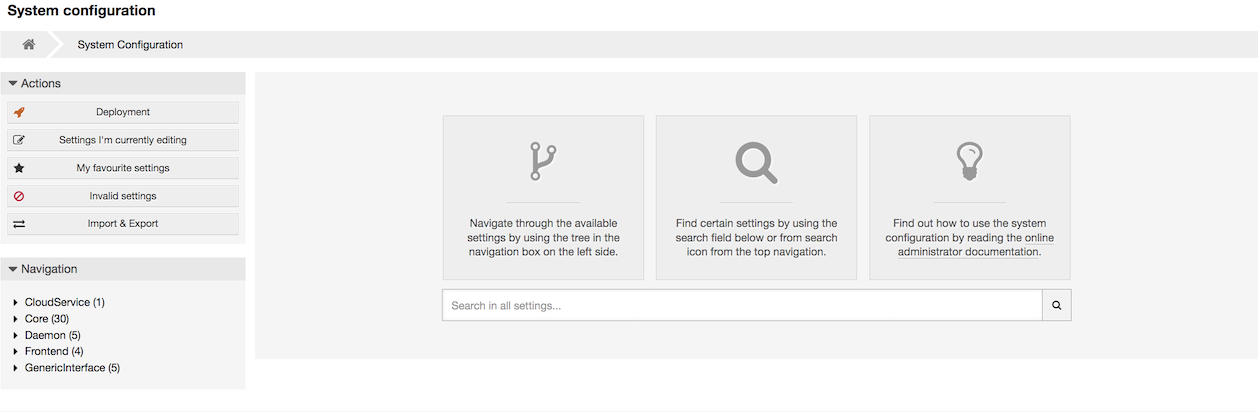
The graphical user interface of the system configuration is described in detail in the chapter "Configuring the system through the web interface".
There are several possibilities to transport new emails into the ticket system. One way is to use a local MTA and the otrs.PostMaster.pl script that pipes the mails directly into the system. Another possibility is the use of mail accounts which can be administrated through the web interface. The "PostMaster Mail Accounts" link on the Admin page loads the management console for the mail accounts (see figure below). OTRS supports the mail protocols: POP3, POP3S, IMAP and IMAPS.
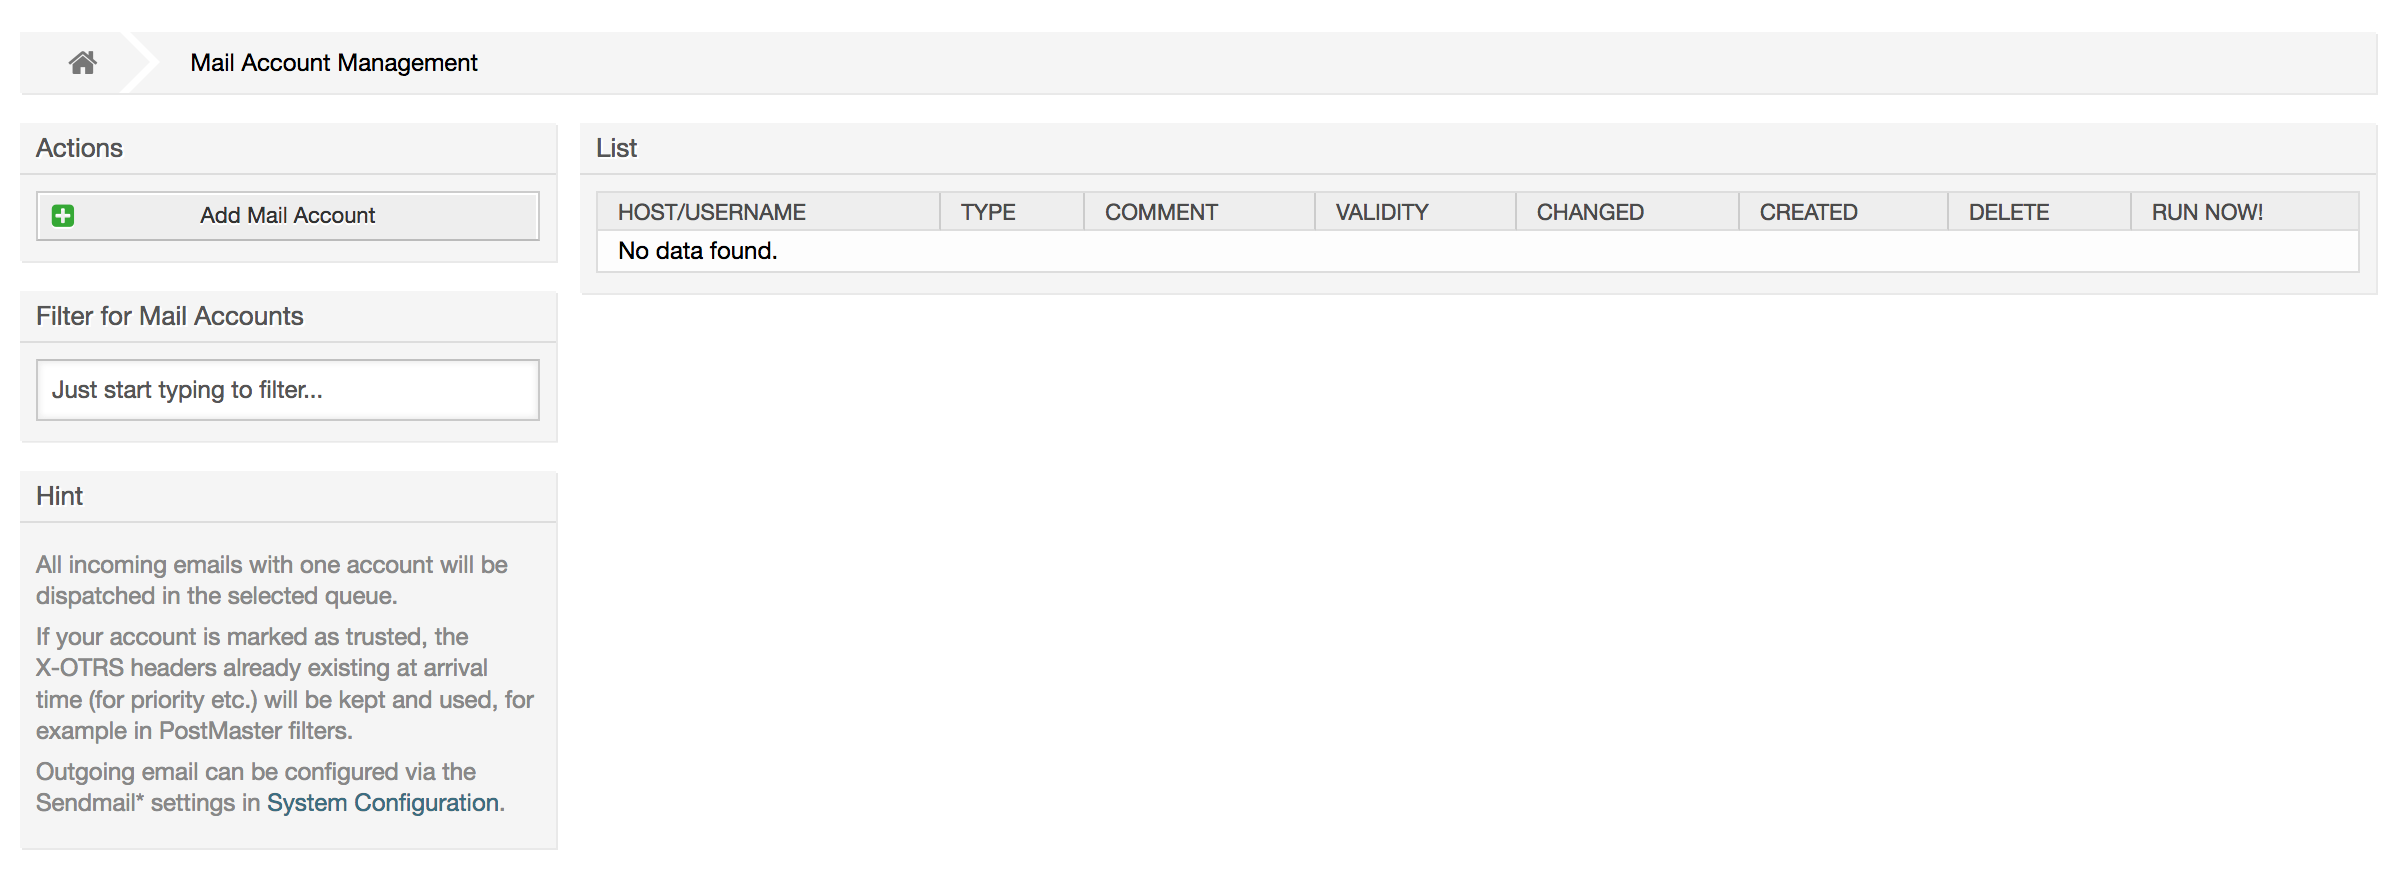
Nähere Informationen erhalten Sie im Kapitel Postmaster Mailaccounts.
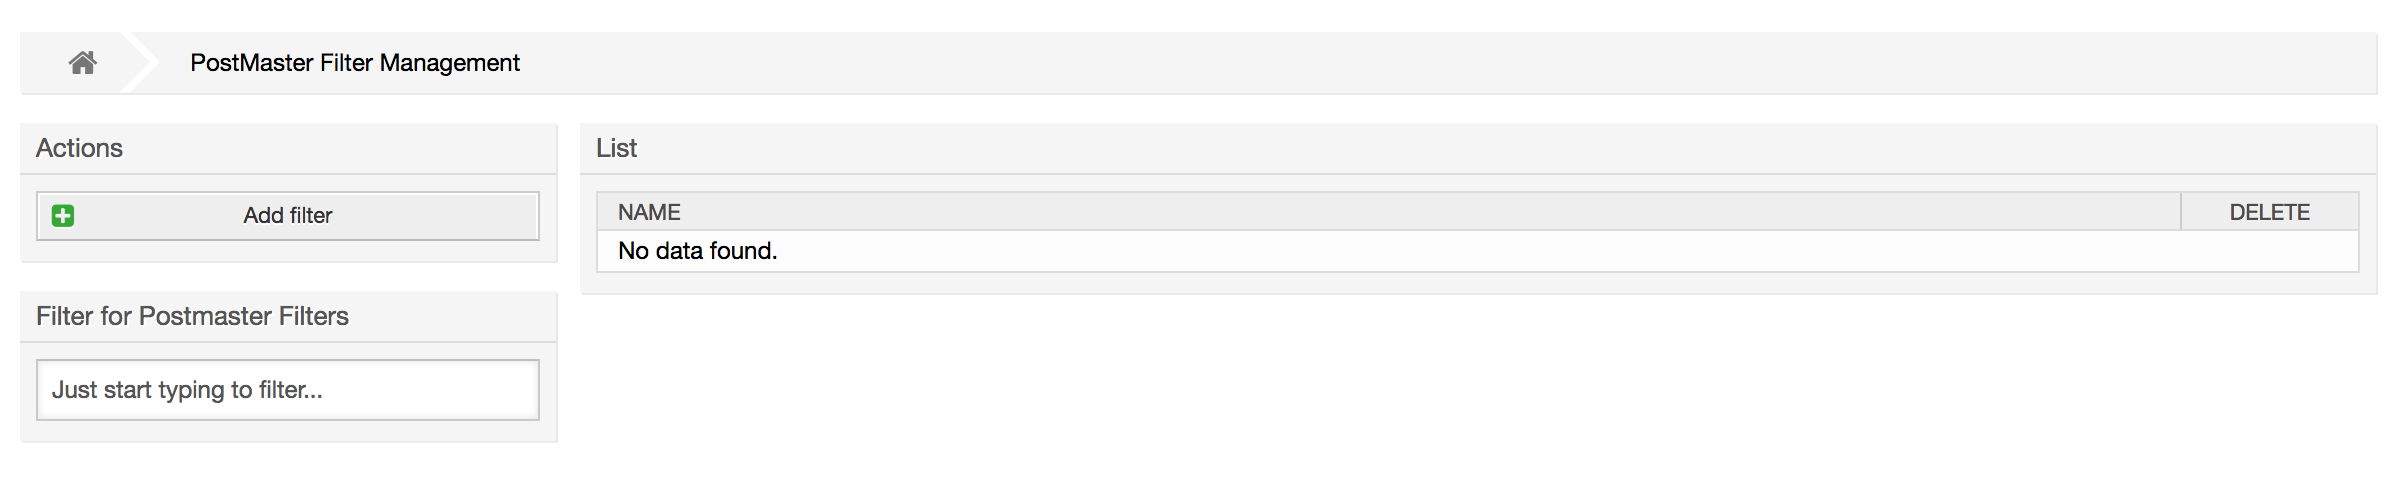
OTRS has the capability to filter incoming email messages. For example, it is possible to put certain emails automatically into specified queues, or to set a specific state or ticket type for some mails. The filters apply to all incoming mails. Several filter conditions can be defined per each mail header. You can manage your filters via the link "PostMaster Filter" on the Admin page (see figure below).
A filter consists of one or more criteria that must be met in order for the
defined actions to be executed on the email. Filter criteria may be defined
for the headers or the body of an email, e.g. search for specific header
entries, such as a sender address, or on strings in the body. Even regular
expressions can be used for extended pattern matching. If your filter
matches, you can set fields using the X-OTRS headers in
the GUI. These values will be applied when creating the ticket or follow-up
message in OTRS. The table below lists the different
X-OTRS headers and their meaning.
Anmerkung
You also can use X-OTRS-FollowUp-* headers to set values
for follow up emails.
Tabelle 4.5. Funktion der verschiedenen X-OTRS-Header
| Name | Mögliche Werte | Beschreibung |
|---|---|---|
| X-OTRS-Priority: | 1 very low, 2 low, 3 normal, 4 high, 5 very high | Legt die Priorität eines Tickets fest. |
| X-OTRS-Queue: | Name einer Queue des Systems. |
Sets the queue where the ticket shall be sorted. If set in X-OTRS header,
all other filter rules that try to sort a ticket into a specific queue are
ignored. If you use a sub-queue, specify it as
Parent::Sub.
|
| X-OTRS-Lock: | lock, unlock | Setzt den "gesperrt"-Status eines Tickets. |
| X-OTRS-Ignore: | Yes oder True | Wird dieser Header gesetzt, wird die Mail komplett ignoriert und gelangt somit nie als Ticket in das System. |
| X-OTRS-State: | new, open, closed successful, closed unsuccessful, ... | Setzt den nächsten Status eines Tickets. |
| X-OTRS-State-PendingTime: | Z. B. 2010-11-20 00:00:00 | Sets the pending time of a ticket (you also should sent a pending state via X-OTRS-State). You can specify absolute dates like "2010-11-20 00:00:00" or relative dates, based on the arrival time of the email. Use the form "+ $Number $Unit", where $Unit can be 's' (seconds), 'm' (minutes), 'h' (hours) or 'd' (days). Only one unit can be specified. Examples of valid settings: "+50s" (pending in 50 seconds), "+30m" (30 minutes), "+12d" (12 days). Note that settings like "+1d 12h" are not possible. You can specify "+36h" instead. |
| X-OTRS-Type: | default (systemabhängig) | Sets the type of a ticket (if Ticket::Type is activated). |
| X-OTRS-Service: | (systemabhängig) |
Sets the service of a ticket (if Ticket::Service is
active). If you want to set a sub-service you should specify it as
Parent::Sub.
|
| X-OTRS-SLA: | (systemabhängig) | Sets the SLA of a ticket (if Ticket::Service support is
active). |
| X-OTRS-CustomerUser: | CustomerUser | Legt den Kunden-Benutzer fest, dem das Ticket zugeordnet werden soll. |
| X-OTRS-CustomerNo: | CustomerNo | Legt die Kunden-ID fest, die dem Ticket zugeordnet werden soll. |
| X-OTRS-SenderType: | agent, system, customer | Legt die Art des Ticket-Absenders fest. |
| X-OTRS-IsVisibleForCustomer: | 0, 1 | Controls if the article is shown in the customer interface. |
| X-OTRS-DynamicField-<DynamicFieldName>: | Hängt von der Konfiguration der dynamischen Felder ab (Text: Notebook, Date: 2010-11-20 00:00:00, Integer: 1) |
Saves an additional info value for the ticket on
<DynamicFieldName> Dynamic Field.
|
| X-OTRS-Loop: | True | Ist dieser X-OTRS-Header gesetzt, wird keine automatische Antwort an den Absender des neuen Tickets geschickt, z. B. um Mailschleifen zu vermeiden. |
| X-OTRS-FollowUp-State-Keep: | 0, 1 |
If this X-OTRS header is set, the incoming follow-up message will not change
the ticket state. For this purpose the header can be customized in the
SysConfig using option KeepStateHeader.
|
| X-OTRS-AttachmentExists: | no, yes | Depending on whether attachments are included in the email this X-OTRS header is set to 'yes', or it has a 'no' value if no attachments are included. |
| X-OTRS-AttachmentCount: | (number of attachments) | This X-OTRS header contains as value the number of attachments which are contained in the email (i.e. '0' for mails without attachments). |
You should specify a name for every filter rule. Filter criteria can be specified in the section "Filter Condition". Choose via the list boxes for "Header 1", "Header 2" and so on for the parts of the messages where you would like to search, and specify on the right side the values you wish to filter on. In the section "Set Email Headers", you can choose the actions that are triggered if the filter rules match. You can select for "Header 1", "Header 2" and so on to select the X-OTRS-Header and set the associated values (see figure below).
Filter rules are evaluated in alphabetical order, and are all executed except if the "Stop after match" setting has been set to "Yes" in one of the rules (in this case evaluation of the remaining filters is canceled).
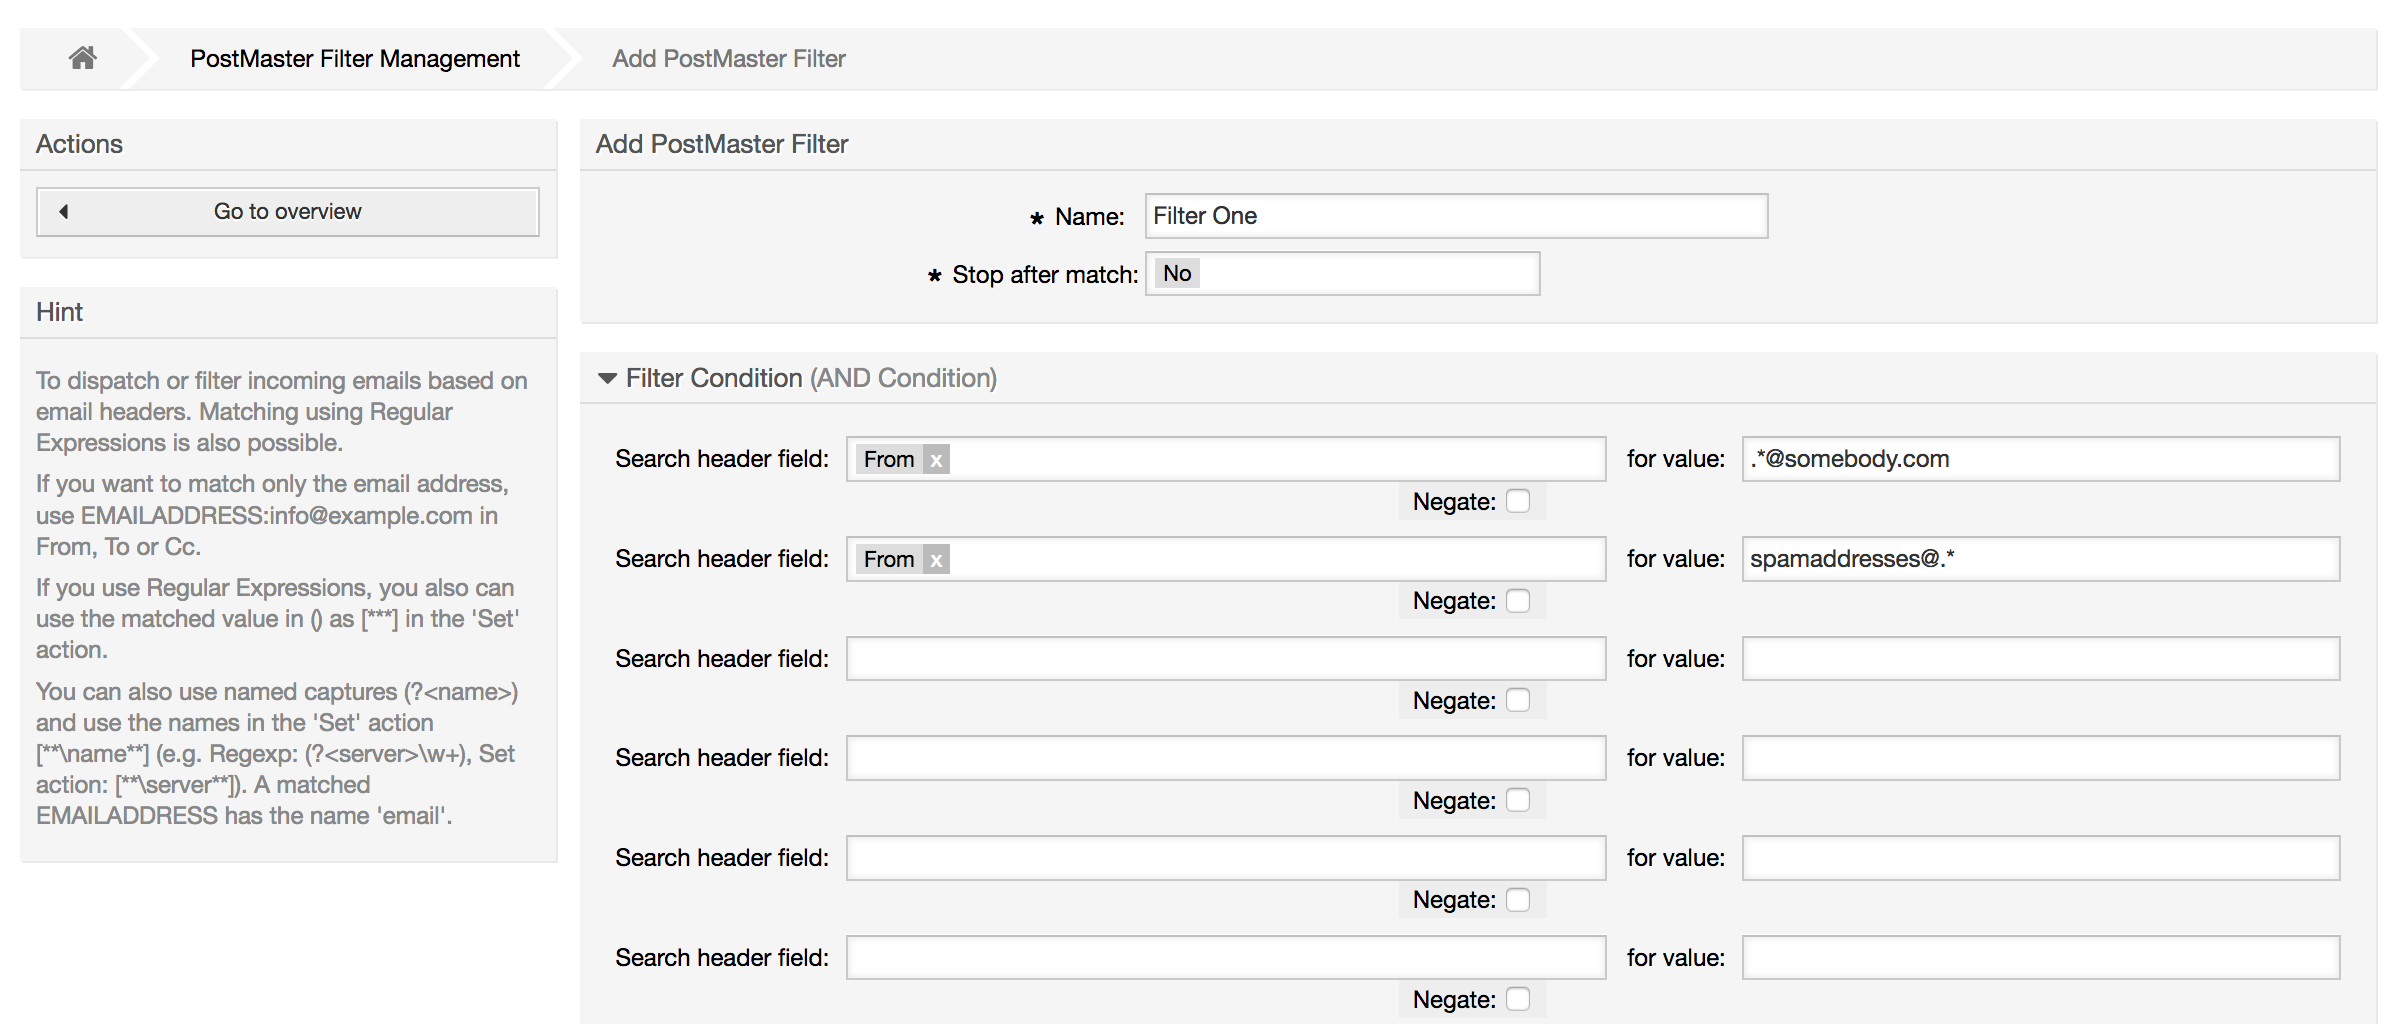
Beispiel 4.1. Aussortierung von Spammails in eine bestimmte Queue
A useful filter rule would be to let OTRS automatically move mails marked for spam, by using a spam detection tool such as SpamAssassin, into the "Junk" queue. SpamAssassin adds the "X-Spam-Flag" header to every checked mail. When the mail is marked as spam, the Header is set to "Yes". So the filter criteria would be "X-Spam-Flag: Yes". To create a filter rule with this criteria you can insert the name as, for example, "spam-mails". In the section for "Filter Condition", choose "X-Spam-Flag:" for "Header 1" from the listbox. Insert "Yes" as value for this header. Now the filter criteria is specified. To make sure that all spam mails are placed into the "Junk" queue, choose in the section for "Set Email Headers", the "X-OTRS-Queue:" entry for "Header 1". Specify "Junk" as value for this header. Finally add the new filter rule to activate it for new messages in the system.
There are additional modules that can be used to filter incoming messages more specifically. These modules might be useful when dealing with larger, more complex systems.
The GenericAgent is a tool to execute tasks automatically. The GenericAgent, for example, can close or move tickets, send notifications on escalated tickets, etc.
Click the link "GenericAgent" on the Admin page (see figure below). A table with all automated jobs in the system is displayed. These jobs can then be edited, run manually or removed entirely.

Click the "Add job" button to create a new job. You first need to supply a name. Then you can specify how the job will be executed: automatic at fixed times (like a cronjob, this mode will operate on all tickets found by the ticket filter) or based on ticket events (right after a single ticket was modified, if it matches the ticket filter). Note that if you manually run event based jobs from the overview screen, they will operate on all tickets fund by the ticket filter.
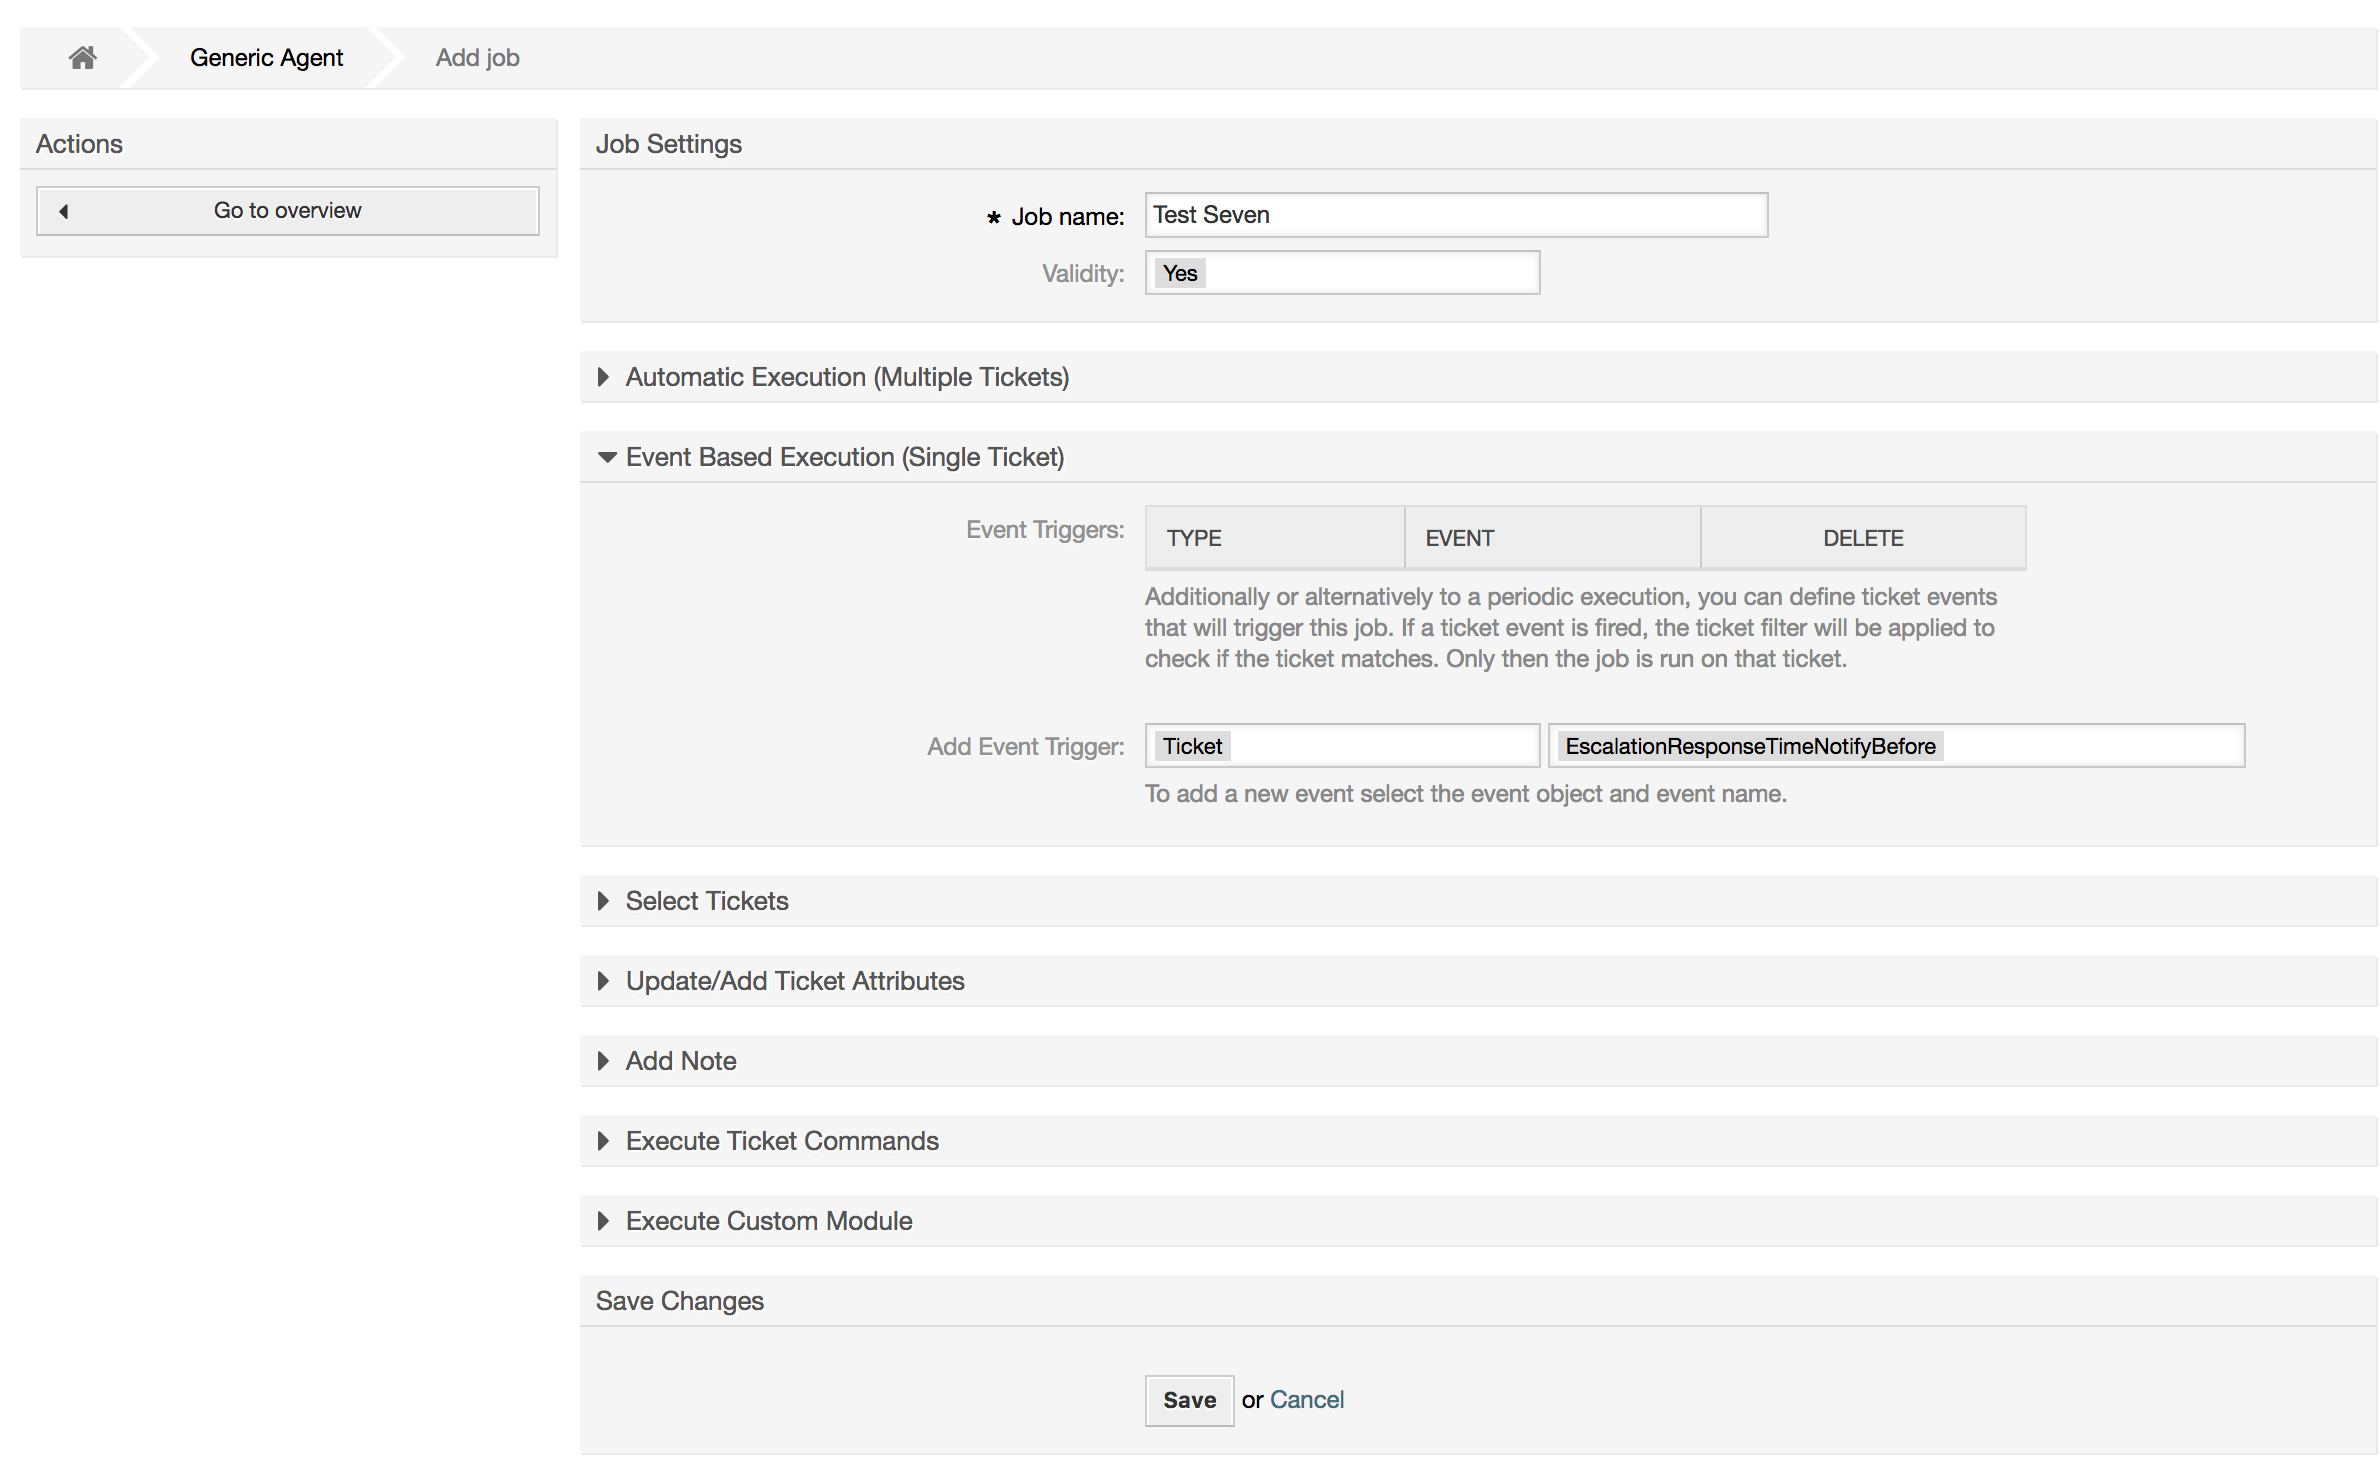
For every job, you can specify a ticket filter, for example to only operate on tickets in a certain queue. All filter criteria must be met for a job to be run on a ticket.
Finally, the ticket can be modified by setting various ticket fields like a new queue or state. It is possible to attach a note to the ticket(s) or run a customized module. You also have the option to delete the ticket(s) from the database. This can be useful to purge outdated or invalid data from the system.
Warnung
If you use the ticket delete function, all affected tickets and their attachments will be removed from the database and cannot be restored!
After editing a job, OTRS will return to the overview screen. There you have the possibility to run any job manually. If you choose to run a job, you will first see all tickets which will be affected when the job actually is run. This list helps you to verify that the job is working as intended. At this point no changes have been made to these tickets yet. Only if you confirm the screen the job will be executed.
OTRS administrators can send messages to specific users or groups. The "Admin Notification" link on the Admin page opens the screen where the agents and groups that should be notified can be selected (see figure below).
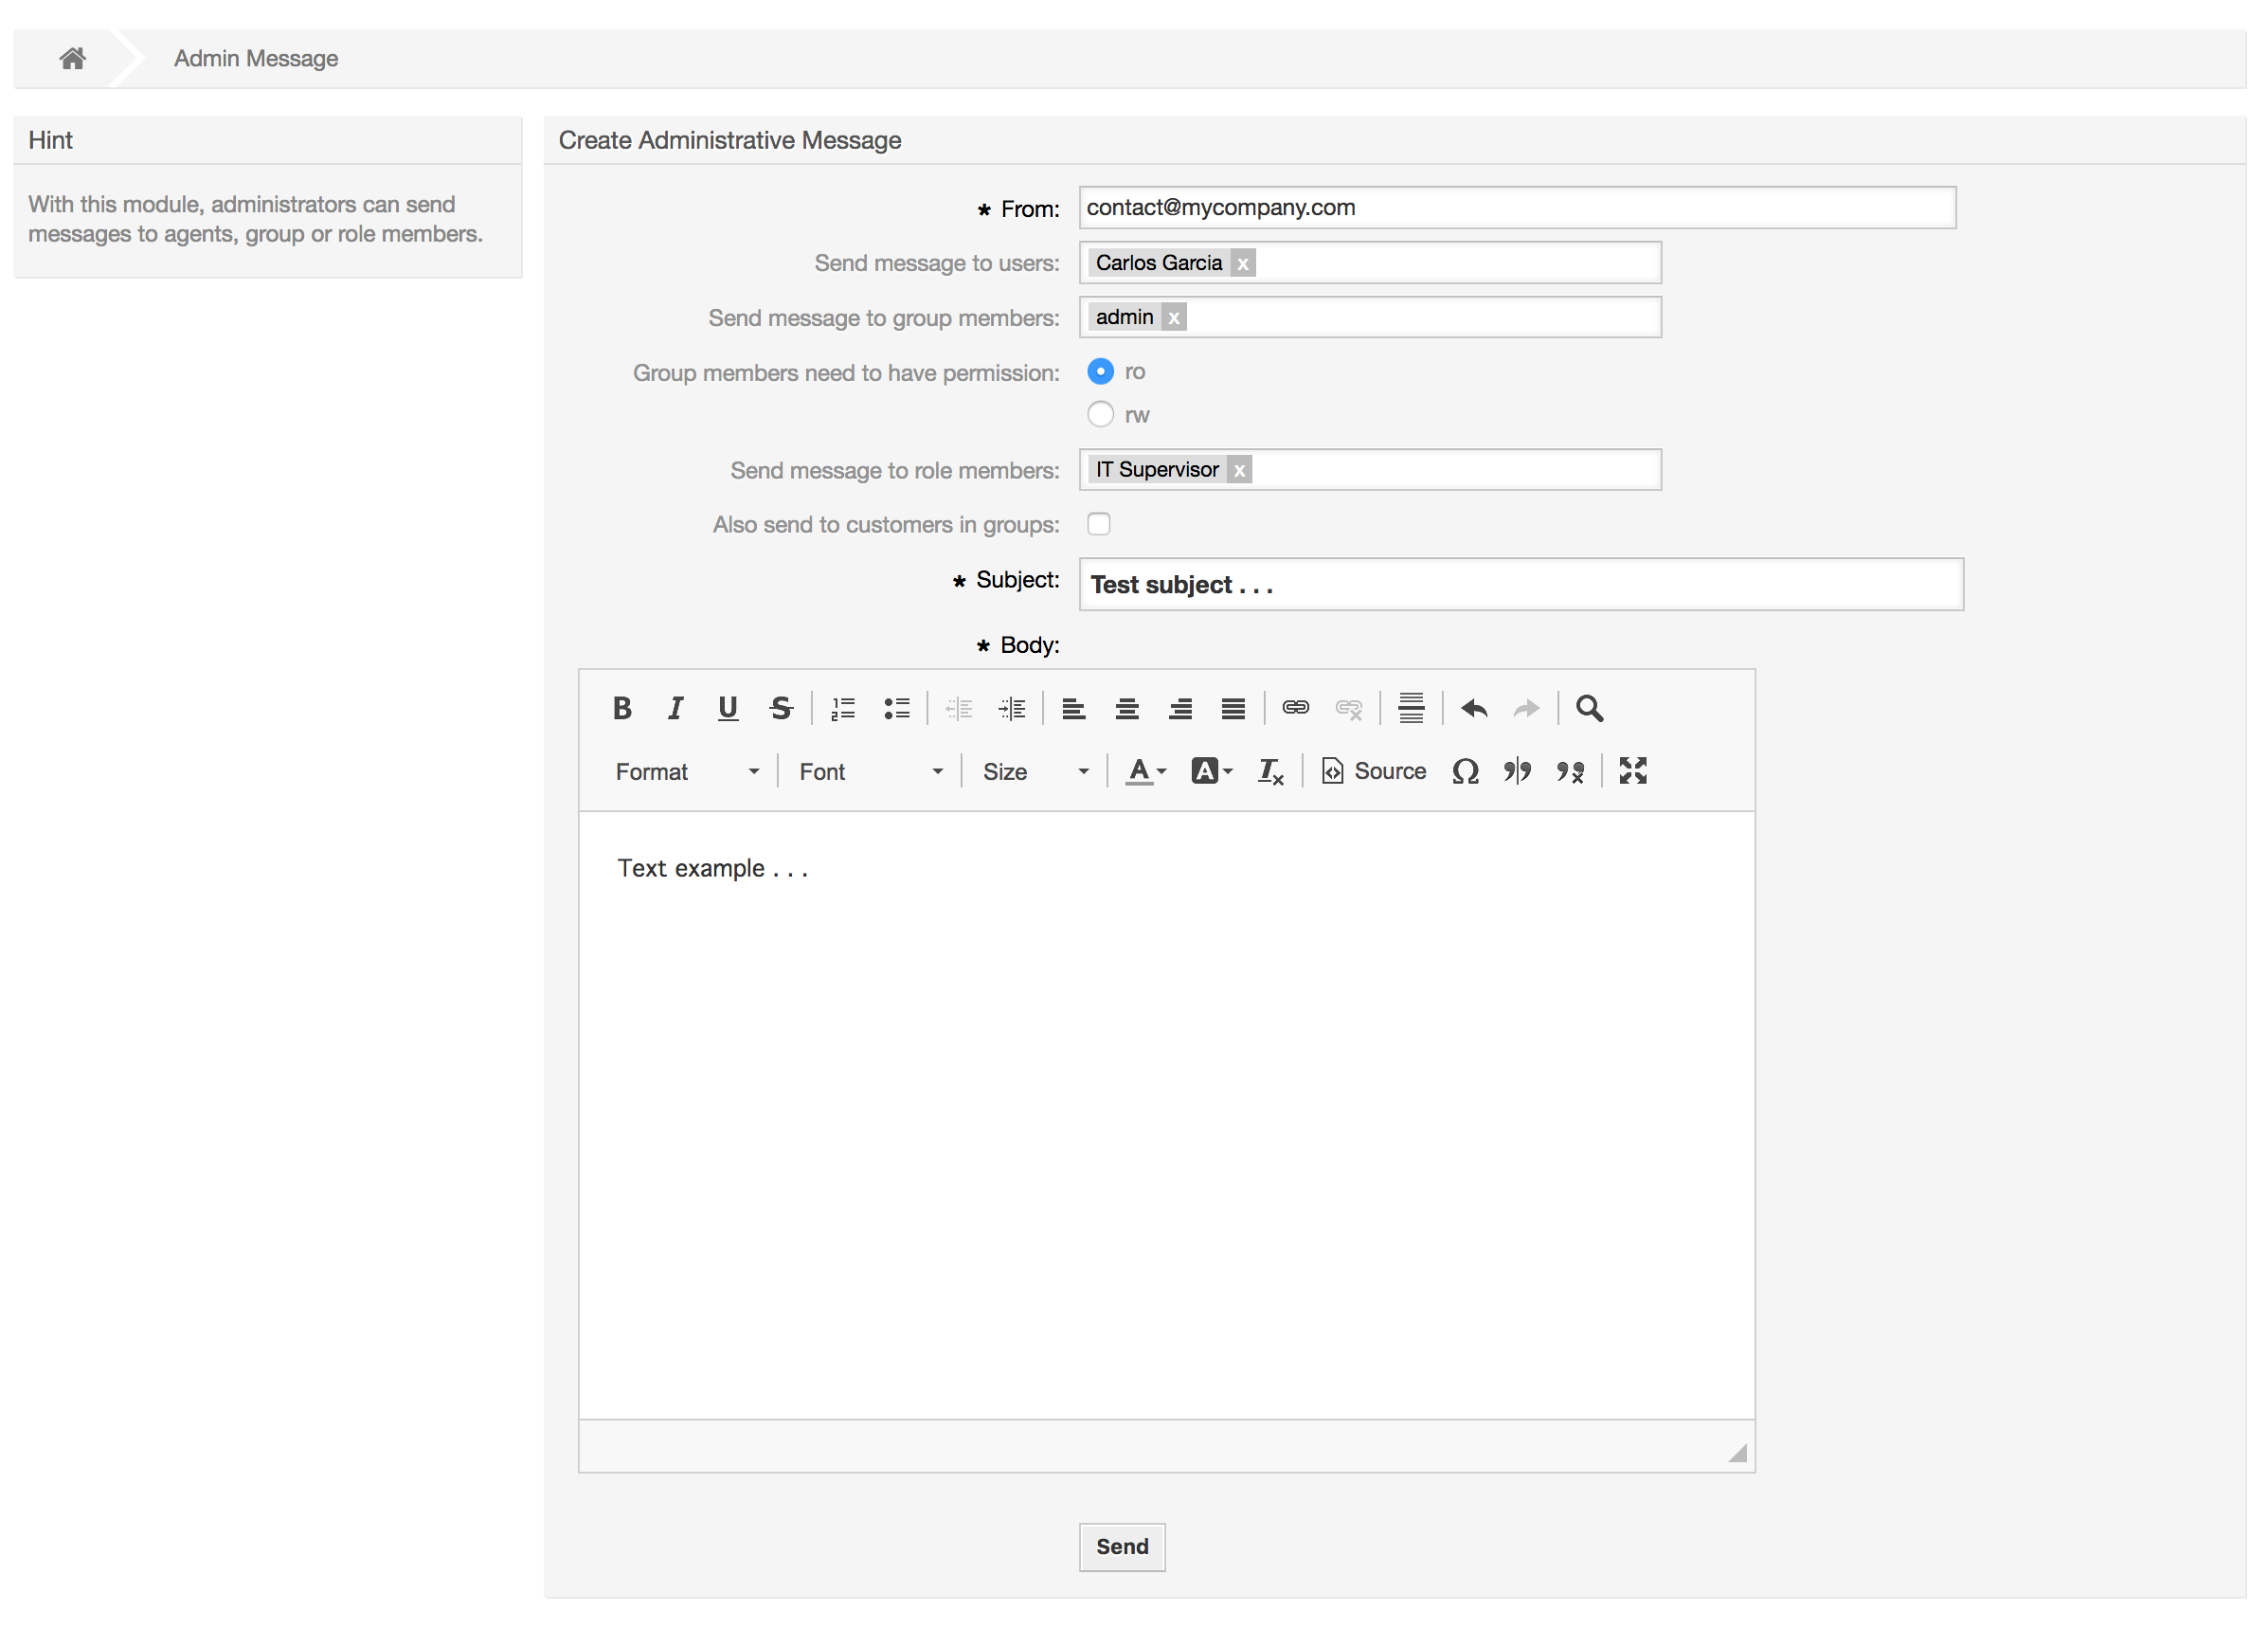
Es wird ein Formular geladen, in das Sie die Absenderadresse, den Betreff und den Inhalt der Administratoren-Mitteilung eintragen können. Weiterhin können Sie aus der Tabelle auswählen, an welche Benutzer und / oder Benutzergruppen bzw. Rollen die Mitteilung gesendet werden soll.
You can see all logged in users and their session details by clicking the "Session Management" link in the admin area (see figure below).
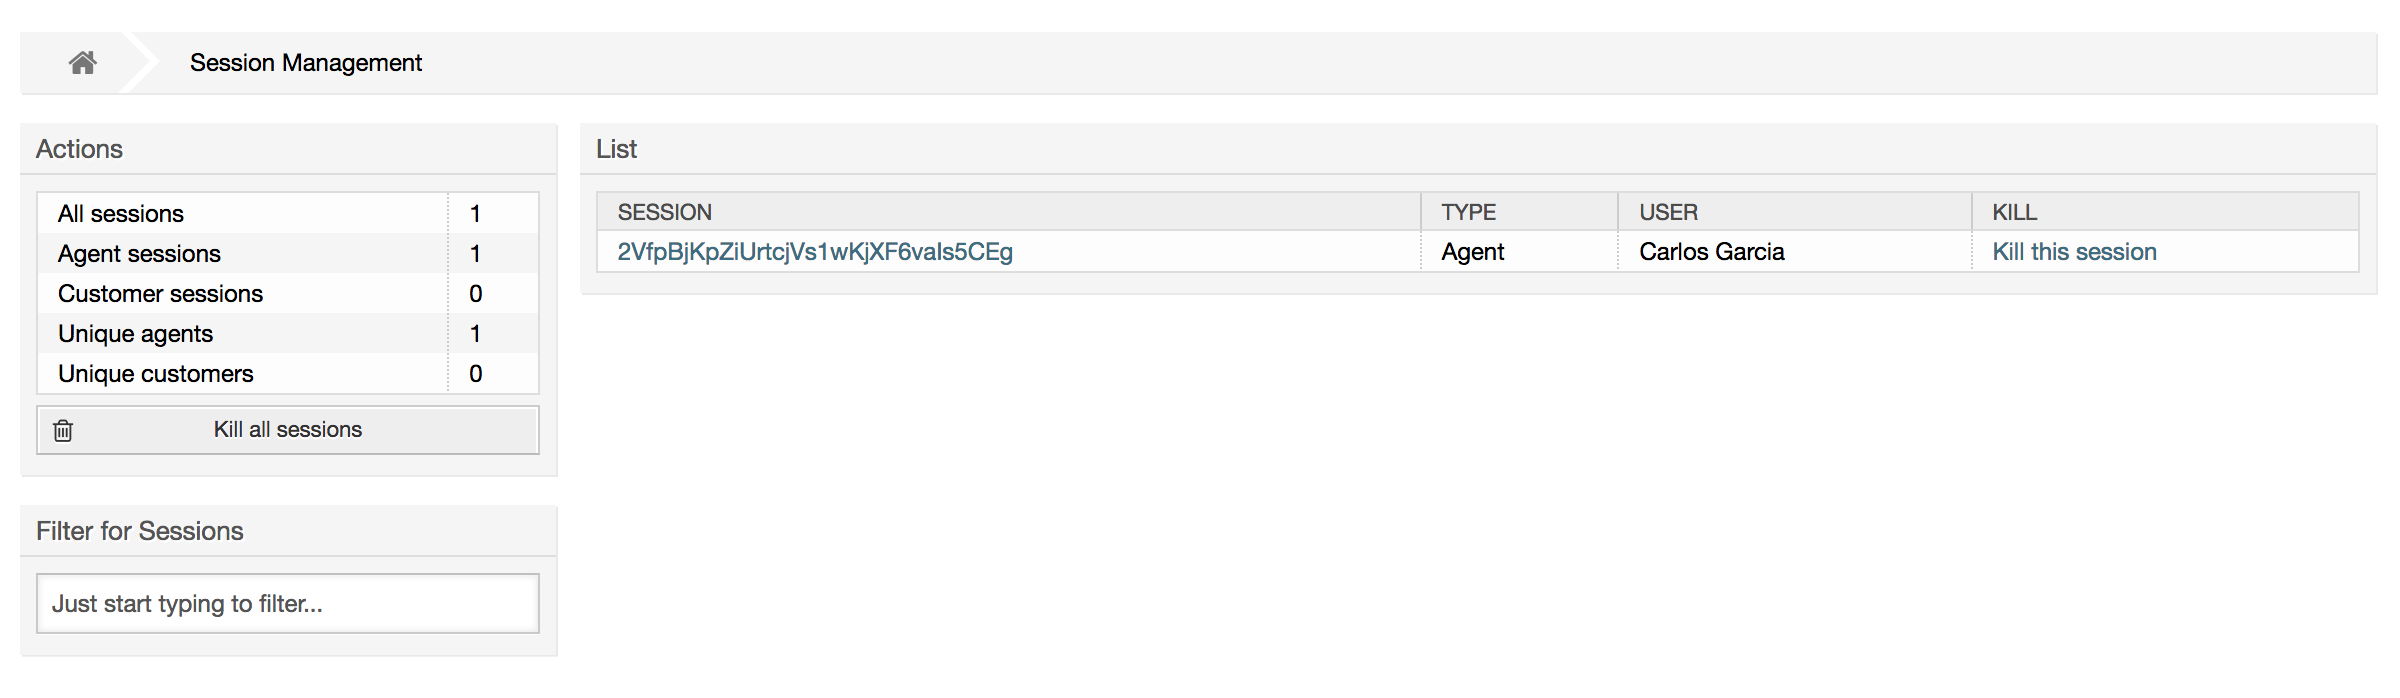
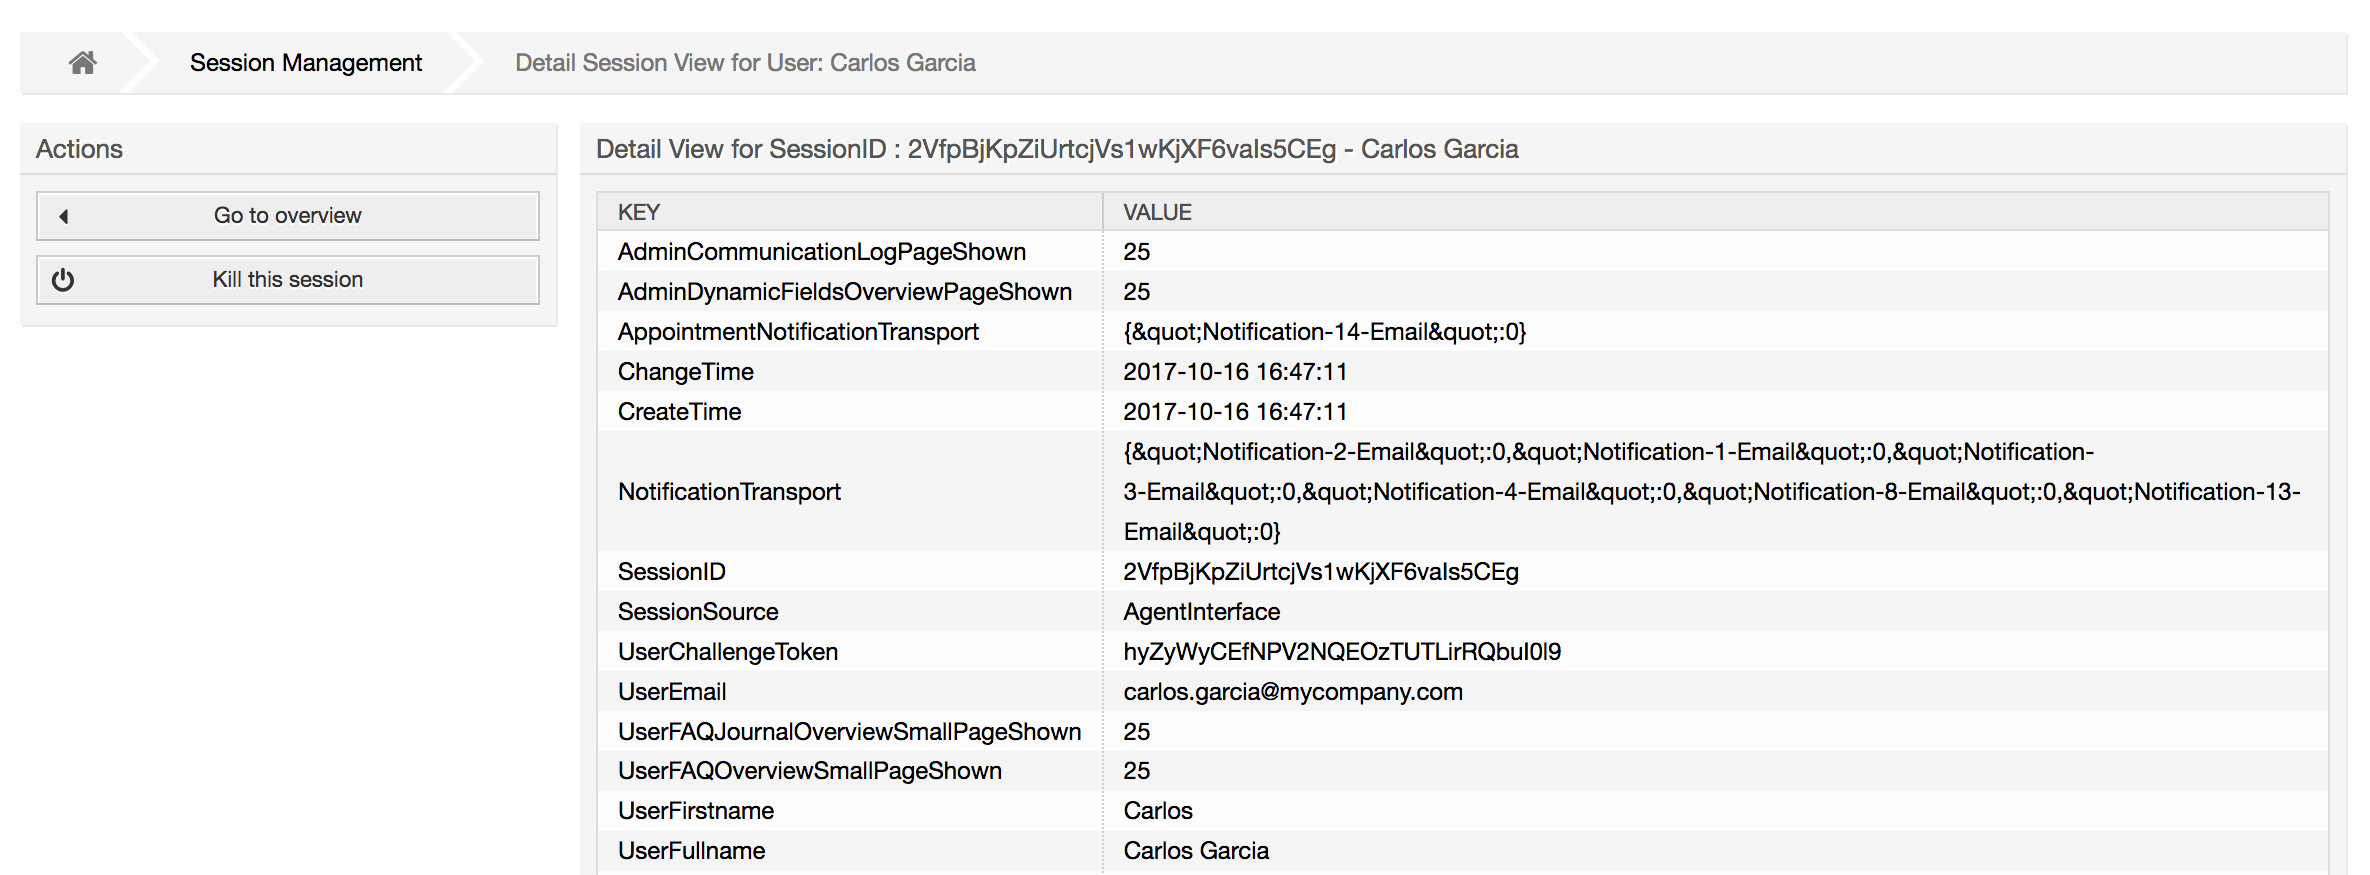
Some statistics about all active sessions are displayed, e.g. how many agents and customer users are logged in and the number of active sessions. Any individual session can be removed by clicking on the Kill this session link on the right-hand side of the list. You also have the option to Kill all sessions, which can be useful if you want to take the system offline. Detailed information for every session is available, too (see figure below).
System Maintenance give the option to schedule one or more maintenance periods for the system. During this period no agents or customers can login into the system (except for Agents in the "admin" group). Current logged users and customers receive a notification about the maintenance (before and during the maintenance period). Administrators have the option to kill the sessions for logged agents and customers, all this in preparation to be able to make changes in the system (e.g. a system update) in a "safe" environment.
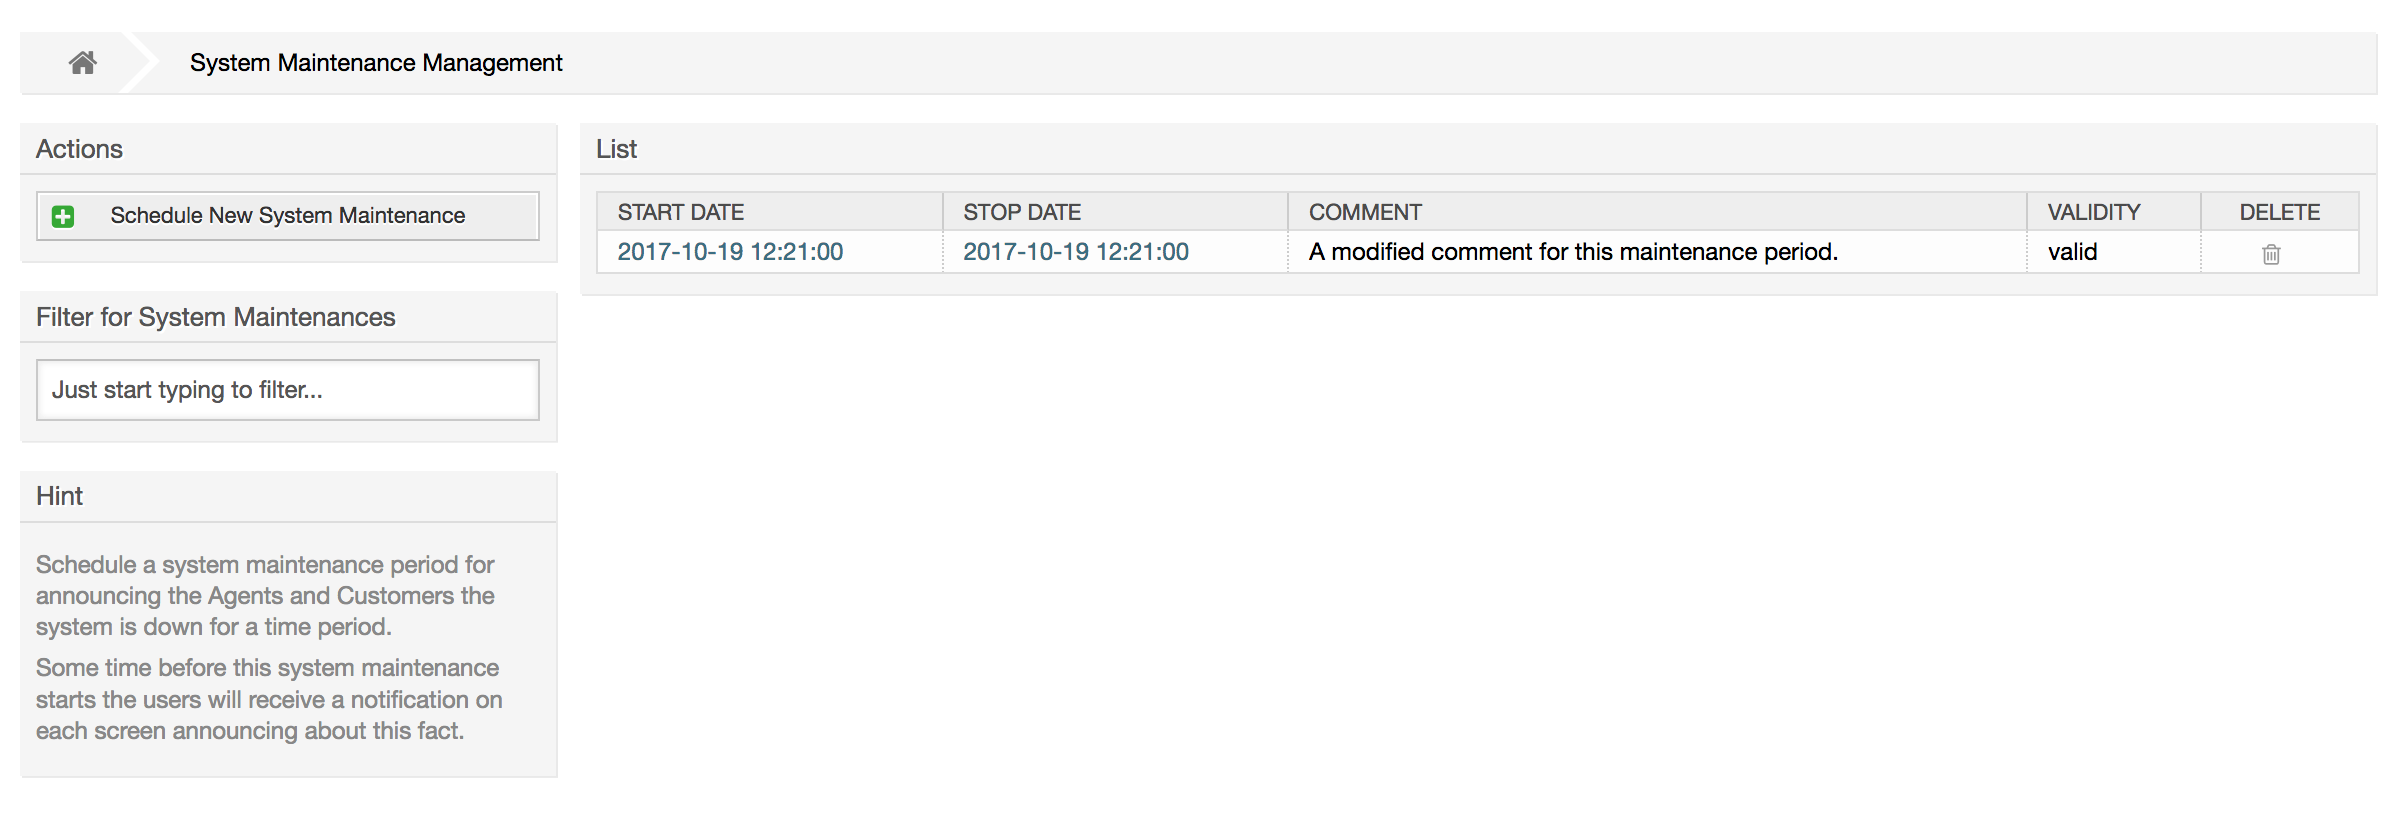
The Start Date and the Stop Date are required fields, and the only rule for this combination is that Start Date can not be a date after the Stop Date.
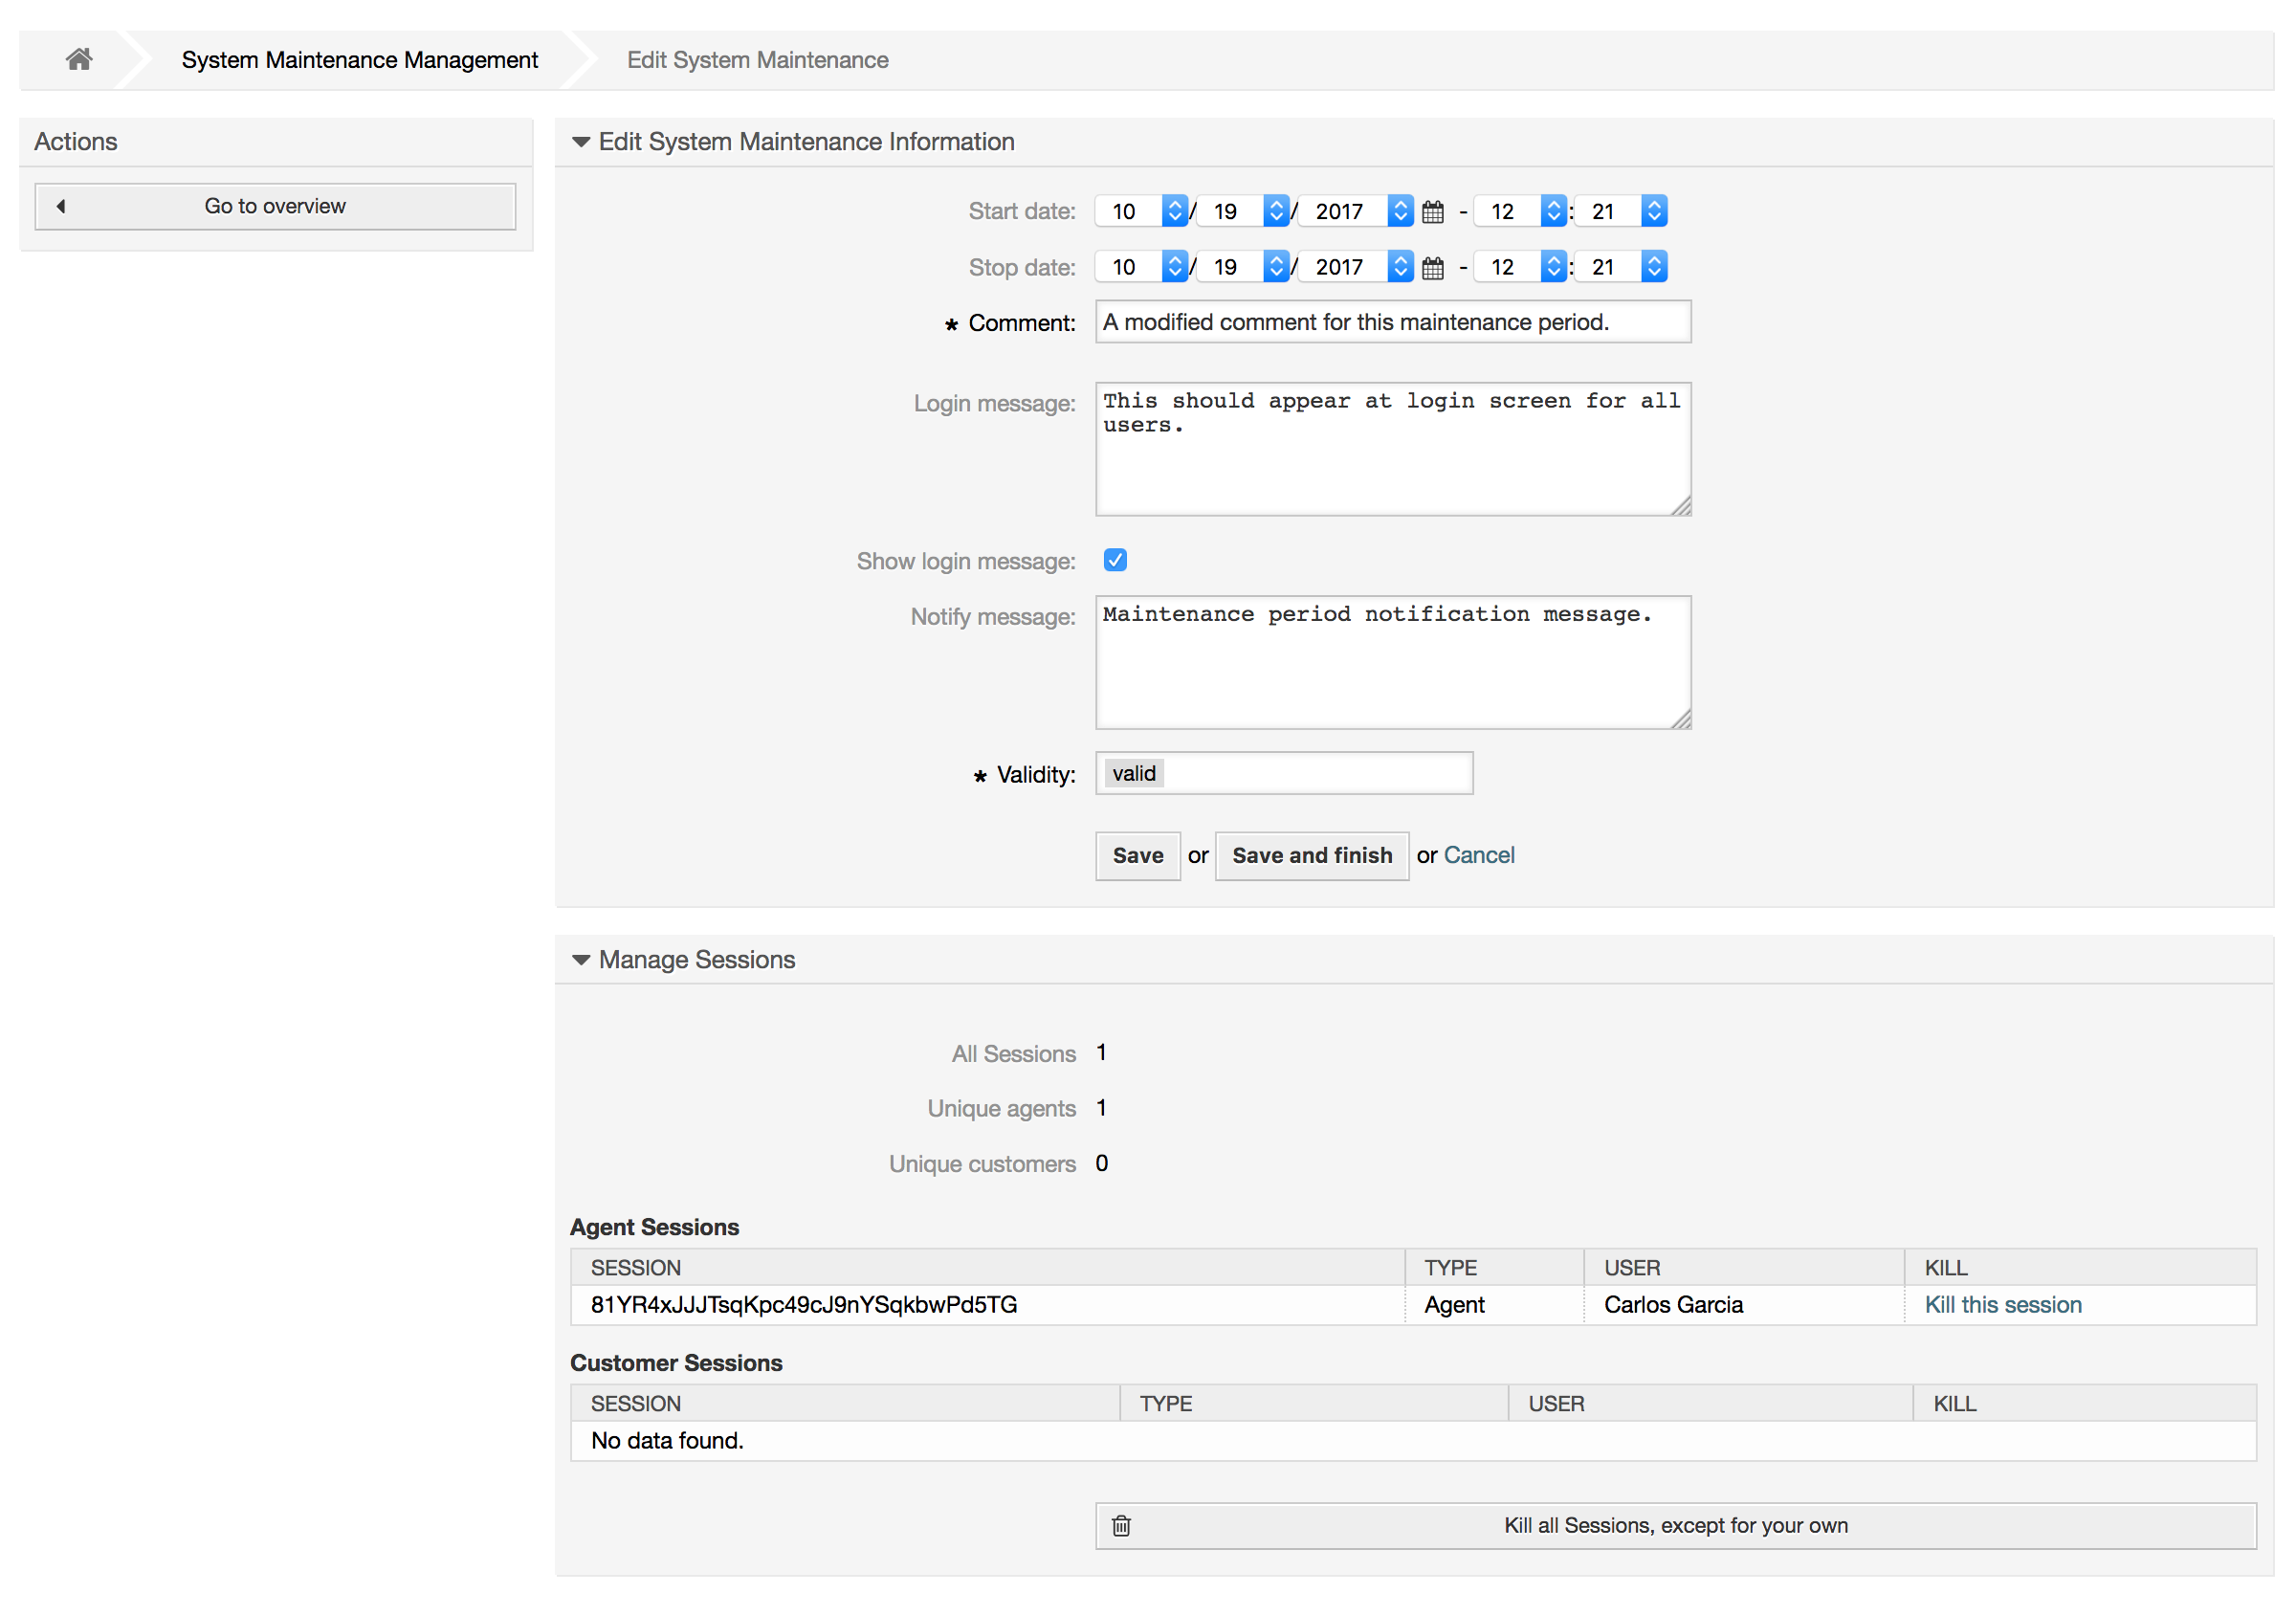
Nachdem eine neue Wartungszeit angelegt wurde, wird eine Übersicht mit Details über aktive Sessions angezeigt, in der Administratoren einzelne oder alle Sessions (außer der aktuellen) beenden können wenn das benötigt ist.
The "System Log" link on the Admin page shows the log entries of the system, reverse chronologically sorted with most recent first (see figure below).
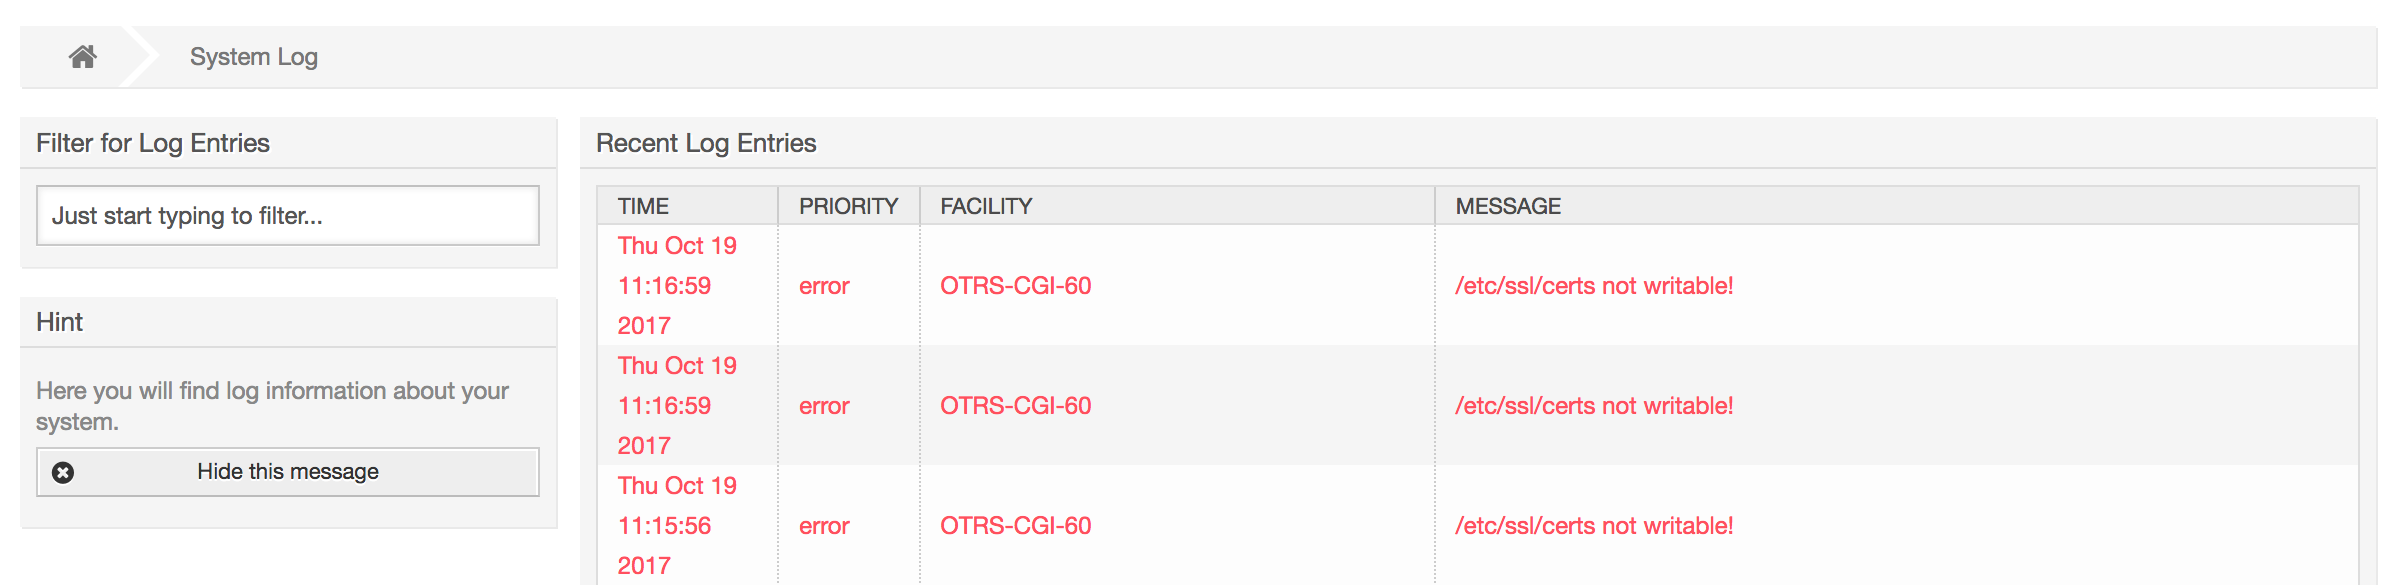
Ein Logeintrag setzt sich aus der Zeit, der Priorität, der betroffenen Systemkomponente und der eigentlichen Meldung zusammen.
Anmerkung
System logs are available via the web interface only on Linux / Unix systems.
The Communication Log frontend in the Admin area allows you to inspect the internal logs about communication handling in OTRS, i.e. sending/receiving emails.
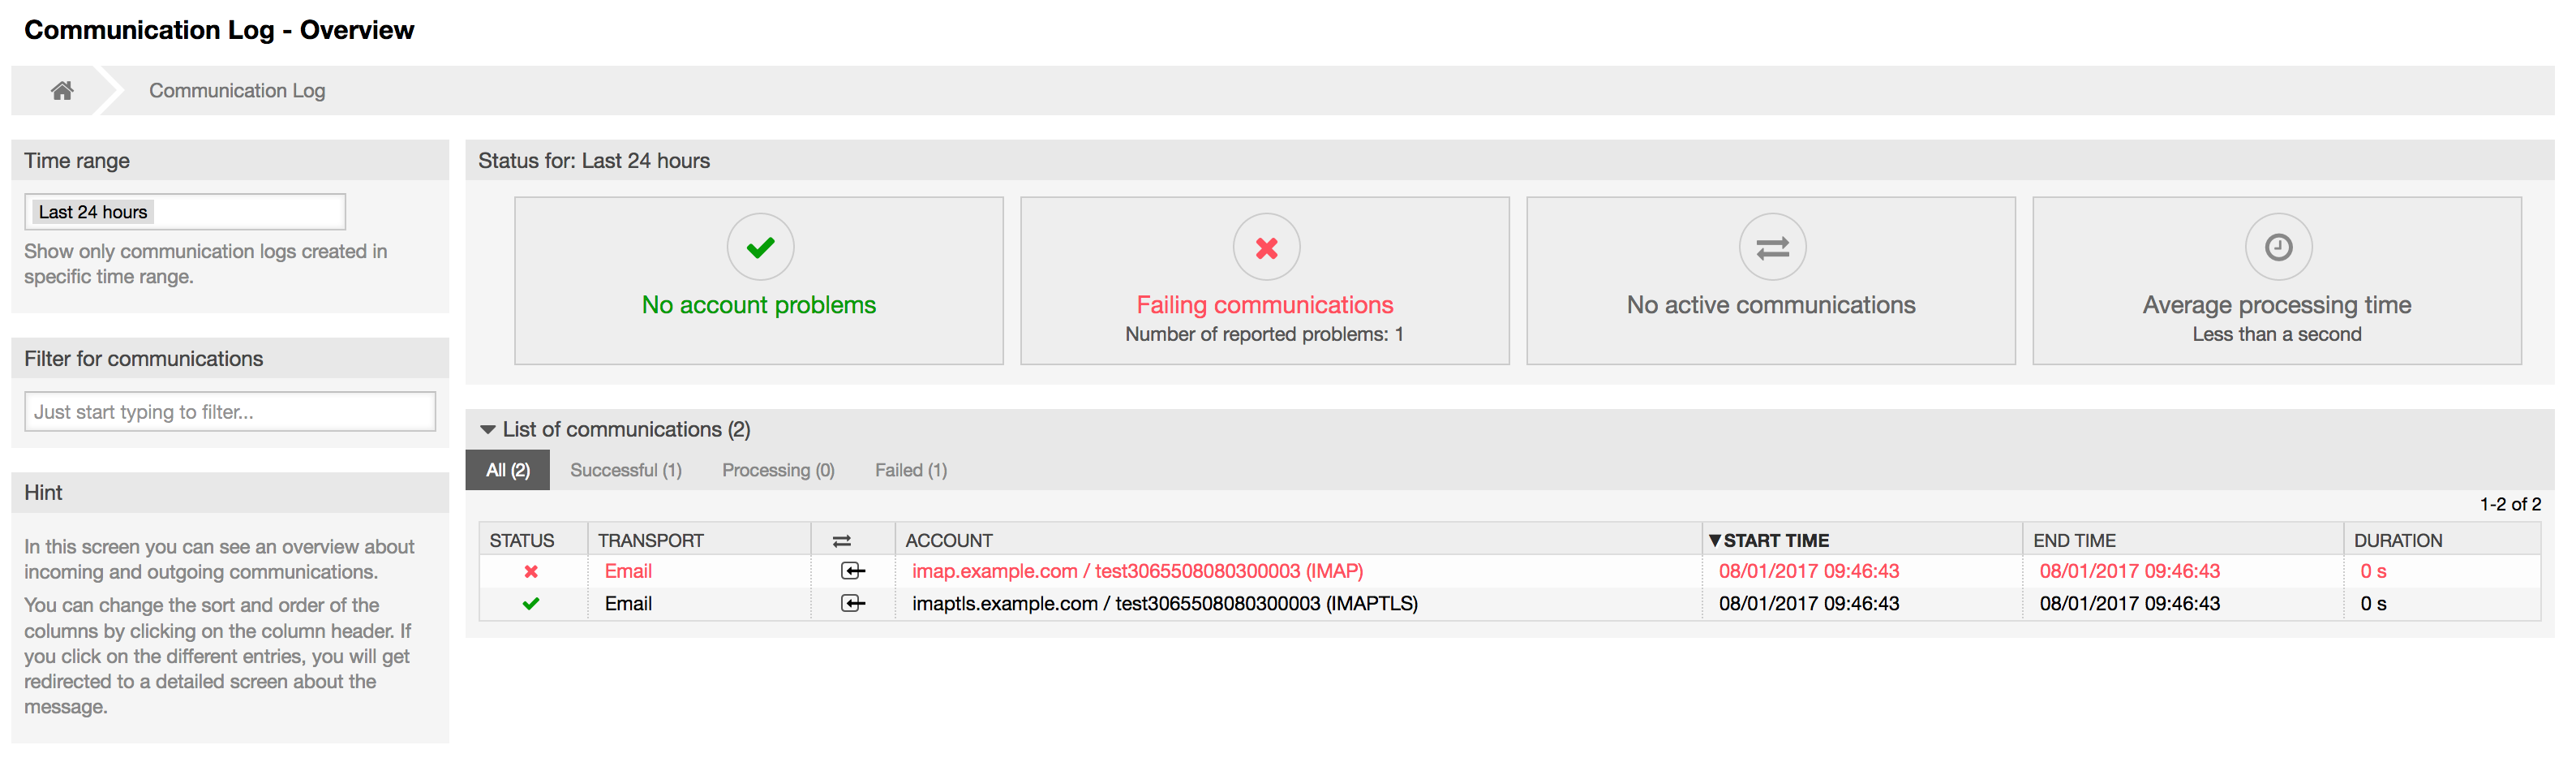
Overview page is a dashboard-like screen with several metrics indicating the overall health of the system, depending on filtered communications.
Account status will signal if you have any issues with configured accounts used for fetching or sending messages.
Communication status will notify you if there are any errors with either account connections or message processing.
Communication state widget will display if there are any active communications currently in the system.
Average processing time is a cumulative time statistic that is needed to complete a communication.
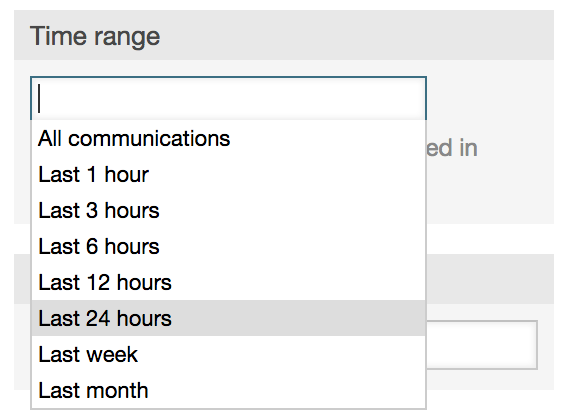
You can select the time range in the left sidebar in order to filter communications depending on their creation time. In addition to this, you can also dynamically filter for any keywords, state of the communication, and you can sort the overview table by all columns.
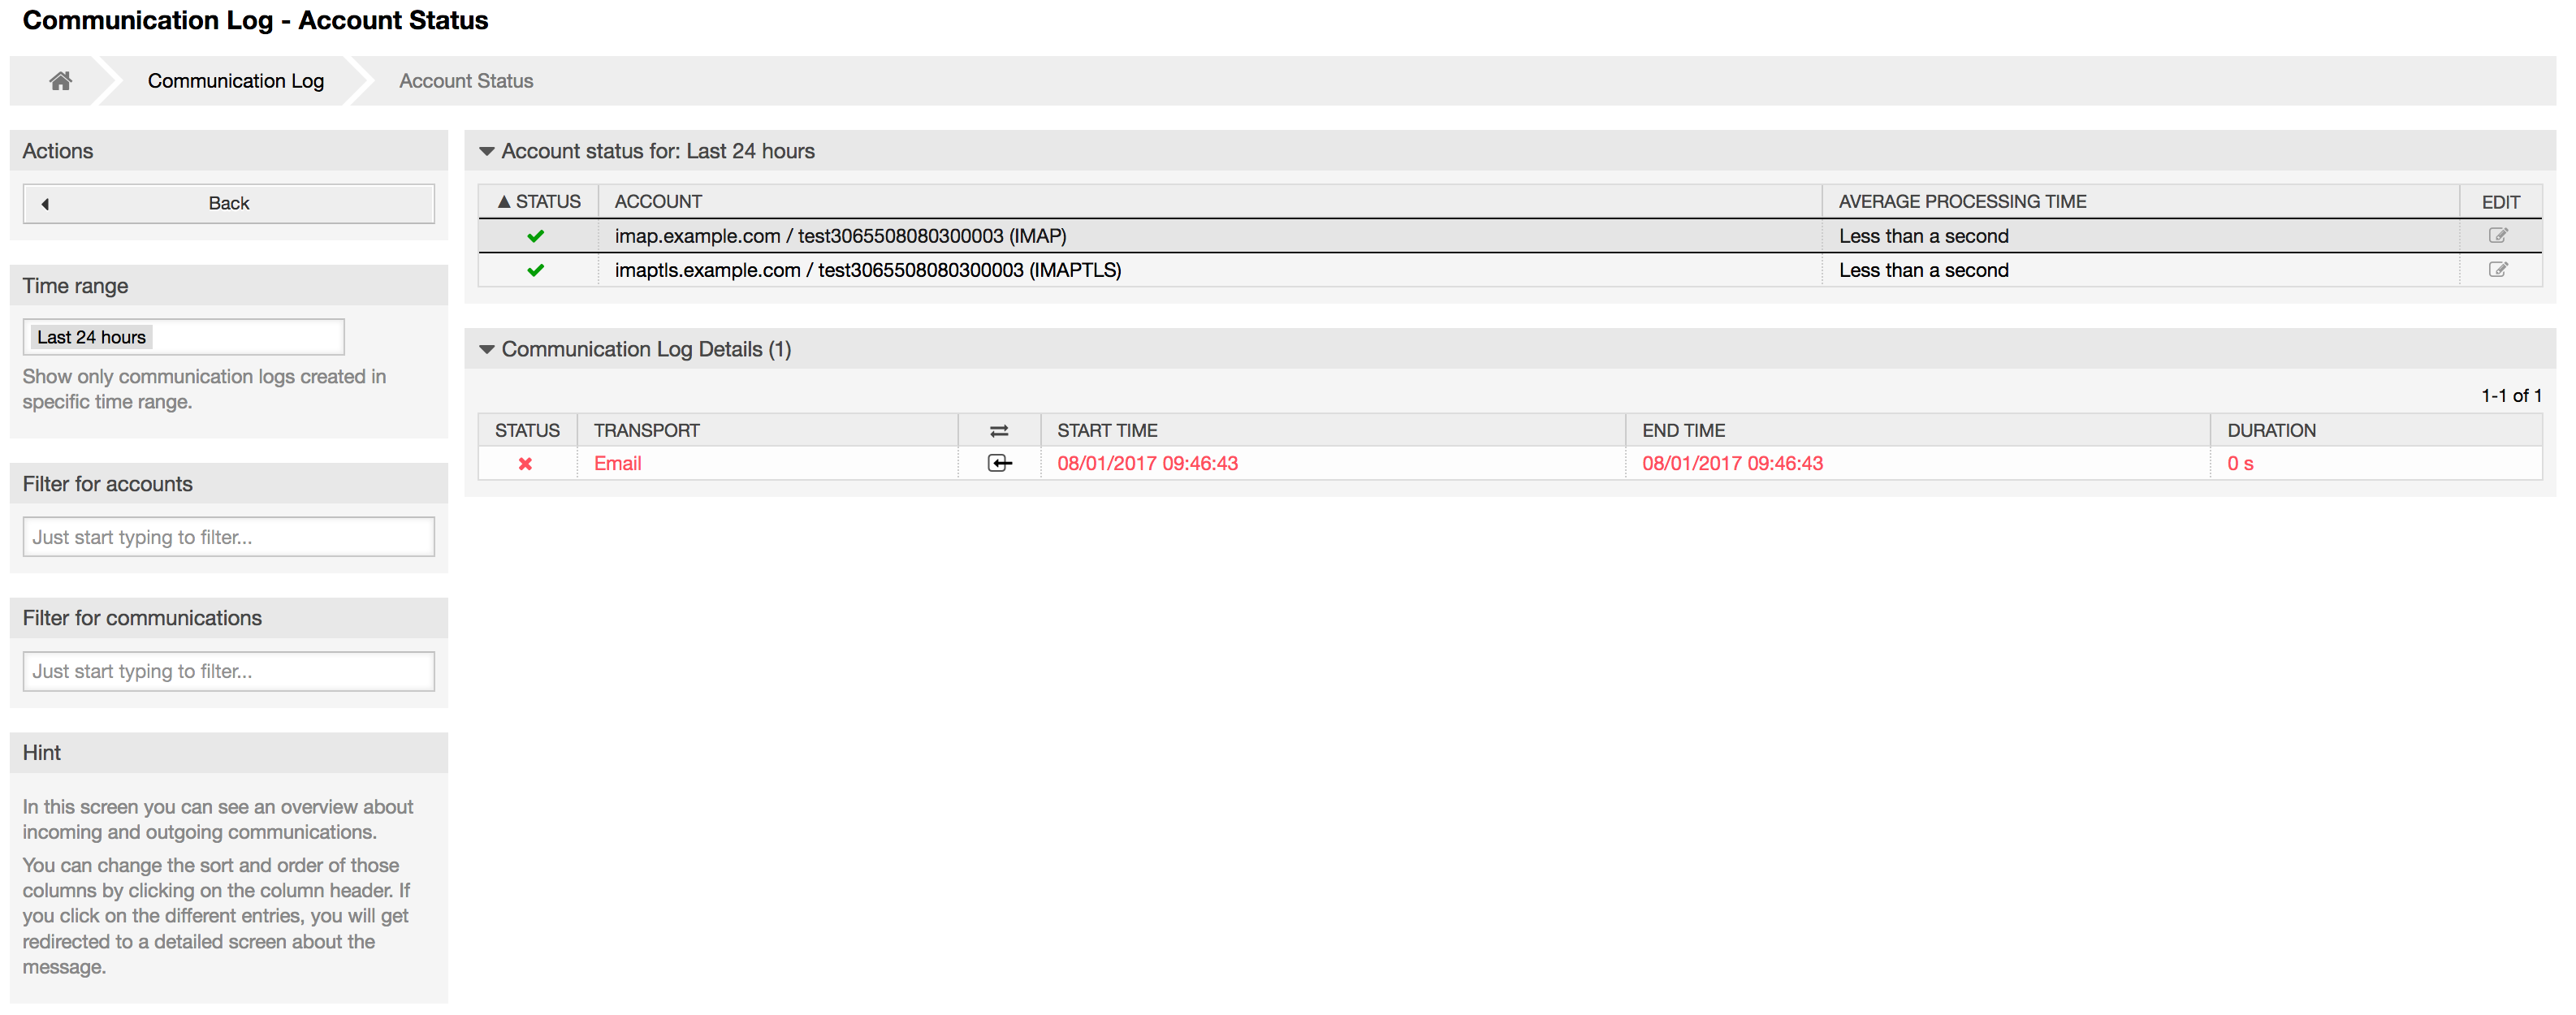
Clicking on account widget will take you to the account status screen, where you can further filter for communications that are related to specific accounts.
If you click on a communication row in any table, you will be presented with a detailed view screen.

Every communication can contain one or more logs, which can be of Connection or Message type.
Connection logs will contain any log messages coming from the modules responsible for connecting to your accounts and fetching/receiving messages.
Message logs will contain any log messages related to specific message processing. Any module working on message themselves can log their actions in this log, giving you a clear overview of what's going on.
You can filter log entries based on their priority, by choosing desired priority in the left sidebar.
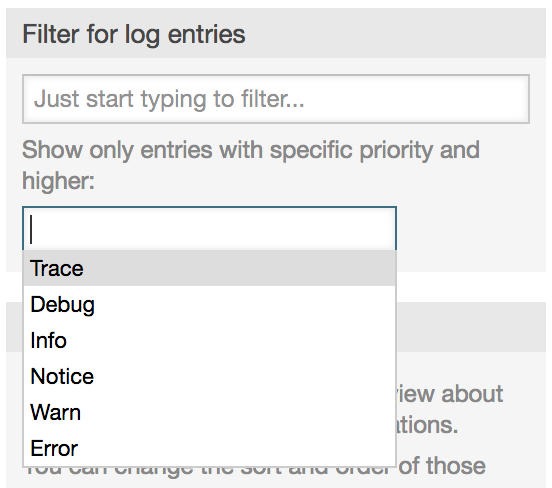
Log level rules apply: by selecting a specific priority, you will get log entries that have that priority set and higher, with Error being the highest.
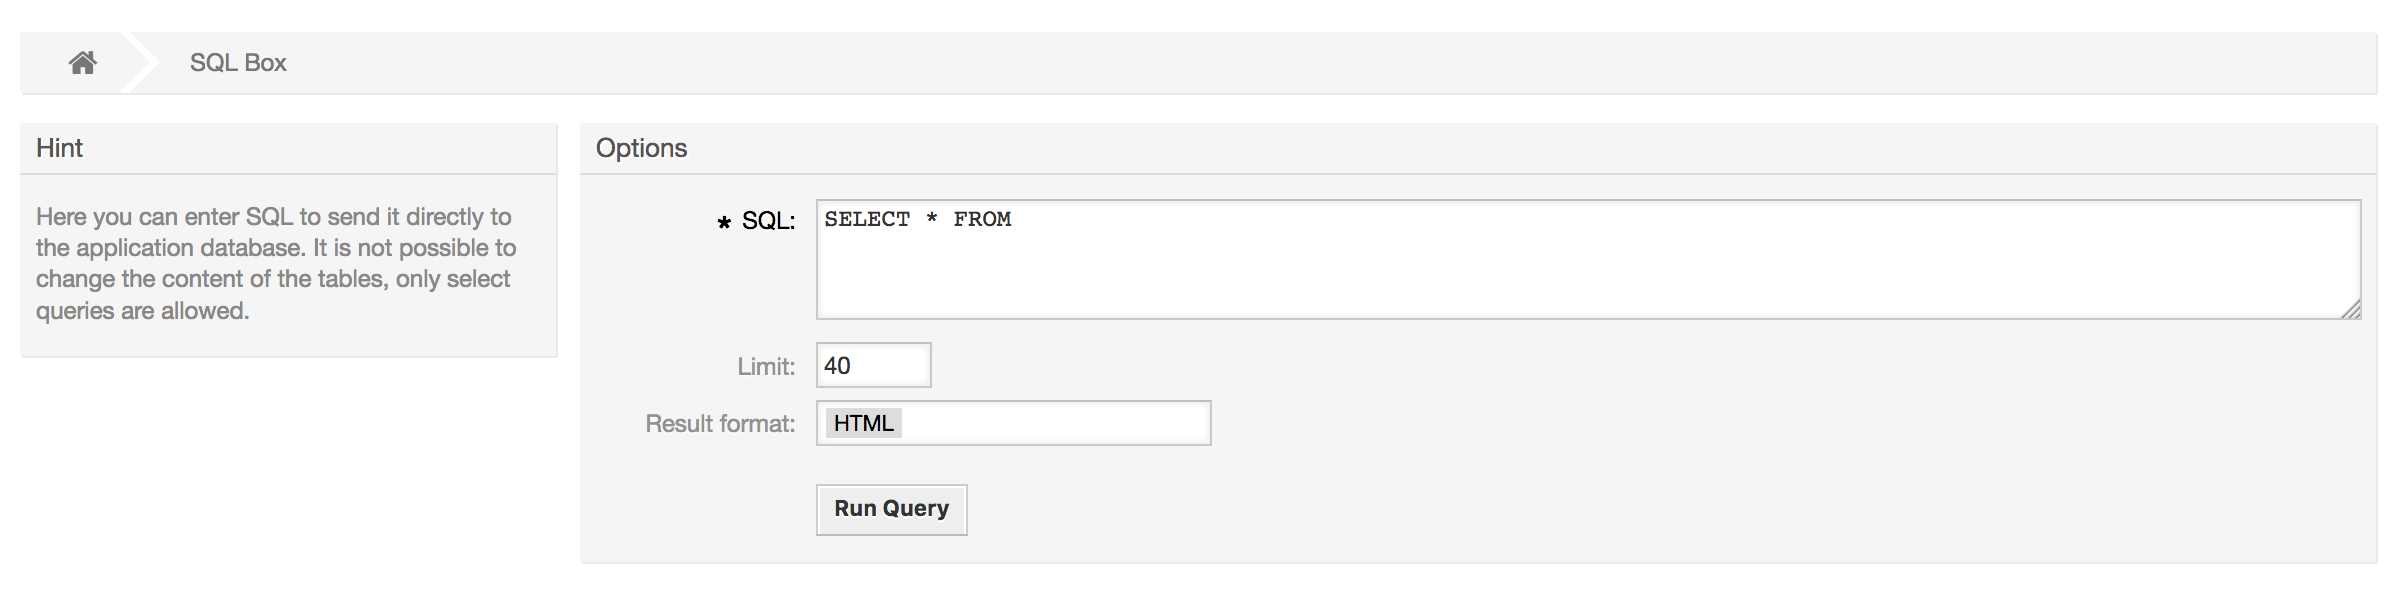
The "SQL Box" link on the Admin page opens a screen that lets you query the content of the tables in the OTRS database (see figure below). It is not possible to change the content of the tables, only 'select' queries are allowed.
Using the Package Manager link on the Admin page, you can install and manage packages that extend the functionality of OTRS (see figure below). See the Additional applications section for a discussion on the extensions that are available from the OTRS repositories.
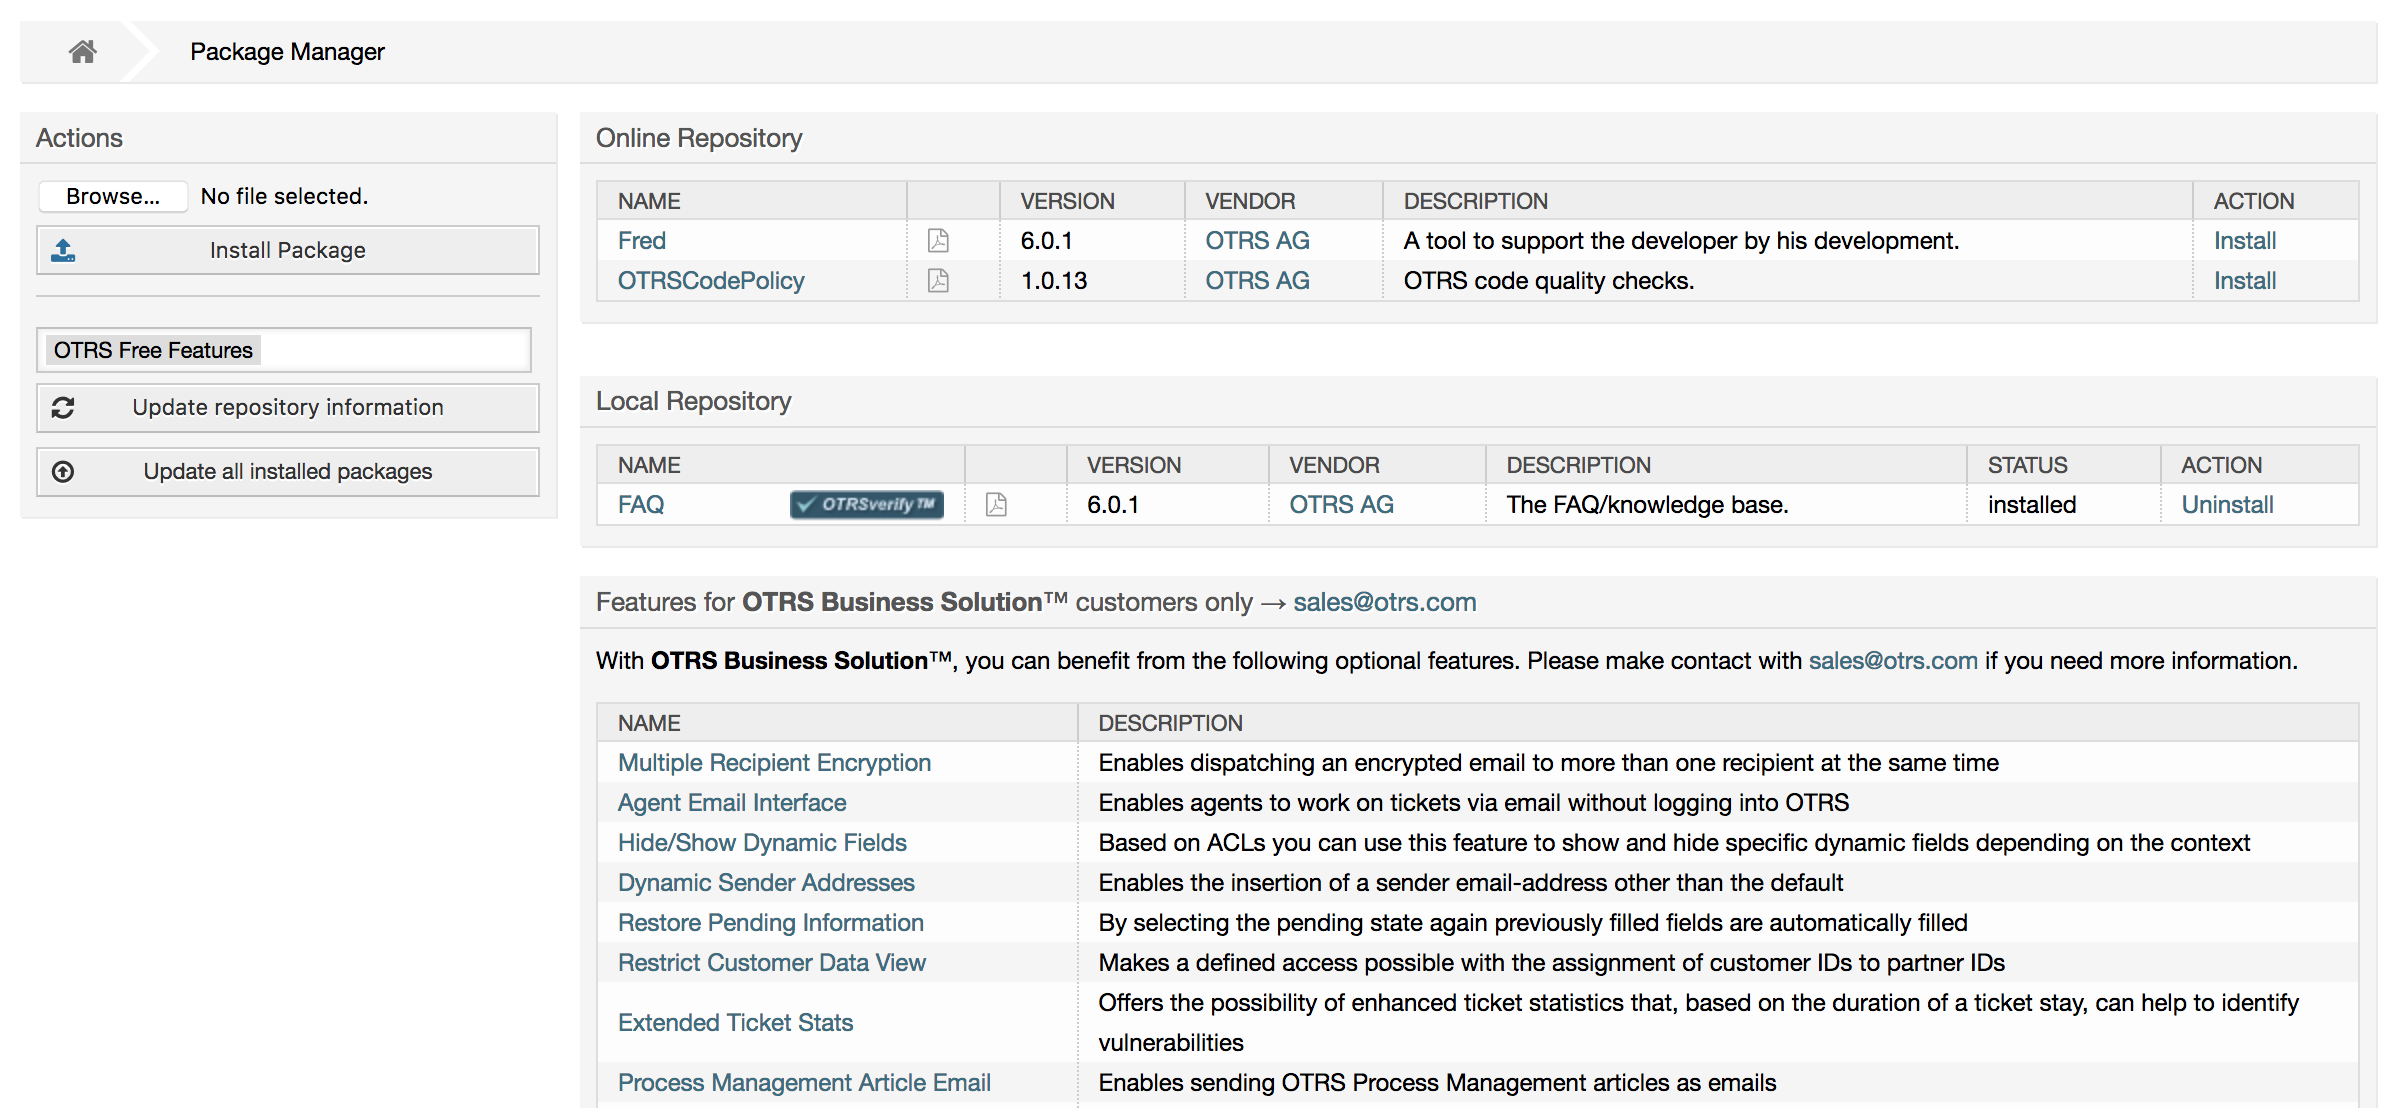
In der Paketverwaltung können Sie die bereits installierten Pakete mit ihrer Versionsinformation einsehen.
Sie können Pakete von einem entfernten Server installieren, indem Sie das Paketverzeichnis im Abschnitt Online-Paketverzeichnis auswählen und auf Verzeichnisinformation aktualisieren klicken. Die verfügbaren Pakete werden rechts tabellarisch dargestellt. Um eines zu installieren, klicken Sie auf "Installieren". Nach der Installation wird das Paket im Abschnitt Lokales Verzeichnis dargestellt.
To update an installed package, the list of available packages in the online repository will show Update in the Action column for any package that has a higher version than the one that is installed locally. Just click Update and it will install the new package version on your system.
In manchen Fällen, wenn beispielsweise ein OTRS-System nicht mit dem Internet verbunden ist, können Sie auch Pakete installieren, die lokal heruntergeladen wurden. Klicken Sie auf den Datei auswählen-Knopf in der "Aktionen"-Liste, und wählen Sie die .opm-Datei auf Ihrem Speichermedium aus. Verwenden Sie dann Paket installieren. Nach der Installation wird das Paket im Abschnitt Lokales Verzeichnis angezeigt. Auf dieselbe Weise können Sie ein bereits installiertes Paket aktualisieren.
In special cases, you might want to configure the Package Manager, e.g., to use a proxy or to use a local repository. Just take a look at the available options in SysConfig under Core::Package.
Since OTRS 6, a new button labeled Update all installed
packages has been added to the sidebar of the package manager
screen. When this button is pressed, an OTRS Daemon task will be scheduled
to update all packages. Alternatively, this action can be also issued from
the command line interface by using the
Admin::Package::UpgradeAll console command.
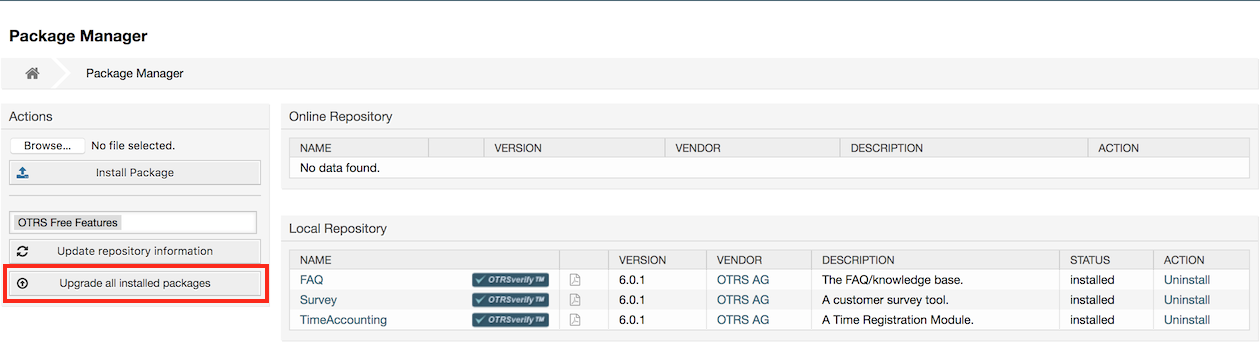
This feature reads the information of all defined package repositories and determines if there is a new version for every installed package in the system and calculates the correct order to update the packages respecting all other package dependencies, even if new versions of existing packages require new packages not yet installed in the system.
Anmerkung
If there are packages installed that do not have a corresponding repository defined in the system, they can not be updated by this feature and will be marked as failed (due to the missing on-line repository).
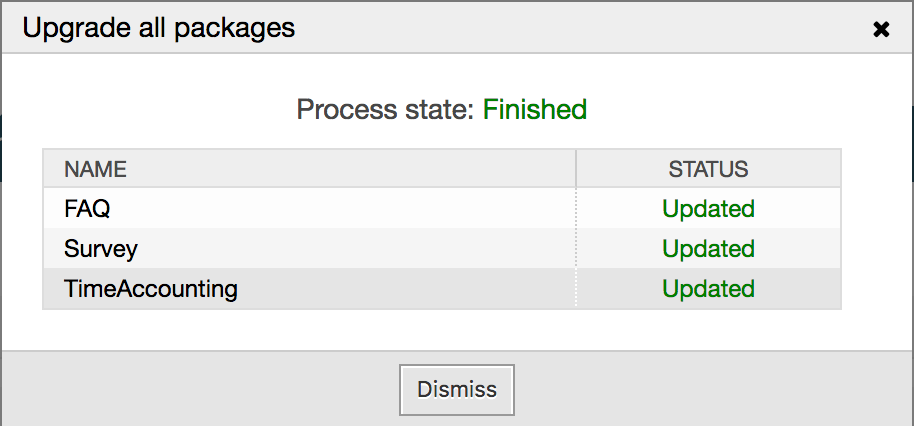
When the process to update all packages is running, a notification bar is added to the package manager screen for easier identification. When notification link is clicked, a progress summary is displayed with the current progress. Also, when the process is running package actions such as "Install", "Update", "Uninstall" and "ReInstall" some actions on the screen might be temporarily disabled in order to avoid conflicts.

When the process finishes (only if it was started in the graphical user interface) the progress notification will change to indicate the new state: it becomes green if all packages was correctly updated or red if there where any failures. Clicking on this notification will show the final summary. In the summary table, a tooltip for the status column of every package can indicate more details about the state. After closing this window, the package manager screen will refresh to show the new version of the installed packages.
The Web Services link leads to the graphical interface where web services (for the OTRS Generic Interface) are created and maintained (see figure below).

The graphical interface for web services configuration is described in more detail in the section "Web Service Graphical Interface".
Dynamic Fields is the place where you setup and manage custom fields for tickets and articles (see figure below).

The dynamic fields configuration is described in more detail in the section "Dynamic Fields Configuration".
Each dynamic field type has its own configuration settings and therefore its own configuration screen.
Anmerkung
In the OTRS framework, dynamic fields can only be linked to tickets and articles by default, but they can be extended to other objects as well.
Via calendar management interface it is possible to add and edit multiple calendars.
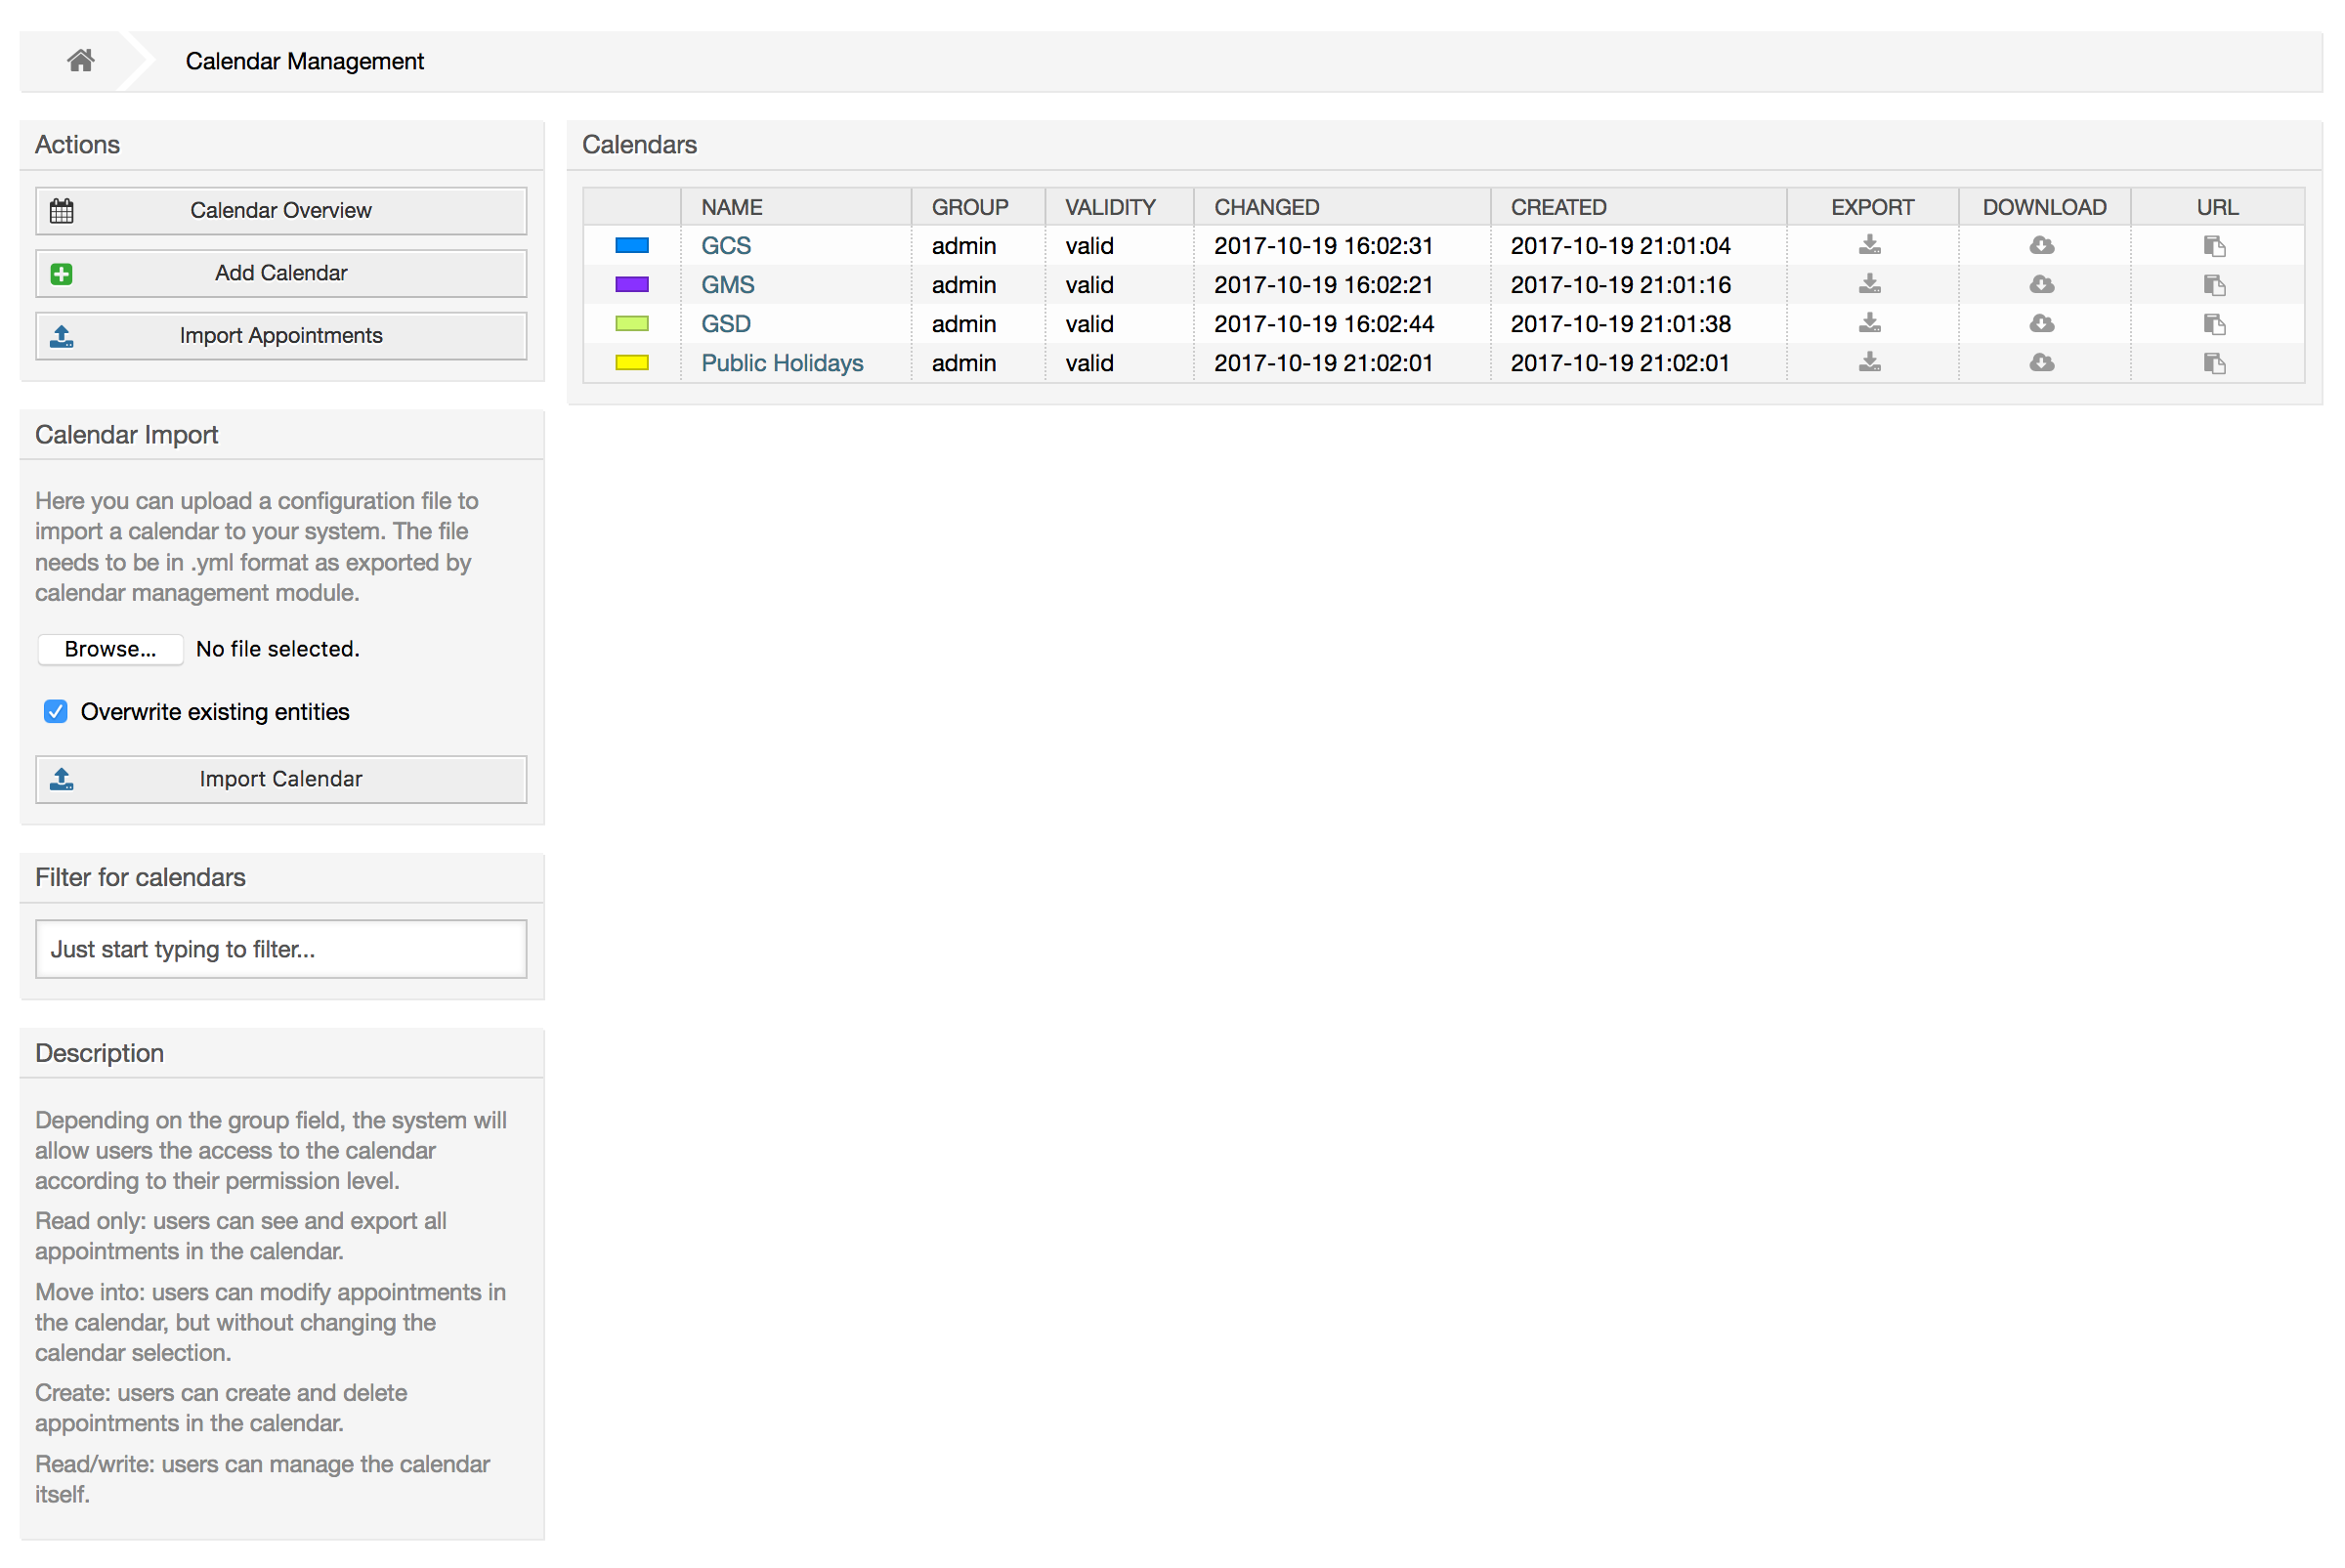
The calendar management is described in more detail in the section Calendar Management.