- Sending/Receiving Emails
- E-Mails senden
- E-Mails empfangen
- Mail Accounts Configured via the OTRS GUI
-
Via Command Line Program and Procmail (
otrs.Console.pl
Maint::PostMaster::Read
) -
Fetching emails via POP3 or IMAP and fetchmail for
otrs.Console.pl Maint::PostMaster::Read - Filtering/Dispatching by OTRS/PostMaster Modules (for More Complex Dispatching)
- Troubleshooting Email Filtering
- Sichere E-Mail mit PGP
- Sichere E-Mail mit S/MIME
OTRS can send out emails via Sendmail, Postfix, Qmail or Exim. The default configuration is to use Sendmail and should work out-of-the-box.
You can configure the sendmail settings via the graphical configuration
frontend (Framework::Core::Sendmail).
OTRS kann E-Mails via SMTP (Simple Mail Transfer Protocol / RFC 821) oder Secure SMTP versenden.
The SMTP server settings can be configured via the SysConfig
(Framework::Core::Sendmail). If you don't see SMTPS
available as an option, the required Perl modules are missing. In that case,
please refer to "Installation
of Perl modules required for OTRS" for instructions.
Before sending, OTRS will queue all emails and let a Daemon task asynchronously handle them in due time. On a normal installation, the emails will be sent out every minute by the OTRS Daemon.
To check the status of email sending, you can use the
bin/otrs.Console.pl Maint::Email::MailQueue console
command with --list switch.
shell> cd /opt/otrs/
shell> bin/otrs.Console.pl Maint::Email::MailQueue --list
  +----+-----------+----------+----------------+--------------------+----------+----------------+-------------------+
  | ID | ArticleID | Attempts | Sender         | Recipient          | Due Time | Last SMTP Code | Last SMTP Message |
  +----+-----------+----------+----------------+--------------------+----------+----------------+-------------------+
  | 28 | 284       | 0        | otrs@localhost | marketing@otrs.com | -        | -              | -                 |
  | 29 | 285       | 0        | otrs@localhost | feedbac@otrs.com   | -        | -              | -                 |
  +----+-----------+----------+----------------+--------------------+----------+----------------+-------------------+

  Mail queue contains 2 message(s)
In order to filter the table, you can use --filter
argument, for example with ID of the send job.
shell> bin/otrs.Console.pl Maint::Email::MailQueue --list --filter ID::28
  +----+-----------+----------+----------------+--------------------+----------+----------------+-------------------+
  | ID | ArticleID | Attempts | Sender         | Recipient          | Due Time | Last SMTP Code | Last SMTP Message |
  +----+-----------+----------+----------------+--------------------+----------+----------------+-------------------+
  | 28 | 284       | 0        | otrs@localhost | marketing@otrs.com | -        | -              | -                 |
  +----+-----------+----------+----------------+--------------------+----------+----------------+-------------------+

  Mail queue contains 1 message(s)

Done.
To delete emails queued for sending, specify either
--delete-all switch, or --delete with
some filter active.
shell> bin/otrs.Console.pl Maint::Email::MailQueue --delete --filter ID::28
Deleted messages from mail queue.
Done.
You can also manually send email without waiting for OTRS Daemon task to
kick in. Simply specify the --send switch.
shell> bin/otrs.Console.pl Maint::Email::MailQueue --send
1 message(s) successfully sent!
Done.
OTRS is able to receive emails from POP3, POP3S, IMAP and IMAPS mail accounts.
Configure your mail accounts via the PostMaster Mail Accounts link on the Admin page.
If a new mail account is to be created (see figure below), then its mail server name, login name and password must be specified. Also, you need to select the mail server type, which can be POP3, POP3S, IMAP or IMAPS. If you don't see your server type available as an option, the required Perl modules are missing on your system. In that case, please refer to Installation of Perl modules required for OTRS for instructions.
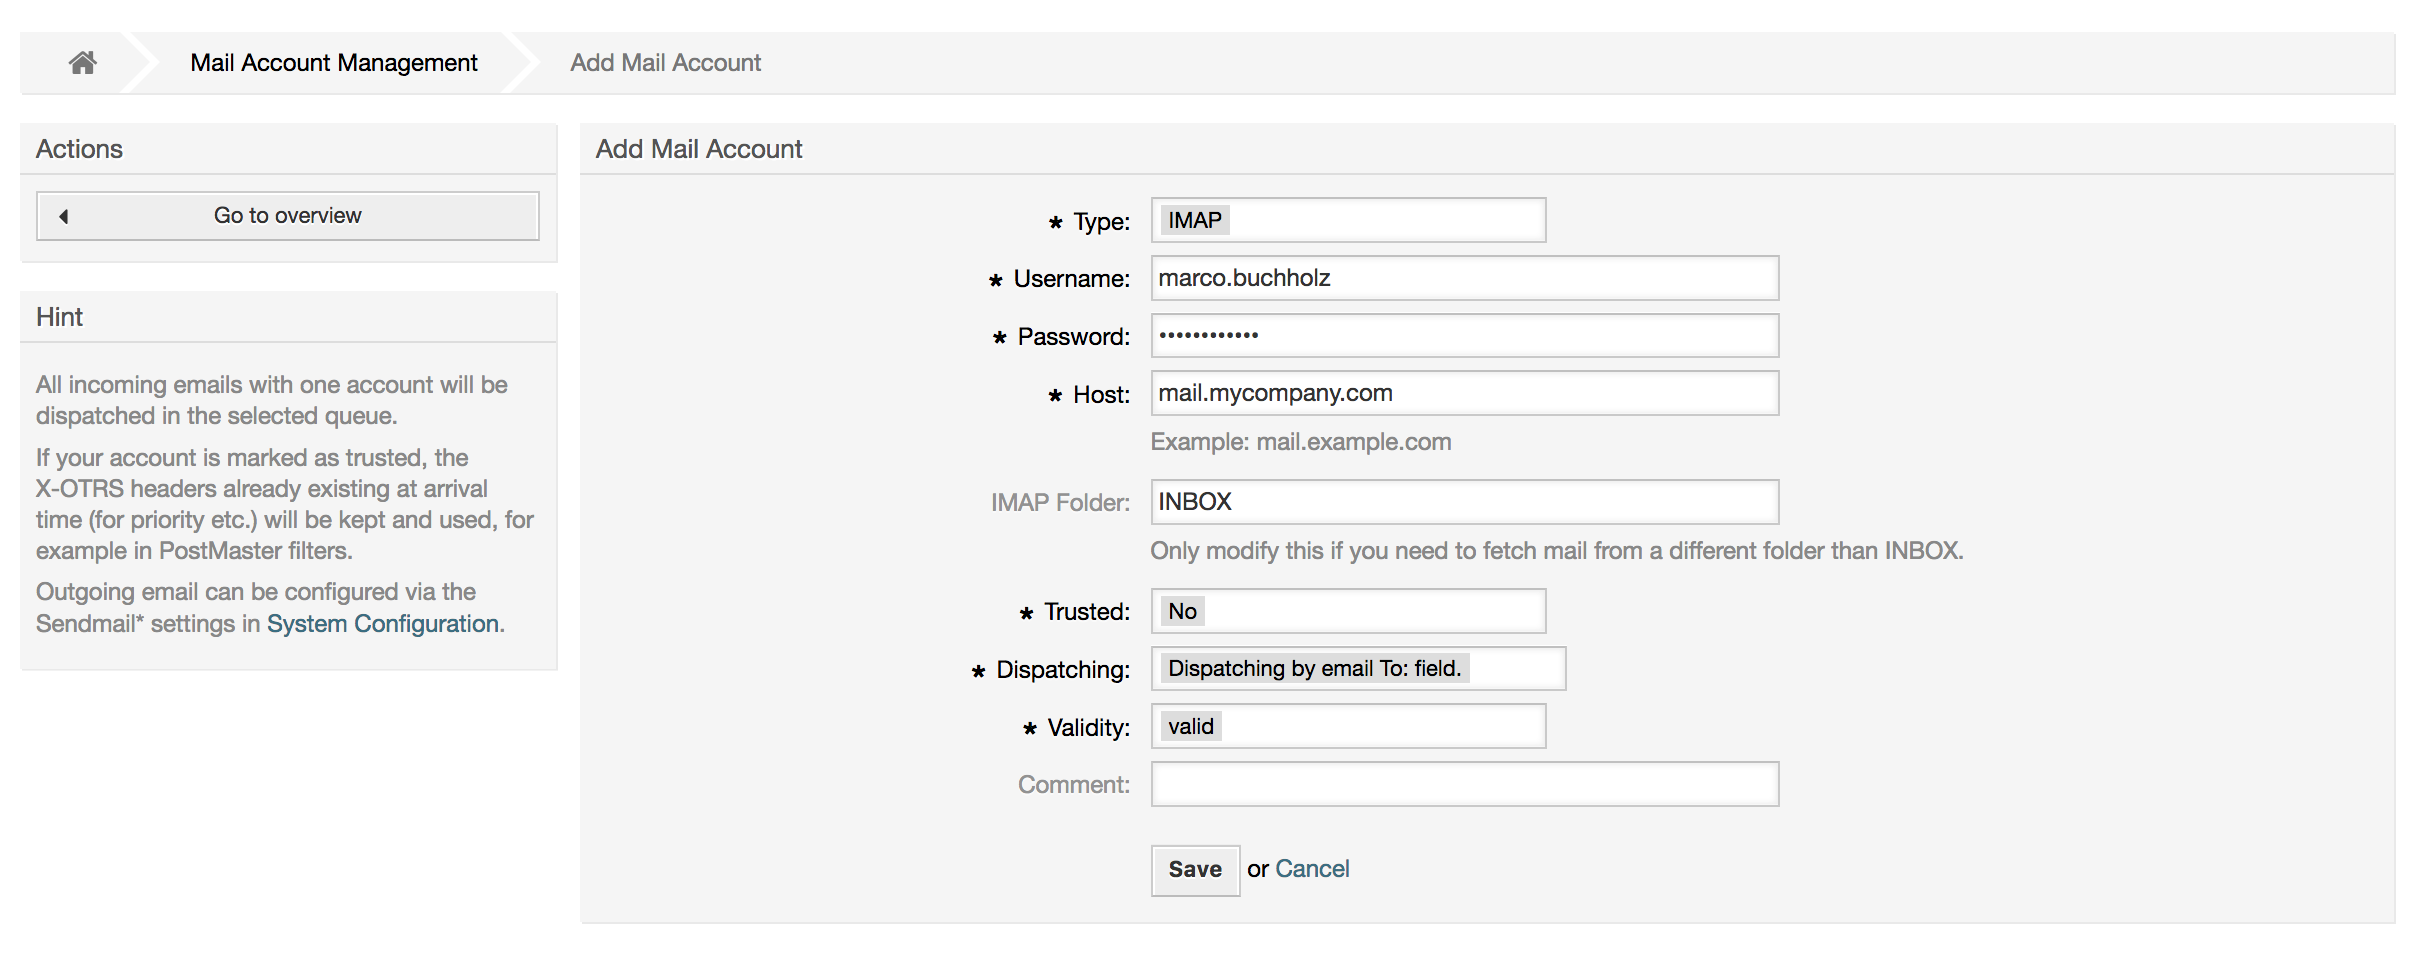
If you select Yes for the value of the Trusted option, any X-OTRS headers attached to an incoming message are evaluated and executed. Because the X-OTRS header can execute some actions in the ticket system, you should set the Trusted option to Yes only for known senders. X-OTRS-Headers are used by the filter module in OTRS. The X-OTRS headers are explained in this table in more detail. Any postmaster filter rules created are executed, irrespective of the Trusted option's setting.
The distribution of incoming messages can be controlled if they need to be sorted by queue or by the content of the To: field. For the Dispatching field, if Dispatching by selected queue is selected, all incoming messages will be sorted into the specified queue. The address where the mail was sent to is disregarded in this case. If Dispatching by email To: field is selected, the system checks if a queue is linked with the address in the To: field of the incoming mail. You can link an address to a queue in the E-mail address management section of the Admin page. If the address in the To: field is linked with a queue, the new message will be sorted into the linked queue. If no link is found between the address in the To: field and any queue, then the message flows into the Raw queue in the system, which is the PostmasterDefaultQueue after a default installation.
All data for the mail accounts are saved in the OTRS database. The
bin/otrs.Console.pl Maint::PostMaster::MailAccountFetch
command uses the settings in the database and fetches the mail. You can
execute it manually to check if all your mail settings are working properly.
On a normal installation, the mail will be fetched every 10 minutes by the OTRS Daemon.
Anmerkung
Beim Abholen löscht OTRS die E-Mails vom POP oder IMAP server. Es besteht keine Möglichkeit, die Mails dort zu erhalten. Wenn Sie dies wünschen, erstellen Sie am Besten Weiterleitungsregeln auf Ihrem Mail-Server. Lesen Sie hierzu bitte in der Dokumentation ihres Mail-Servers nach.
If you cannot use mail accounts to get the email into OTRS, the command line
program bin/otrs.Console.pl Maint::PostMaster::Read
might be a way around the problem. It takes the mails via STDIN and pipes
them directly into OTRS. That means email will be available in your OTRS
system if the MDA (mail delivery agent, e.g. procmail) executes this
program.
To test bin/otrs.Console.pl Maint::PostMaster::Read
without an MDA, execute the command of the following script.
linux:/opt/otrs# cd bin
linux:/opt/otrs/bin# cat ../doc/sample_mails/test-email-1.box | ./otrs.Console.pl Maint::PostMaster::Read
linux:/opt/otrs/bin#
Skript: PostMaster-Test ohne MDA.
Wird die E-Mail in der Queue-Ansicht angezeigt, sind Ihre Einstellungen in Ordnung.
Beispiel 4.2. Routing via Procmail Using otrs.Console.pl
In order to route mails in a specific queue using
otrs.Console.pl use the following example.
| $SYS_HOME/bin/otrs.Console.pl Maint::PostMaster::Read --target-queue=QUEUENAME
When sorting to a subqueue, you must separate the parent and child queue
with a ::.
| $SYS_HOME/bin/otrs.Console.pl Maint::PostMaster::Read --target-queue=QUEUENAME::SUBQUEUE
Procmail ist in der Linux-Umgebung ein sehr bekannter E-Mail-Filter, der höchstwahrscheinlich auf Ihrem System installiert sein wird. Falls nicht, erhalten Sie auf der procmail Homepage weitere Informationen.
Um procmail einzurichten (benötigt einen für procmail konfigurierten MDA
(z. B. sendmail, postfix, exim oder qmail)), kann die
Datei.procmailrc.dist aus dem OTRS-Homeverzeichnis
verwendet werden. Kopieren Sie .procmailrc.dist nach
.procmailrc und nehmen Sie die in Skript: dargestellten
Änderungen vor.
SYS_HOME=$HOME
PATH=/bin:/usr/bin:/usr/local/bin
# --
# Pipe all email into the PostMaster process.
# --
:0 :
| $SYS_HOME/bin/otrs.Console.pl Maint::PostMaster::Read
Skript: Konfiguration von procmail für OTRS.
All email sent to the local OTRS user will be piped into
bin/otrs.Console.pl Maint::PostMaster::Read and then
shown in your QueueView.
In order to get email from your mail server, via a POP3 or IMAP mailbox, to the OTRS machine/local OTRS account and to procmail, use fetchmail.
Anmerkung
Voraussetzung ist eine funktionierende SMTP-Konfiguration auf dem OTRS-Rechner.
You can use the .fetchmailrc.dist in the home directory
of OTRS and copy it to .fetchmailrc. Modfiy/change it
for your needs (see the Example below).
Beispiel 4.3. .fetchmailrc
#poll (mailserver) protocol POP3 user (user) password (password) is (localuser)
poll mail.example.com protocol POP3 user joe password mama is otrs
Don't forget to set the .fetchmailrc to 710
(chmod 710 .fetchmailrc)!
With the .fetchmailrc from the Example above, all email
will be forwarded to the local OTRS account, if the command
fetchmail -a is executed. Set up a cronjob with this
command if you want to fetch the mails regularly.
If you use the bin/otrs.Console.pl
Maint::PostMaster::Read or bin/otrs.Console.pl
Maint::PostMaster::MailAccountFetch method, you can insert or
modify X-OTRS header entries with the PostMaster filter modules. With the
X-OTRS headers, the ticket system can execute some actions on incoming
mails, sort them into a specific queue, change the priority or change the
customer ID, for example. More information about the X-OTRS headers are
available in the section about adding mail accounts from
the OTRS Admin page.
Es gibt verschiedene Standard-Filtermodule:
Anmerkung
Der Jobname (z. B. $Self->{"PostMaster::PreFilterModule"}->{"Jobname"}) muss eindeutig sein!
Kernel::System::PostMaster::Filter::Match is a default
module to match on some email header (e.g. From, To, Subject, ...). It can
set new email headers (e.g. X-OTRS-Ignore: yes or X-OTRS-Queue: spam) if a
filter rule matches. The jobs of the Example below can be inserted in
Kernel/Config.pm
Beispiel 4.4. Example jobs for the filter module
Kernel::System::PostMaster::Filter::Match
# Job Name: 1-Match
# (block/ignore all spam email with From: noreply@)
$Self->{'PostMaster::PreFilterModule'}->{'1-Match'} = {
    Module => 'Kernel::System::PostMaster::Filter::Match',
    Match => {
        From => 'noreply@',
    },
    Set => {
        'X-OTRS-Ignore' => 'yes',
    },
};
# Job Name: 2-Match
# (sort emails with From: sales@example.com and Subject: **ORDER**
# into queue 'Order')
$Self->{'PostMaster::PreFilterModule'}->{'2-Match'} = {
    Module => 'Kernel::System::PostMaster::Filter::Match',
    Match => {
        To => 'sales@example.com',
        Subject => '**ORDER**',
    },
    Set => {
        'X-OTRS-Queue' => 'Order',
    },
};
Kernel::System::PostMaster::Filter::CMD is a default
module to pipe the email into an external command. The output is given to
STDOUT and if the result is true, then set new email header
(e.g. X-OTRS-Ignore: yes or X-OTRS-Queue: spam). The Example below can be
used in Kernel/Config.pm
Beispiel 4.5. Beispiel-Job für das Filtermodul Kernel::System::PostMaster::Filter::CMD
# Job Name: 5-SpamAssassin
# (SpamAssassin example setup, ignore spam emails)
$Self->{'PostMaster::PreFilterModule'}->{'5-SpamAssassin'} = {
    Module => 'Kernel::System::PostMaster::Filter::CMD',
    CMD => '/usr/bin/spamassassin | grep -i "X-Spam-Status: yes"',
    Set => {
        'X-OTRS-Ignore' => 'yes',
    },
};
Kernel::System::PostMaster::Filter::ExternalTicketNumberRecognition
is a default module that adds the possibility to parse external identifiers,
in the email subject, the body or both using regular expressions. It then
stores this value in a defined dynamic field. When an email comes in, OTRS
will first search for an external identifier and when it finds one, query
OTRS on the pre-defined dynamic field. If it finds an existing ticket, it
will update this ticket, otherwise it will create a new ticket with the
external reference number in the separate field.
OTRS SysConfig already provide 4 different settings to setup different
external ticket numbers. If more settings are needed they need to be added
manually. The following example can be used in
Kernel/Config.pm to extend SysConfig settings.
Beispiel 4.6.
Example job for the filter module
Kernel::System::PostMaster::Filter::ExternalTicketNumberRecognition
# Job Name: ExternalTicketNumberRecognition
# External Ticket Number Reconition, check for Incident-<number> in incoming mails subject and
# body from the addeesses <sender>@externalticket.com, if number is found it will be stored in
# the dynamic field 'ExternalNumber' (that need to be setup in the Admin Panel).
$Self->{'PostMaster::PreFilterModule'}->{'000-ExternalTicketNumberRecognition'} = {
    'FromAddressRegExp' => '\\s*@externalticket.com',
    'NumberRegExp'      => 'Incident-(\\d.*)',
    'SearchInSubject'   => '1',
    'SearchInBody'      => '1',
    'TicketStateTypes'  => 'new;open'
    'DynamicFieldName'  => 'ExternalNumber',
    'Module'            => 'Kernel::System::PostMaster::Filter::ExternalTicketNumberRecognition',
    'Name'              => 'Test External Ticket Number',
    'SenderType'        => 'system',
};
Konfigurationsoptionen
FromAddressRegExp
This is an optional setting. Only mails matching this From: address will be considered for this filter. You can adjust this setting to the sender address your external system uses for outgoing mails. In case this address can differ, you can set this option to empty. OTRS will in that case not check the sender address.
NumberRegExp
This is a mandatory setting. This setting contains the regular expression OTRS will use to extract the ticket number out of the subject and/or ticket body. The default regular expression will match occurrences of for example 'Incident-12354' and will put the part between parentheses in the dynamic field field, in this case '12354'.
SearchInSubject
Wenn diese Variable auf '1' gesetzt ist, wird der E-Mailbetreff nach einer Ticketnummer durchsucht.
SearchInBody
Wenn diese Variable auf '1' gesetzt ist, wird der E-Mailbody nach einer Ticketnummer durchsucht.
TicketStateTypes
This is an optional setting. If given, it will search OTRS only for open external tickets of given state types. The state types are separated with semicolons.
DynamicField
This is a required setting. It defines the dynamic filed that is used to store the external number (the field name must exist in the system and has to be valid).
SenderType
Definiert den Absender Typ welcher bei der Ticket erstellung verwendet wird.
Kernel::System::PostMaster::Filter::Decrypt is a default
module that is capable to decrypt an encrypted incoming email message
(S/MIME or PGP) placing the unencrypted message body in the email header
X-OTRS-BodyDecrypted to be processed later. Additionally it can also update
the email body to the unencrypted version.
In order to decrypt the emails the system needs to be properly configured for S/MIME and/or PGP and have the needed private keys to decrypt the information.
This module is disabled by default and it can be configured directly in the System Configuration in the Admin Panel.
Konfigurationsoptionen
StoreDecryptedBody
Set this option to "1" to update the email body to the unencrypted version if the decryption was successful. Be aware that using this the emails will be stored unencrypted and there is no possible way to revert this action.
Natürlich ist es auch möglich, eigene PostMaster-Filtermodule zu entwickeln.
This section shows some common issues and things to consider when troubleshooting Postmaster filters.
The filters are worked in order of their alphabetically sorted filter names. The last filter wins for a certain field to be set, when the criteria match twice.
Stop After Match can prevent a second match.
Make sure the regular expression is valid.
Headers can be set as to control OTRS, but are not written in the mail itself.
When matching one From, CC, TO, use EMAILADDRESS: <your@address>
The Mailbox must be trusted.
The match criteria are AND conditions.
Ticket properties can not be matched by the postmaster filter.
Anmerkung
Details about Postmaster filter processing are also present in communication logs. Make sure to check Communication Log in the Admin area.
In OTRS können ausgehende E-Mails mit Hilfe von PGP signiert oder verschlüsselt werden. Ebenfalls ist es möglich verschlüsselte Nachrichten zu entschlüsseln. Die Ver- und Entschlüsselung mit PGP wird mit Hilfe des GPL-Werkzeugs GnuPG vorgenommen. Um GnuPGP für OTRS einzurichten, sind die folgenden Schritte notwendig:
Erste Aufgabe ist es, das entsprechende GnuPG-Software-Paket zu installieren, welches bei den meisten Linux-Distributionen mitgeliefert wird. Dies sollte mit Hilfe des jeweiligen Paketmanagers leicht durchgeführt werden können.
Im zweiten Schritt muss das soeben installierte GnuPG zur Benutzung für OTRS konfiguriert werden. Dies geschieht auf der Kommandozeilenebene durch einen Aufruf von GnuPG, der die notwendigen Verzeichnisse anlegt und den privaten Schlüssel erzeugt. Der Aufruf muss als Benutzer 'otrs' durchgeführt werden.
    linux:~# su otrs
    linux:/root$ cd
    linux:~$ pwd
    /opt/otrs
    linux:~$ gpg --gen-key
    gpg (GnuPG) 1.4.2; Copyright (C) 2005 Free Software Foundation, Inc.
    This program comes with ABSOLUTELY NO WARRANTY.
    This is free software, and you are welcome to redistribute it
    under certain conditions. See the file COPYING for details.

    gpg: directory `/opt/otrs/.gnupg' created
    gpg: new configuration file `/opt/otrs/.gnupg/gpg.conf' created
    gpg: WARNING: options in `/opt/otrs/.gnupg/gpg.conf' are not yet active during t
    his run
    gpg: keyring `/opt/otrs/.gnupg/secring.gpg' created
    gpg: keyring `/opt/otrs/.gnupg/pubring.gpg' created
    Please select what kind of key you want:
       (1) DSA and Elgamal (default)
       (2) DSA (sign only)
       (5) RSA (sign only)
    Your selection? 1
    DSA keypair will have 1024 bits.
    ELG-E keys may be between 1024 and 4096 bits long.
    What keysize do you want? (2048)
    Requested keysize is 2048 bits
    Please specify how long the key should be valid.
         0 = key does not expire
      <n>  = key expires in n days
      <n>w = key expires in n weeks
      <n>m = key expires in n months
      <n>y = key expires in n years
    Key is valid for? (0)
    Key does not expire at all
    Is this correct? (y/N) y

    You need a user ID to identify your key; the software constructs the user ID
    from the Real Name, Comment and Email Address in this form:
        "Heinrich Heine (Der Dichter) <heinrichh@duesseldorf.de>"

    Real name: Ticket System
    Email address: support@example.com
    Comment: Private PGP Key for the ticket system with address support@example.com
    You selected this USER-ID:
    "Ticket System (Private PGP Key for the ticket system with address support@examp
    le.com) <support@example.com>"

    Change (N)ame, (C)omment, (E)mail or (O)kay/(Q)uit? O
    You need a Passphrase to protect your secret key.

    Passphrase: secret
    Repeat passphrase: secret

    We need to generate a lot of random bytes. It is a good idea to perform
    some other action (type on the keyboard, move the mouse, utilize the
    disks) during the prime generation; this gives the random number
    generator a better chance to gain enough entropy.
    ++++++++++.+++++++++++++++++++++++++....+++++.+++++...+++++++++++++++++++++++++.
    +++++++++++++++++++++++++.+++++.+++++.+++++++++++++++++++++++++>++++++++++>+++++
    .......>+++++<+++++................................+++++

    Not enough random bytes available.  Please do some other work to give
    the OS a chance to collect more entropy! (Need 280 more bytes)

    ++++++++++.+++++..++++++++++..+++++....++++++++++++++++++++.+++++++++++++++.++++
    ++++++++++++++++++++++++++.++++++++++.+++++++++++++++.++++++++++.+++++++++++++++
    ..+++++>.+++++....>+++++........................................................
    ...........................................................>+++++<+++++.........
    .............+++++^^^
    gpg: /opt/otrs/.gnupg/trustdb.gpg: trustdb created
    gpg: key 7245A970 marked as ultimately trusted
    public and secret key created and signed.

    gpg: checking the trustdb
    gpg: 3 marginal(s) needed, 1 complete(s) needed, PGP trust model
    gpg: depth: 0  valid:   1  signed:   0  trust: 0-, 0q, 0n, 0m, 0f, 1u
    pub   1024D/7245A970 2006-02-03
          Key fingerprint = 2ED5 BC36 D2B6 B055 7EE1  5833 1D7B F967 7245 A970
     uid                  Ticket System (Private pgp key for ticket system with addre
    ss support@example.com) <support@example.com>
    sub   2048g/52B97069 2006-02-03

    linux:~$
Skript: Konfiguration von GnuPG.
Wie man sehen kann, genügt es bei den meisten Fragen die Vorgabe mit <EINGABE> zu bestätigen. Lediglich die Angabe zur Person des Schlüsselbesitzers ist zu vervollständigen bzw. zum Ende hin ist an der mit (passphrase) gekennzeichneten Stelle die Passphrase für den zu generierenden Schlüssel einzugeben.
In the screen for the PGP settings, PGP should be activated for OTRS (first option). Also, the path to the gpg program should be set and checked.
Die nächste Einstellung (PGP::Options) muss ggf. modifiziert werden. Es handelt sich um die Parameter, mit denen OTRS das Programm gpg aufruft. Hier ist insbesondere die Option für die Lage des GnuPG-Konfigurationsverzeichnisses des OTRS-Benutzers otrs wichtig. Im Beispiel ist dies: /opt/otrs/.gnupg. Dieses Verzeichnis wurde im Schritt 1 automatisch von GnuPG angelegt.
Über die letzte Option (PGP::Key::Password) können die Schlüssel-Werte-Paare für die IDs und Passphrasen der eigenen PGP-Schlüssel dem Ticket System bekannt gemacht werden. Noch einmal genauer: da andere Kommunikationspartner an das Ticket-System E-Mails mit dessen öffentlichen Schlüssel verschlüsselt schicken, kann OTRS mit den in dieser Option angegebenen privaten Schlüsseln solchermaßen verschlüsselte Mails entschlüsseln.
Woher bekommt man die ID des eigenen Schlüssels? Die ID steckt schon in der Ausgabe der Schlüsselgenerierung (siehe Schritt 1). Man kann die ID aber auch als Benutzer 'otrs' jederzeit über die Kommandozeile ermitteln:
    linux:~# su otrs
    linux:/root$ cd
    linux:~$ pwd
    /opt/otrs
    linux:~$ gpg --list-keys
    /opt/otrs/.gnupg/pubring.gpg
    ----------------------------
    pub   1024D/7245A970 2006-02-03
    uid                  Ticket System (Private pgp key for ticket system with
    address support@example.com) <support@example.com>
    sub   2048g/52B97069 2006-02-03

    linux:~$
Skript: Die ID des eigenen privaten Schlüssels ermitteln.
Die ID des Schlüssels befindet sich in der Zeile, die mit sub beginnt und ist eine 8-stellige hexadezimale Kennung (im Beispiel lautet sie "52B97069". Die für die Option geforderte Passphrase ist dieselbe, die beim Schlüsselgenerieren in Schritt 1 verwendet wurde.
Nach Eingabe all dieser Angaben können sie mit dem Aktualisieren-Button gespeichert werden. OTRS ist jetzt für das Empfangen mit PGP verschlüsselter E-Mails konfiguriert.
Der letzte Schritt ist der Import des öffentlichen PGP-Schlüssels eines Kunden. Dadurch wird sicher gestellt, dass aus OTRS heraus verschlüsselte Mails an den jeweiligen Kunden gesendet werden können. Es bestehen zwei Möglichkeiten für den Import.
Zum einem können über das Modul zur Verwaltung der Kunden die öffentlichen PGP-Schlüssel beim Anlegen/Bearbeiten des jeweiligen Kunden im System hinterlegt werden.
Die zweite Möglichkeit bietet das System in den PGP-Einstellungen innerhalb des Admin-Bereiches. In dieser Konfigurationsmaske ist im rechten Teil eine Liste der bereits dem System zur Verfügung stehenden öffentlichen Schlüssel zu sehen. Im Regelfall sollte nach der obigen Einrichtung hier schon der öffentliche Schlüssel des Ticket-Systems selbst zu sehen sein. Im linken Teil besteht neben der Suche die Möglichkeit, neue Schlüssel als Schlüsseldatei ins System zu laden.
Sowohl für das Hinzufügen eines Schlüssels über die Kunden- als auch über die PGP-Verwaltung gilt, dass die Dateien mit den Schlüsseln PGP/GnuPG-konforme Schlüssel sein müssen. Normalerweise wird der Schlüssel als "ASCII armored key"-Datei vorliegen, welches problemlos von OTRS verarbeitet werden kann.
Die Einrichtung der Verschlüsselung mit S/MIME scheint auf den ersten Blick ein bisschen komplizierter als die PGP-Einrichtung zu sein, da für das OTRS-System erst einmal eine Certification Authority (CA) eingerichtet werden muss. Ansonsten ist das Vorgehen ähnlich wie bei PGP: OTRS konfigurieren, eigenes Zertifikat einrichten, ggf. fremde Public-Zertifikate importieren, usw.
Die S/MIME-Konfiguration geschieht zu einem großen Teil außerhalb der
OTRS-Web-Oberfläche und sollte als otrs-Benutzer (bzw. als der Benutzer mit
dessen Rechten OTRS läuft) in einer Shell durchgeführt werden. Da die
MIME-Konfiguration unter Linux im wesentlichen auf SSL
(openssl basiert, sollte zuerst sichergestellt
werden, dass das openssl-Paket installiert
ist. Mit dem openssl-Paket kommt ein Skript,
CA.pl, mit welchem die wichtigsten Schritte zur
Zertifikatserstellung bewältigt werden können. Damit dieser Vorgang
einfacher wird, sollte zuerst herausgefunden werden, wo sich das Skript
CA.pl im Dateisystem befindet. Danach sollte diese
Stelle der Einfachheit halber temporär in den Suchpfad der Shell übernommen
werden.
otrs@linux:~> rpm -ql openssl | grep CA
/usr/share/ssl/misc/CA.pl
otrs@linux:~> export PATH=$PATH:/usr/share/ssl/misc
otrs@linux:~> which CA.pl
/usr/share/ssl/misc/CA.pl
otrs@linux:~> mkdir tmp; cd tmp
otrs@linux:~/tmp>
Skript: Konfiguration von S/MIME.
Im Beispiel sieht man auch, dass ein temporäres Verzeichnis
~/tmp angelegt wurde, in welchem die
Zertifikatsgenerierung durchgeführt wird.
Im einzelnen sind zur Zertifikatserzeugung folgende Schritte durchzuführen, die einzelnen Schritte sind in der Kommandozeile auszuführen. Sollte ein beglaubigtes SSL-Zertifikat für die Verschlüsselung bereits vorhanden sein, so sollte natürlich dieses verwendet werden. Dann können die nun folgenden Schritte übersprungen werden. Der beschriebene Ablauf geht davon aus, dass der OTRS-Administrator sich das SSL-Zertifikat zu Test- und Lernzwecken selbst anlegen muss.
Anlegen einer eigenen Certification Authority für SSL. Diese wird benötigt, um die Anfrage für ein eigenes SSL-Zertifikat zu beglaubigen.
otrs@linux:~/tmp> CA.pl -newca
CA certificate filename (or enter to create)

Making CA certificate ...
Generating a 1024 bit RSA private key
...++++++
......++++++
writing new private key to './demoCA/private/cakey.pem'
Enter PEM pass phrase:
Verifying - Enter PEM pass phrase:
-----
You are about to be asked to enter information that will be incorporated
into your certificate request.
What you are about to enter is what is called a Distinguished Name or a DN.
There are quite a few fields but you can leave some blank
For some fields there will be a default value,
If you enter '.', the field will be left blank.
-----
Country Name (2 letter code) [AU]:DE
State or Province Name (full name) [Some-State]:OTRS-state
Locality Name (eg, city) []:OTRS-town
Organization Name (eg, company) [Internet Widgits Pty Ltd]:Your company
Organizational Unit Name (eg, section) []:
Common Name (eg, YOUR name) []:OTRS Admin
Email Address []:otrs@your-domain.tld
otrs@linux:~/tmp> ls -la demoCA/
total 8
-rw-r--r--  1 otrs otrs 1330 2006-01-08 17:54 cacert.pem
drwxr-xr-x  2 otrs otrs   48 2006-01-08 17:53 certs
drwxr-xr-x  2 otrs otrs   48 2006-01-08 17:53 crl
-rw-r--r--  1 otrs otrs    0 2006-01-08 17:53 index.txt
drwxr-xr-x  2 otrs otrs   48 2006-01-08 17:53 newcerts
drwxr-xr-x  2 otrs otrs   80 2006-01-08 17:54 private
-rw-r--r--  1 otrs otrs   17 2006-01-08 17:54 serial
otrs@linux:~/tmp>
Skript: Anlegen einer Certification Authority für SSL.
Erzeugen der Zertifikatsanfrage.
otrs@linux:~/tmp> CA.pl -newreq
Generating a 1024 bit RSA private key
..........................................++++++
....++++++
writing new private key to 'newreq.pem'
Enter PEM pass phrase:
Verifying - Enter PEM pass phrase:
-----
You are about to be asked to enter information that will be incorporated
into your certificate request.
What you are about to enter is what is called a Distinguished Name or a DN.
There are quite a few fields but you can leave some blank
For some fields there will be a default value,
If you enter '.', the field will be left blank.
-----
Country Name (2 letter code) [AU]:DE\keyreturn
State or Province Name (full name) [Some-State]:OTRS-state
Locality Name (eg, city) []:OTRS-town
Organization Name (eg, company) [Internet Widgits Pty Ltd]:Your company
Organizational Unit Name (eg, section) []:
Common Name (eg, YOUR name) []:OTRS admin
Email Address []:otrs@your-domain.tld

Please enter the following 'extra' attributes
to be sent with your certificate request
A challenge password []:
An optional company name []:
Request (and private key) is in newreq.pem
otrs@linux:~/tmp> ls -la
total 4
drwxr-xr-x  6 otrs otrs  232 2006-01-08 17:54 demoCA
-rw-r--r--  1 otrs otrs 1708 2006-01-08 18:04 newreq.pem
otrs@linux:~/tmp>
Skript: Erstellen einer Zertifikatsanfrage.
Die Zertifikatsanfrage durch die CA signieren lassen. Die Zertifikatsanfrage kann entweder durch die selbst angelegte CA signiert (= beglaubigt) werden. Allerdings ist es natürlich seriöser, wenn das eigene SSL-Zertifikat von einer fremden, externen und ihrerseits beglaubigten CA beglaubigt wird.
otrs@linux:~/tmp> CA.pl -signreq
Using configuration from /etc/ssl/openssl.cnf
Enter pass phrase for ./demoCA/private/cakey.pem:
Check that the request matches the signature
Signature ok
Certificate Details:
        Serial Number:
            fd:85:f6:9f:14:07:16:c8
        Validity
            Not Before: Jan  8 17:04:37 2006 GMT
            Not After : Jan  8 17:04:37 2007 GMT
        Subject:
            countryName               = DE
            stateOrProvinceName       = OTRS-state
            localityName              = OTRS-town
            organizationName          = Your Company
            commonName                = OTRS administrator
            emailAddress              = otrs@your-domain.tld
        X509v3 extensions:
            X509v3 Basic Constraints:
                CA:FALSE
            Netscape Comment:
                OpenSSL Generated Certificate
            X509v3 Subject Key Identifier:
                01:D9:1E:58:C0:6D:BF:27:ED:37:34:14:D6:04:AC:C4:64:98:7A:22
            X509v3 Authority Key Identifier:
                keyid:10:4D:8D:4C:93:FD:2C:AA:9A:B3:26:80:6B:F5:D5:31:E2:8E:DB:A8
                DirName:/C=DE/ST=OTRS-state/L=OTRS-town/O=Your Company/
                CN=OTRS admin/emailAddress=otrs@your-domain.tld
                serial:FD:85:F6:9F:14:07:16:C7

Certificate is to be certified until Jan  8 17:04:37 2007 GMT (365 days)
Sign the certificate? [y/n]:y

1 out of 1 certificate requests certified, commit? [y/n]y
Write out database with 1 new entries
Data Base Updated
Signed certificate is in newcert.pem
otrs@linux:~/tmp>
Skript: Signieren der Zertifikatsanfrage.
Mit der signierten Zertifikatsanfrage das eigene Zertifikat und alle dazugehörigen Dateien erzeugen.
otrs@linux:~/tmp> CA.pl -pkcs12 "OTRS Certificate"
Enter pass phrase for newreq.pem:
Enter Export Password:
Verifying - Enter Export Password:
otrs@linux:~/tmp> ls -la
total 12
drwxr-xr-x  6 otrs otrs  328 2006-01-08 18:04 demoCA
-rw-r--r--  1 otrs otrs 3090 2006-01-08 18:13 newcert.p12
-rw-r--r--  1 otrs otrs 3791 2006-01-08 18:04 newcert.pem
-rw-r--r--  1 otrs otrs 1708 2006-01-08 18:04 newreq.pem
otrs@linux:~/tmp>
Skript: Neues Zertifikat erstellen.
Nach der Durchführung dieser Schritte ist es notwendig die Einrichtung von S/MIME in OTRS abzuschließen.
Die OTRS-seitige Einrichtung erfolgt aus dem Admin-Bereich, Block System über den Punkt SMIME. Falls die generelle S/MIME-Unterstützung in OTRS noch nicht aktiviert wurde, weist die Maske den OTRS-Administrator beim Aufruf darauf hin und bietet einen bequemen Link zur Einrichtung.
With the SysConfig group "Crypt::SMIME", you can also enable and configure the general S/MIME support.
Hier können sie S/MIME-Unterstützung aktivieren, und die Pfade zum OpenSSL-Kommando und zu den Zertifikaten angeben. Die vorhin erzeugte Schlüsseldatei muss in diesem Verzeichnis gespeichert werden, sonst kann OpenSSL sie nicht verwenden.
Im nächsten Schritt geht es (zurück) zur S/MIME-Konfiguration im Administrationsbereich. Dort können nun sowohl der private Schlüssel(Key) bzw. die privaten Schlüssel des OTRS-Systems, als auch die öffentlichen Schlüssel anderer Kommunikationspartner ins System importiert werden. Tragen Sie hier den öffentlichen Schlüssel ein, der zu Beginn dieses Abschnitts erzeugt und dann in OTRS hinzugefügt wurde.
Obviously, all public S/MIME keys of communication partners can be imported using the customer user administration tool as well.
It is possible to use a Customer User Backed (such as LDAP) as the source of public S/MIME certificates. This certificates could be imported into the system and be displayed in S/MIME configuration on the OTRS Admin page and they can be used from OTRS to send encrypted emails to the customers.
In order to enable this feature is needed to:
Enable
SMIMEin SysConfigEnable
SMIME::FetchFromCustomerin SysConfigConfigure a customer user backend to provide the attribute
UserSMIMECertificatewith the customer user S/MIME certificate (there is an example for LDAP customer user mapping in$OTRS_HOME/Kernel/Config/Defaults.pm).
This feature can be used in three different ways:
Incoming Emails:
A dedicated Postmaster filter (
PostMaster::PreFilterModule###000-SMIMEFetchFromCustomerin SysConfig) will extract the email address of each incoming email and will try to find the email address is the list of customers. If found it will try get the S/MIME certificate from customer user attributes. If a certificate is found it will try to import it (unless it was already imported).Specific email address or all customers:
The console command
Maint::SMIME::CustomerCertificate::Fetchcan be used to import the S/MIME certificate of one customer email address as:shell> perl /opt/otrs/bin/otrs.Console.pl Maint::SMIME::CustomerCertificate::Fetch --email customer@example.comIn this case the console command will try to match the supplied email address with one of the customer users. If found it will try add to the system the S/MIME certificate found in customer user properties (if the certificate is not already added).
The same console command can be used to import the S/MIME certificates of all customer users (limited to
CustomerUserSearchListLimitproperty from the customer user backend). This option is discouraged specially for systems with a large number of customer users as it might require too much time to execute and depending on the limit it might be possible that not all customer certificates will be fetch. Execute the console command in this mode as:shell> perl /opt/otrs/bin/otrs.Console.pl Maint::SMIME::CustomerCertificate::Fetch --add-allFor this option the console command will query the customer user backends to get all possible customers and for each it will check if there is a S/MIME certificate. If a certificate is found, it will try to add it to the system (if the certificate is not already added).
Renew existing certificates:
Another console command
Maint::SMIME::CustomerCertificate::Renewcan be used to check for all existing certificates in the system. This verifies that the existing certificates from customer users matches the ones that are retrieved by the customer user properties. Any new certificate in the customer user backend will be added into the system (no certificates are deleted in this process).This console command is executed once a day by the OTRS daemon automatically with the task
Daemon::SchedulerCronTaskManager::Task###RenewCustomerSMIMECertificates(as seen in SysConfig), but it can be also executed manually on demand as:shell> perl /opt/otrs/bin/otrs.Console.pl Maint::SMIME::CustomerCertificate::Renew