The OTRS Generic Interface consists of a multiple layer framework that lets OTRS communicate with other systems via a web service. This communication could be bi-directional:
OTRS as Provider: OTRS acts as a server listening to requests from the External System, processing the information, performing the requested action, and answering the request.
OTRS as Requester: OTRS acts as a client collecting information, sending the request to the Remote System, and waiting for the response.
Generic Interface is build based on a layer model, to be flexible and easy to customize.
A layer is a set of files, which control how the Generic Interface performs different parts of a web service. Using the right configuration, one can build different web services for different External Systems without creating new modules.
Anmerkung
If the Remote System does not support the current bundled modules of the Generic Interface, special modules need to be developed for that specific web service.
The list of provided Generic Interface modules shipped with OTRS will be updated and increased over time.
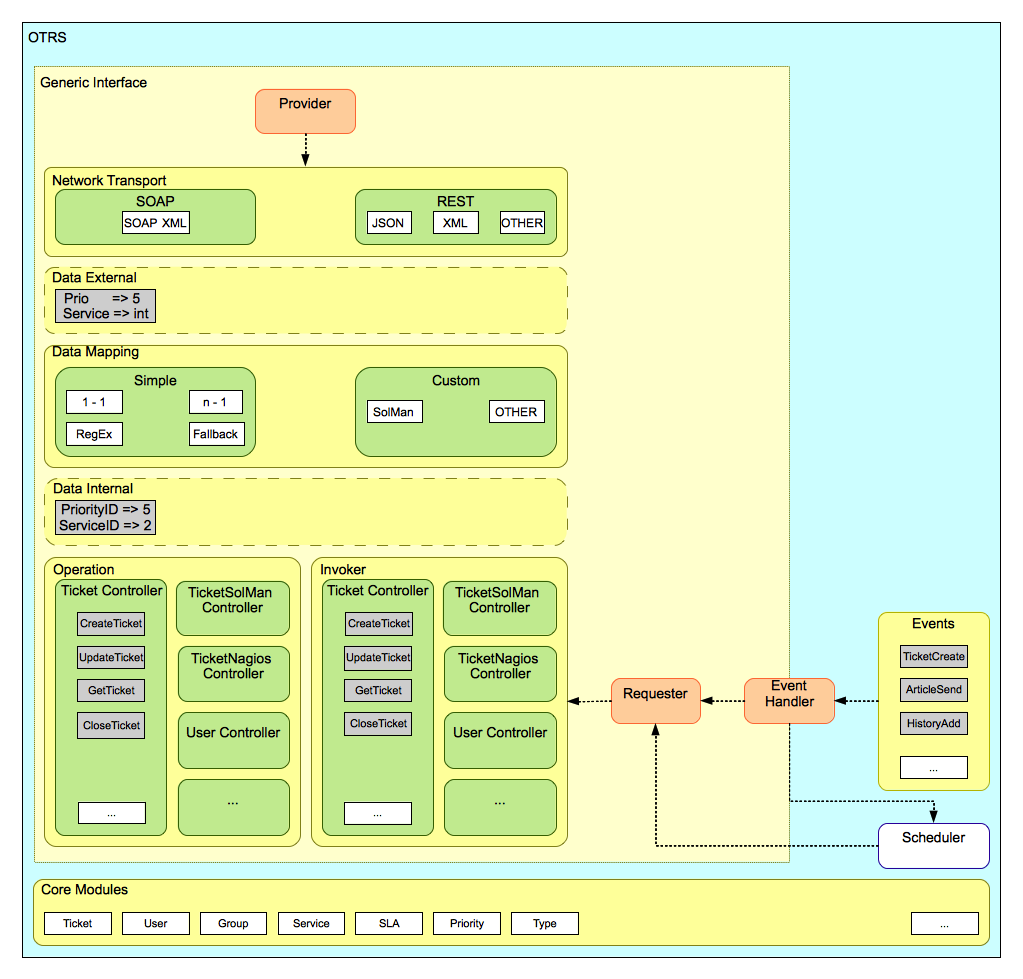
Abbildung: Die grafischen Interface Schichten.
This layer is responsible for the correct communication with the Remote System. It receives requests and generates responses when acting as provider, and generates requests and receives responses when acting as requester.
Provider communication is handled by a new web server handle called "nph-genericinterface.pl".
Requester communication could be initiated during an event triggered by a Generic Interface module or any other OTRS module. This event is catched by the event handler and depending on the configuration the event will be processed directly by the requester object or delegated to the Scheduler (a separated daemon designed to process tasks asynchronously).
This layer is responsible for translating data structures between OTRS and the Remote System (data internal and data external layers). Usually Remote Systems have different data structures than OTRS (including different values and names for those values), and here resides the importance of the layer to change the received information into something that OTRS can understand and on the opposite way send the information to each Remote System using their data dictionaries.
Example: "Priority" (OTRS) might be called "Prio" in a remote system and it could be that value "1 Low" (OTRS) should be mapped to "Information" on the remote system.
Controllers are collections of similar Operations or Invokers. For example, a Ticket controller might contain several standard ticket operations. Custom controllers can be implemented, for example a "TicketExternalCompany" controller which may contain similar functions as the standard Ticket controller, but with a different data interface, or function names (to adapt to the Remote System function names) or complete different code.
One application for Generic Interface could be to synchronize information with one Remote System that only can talk with another Remote System of the same kind. In this case new controllers needs to be developed and the Operations and Invokers has to emulate the Remote System behavior in such way that the interface that OTRS exposes is similar to the Remote System's interface.
An Operation is a single action that can be performed within OTRS. All operations have the same programming interface, they receive the data into one specific parameter, and return a data structure with a success status, potential error message and returning data.
Normally operations uses the already mapped data (internal) to call core modules and perform actions in OTRS like: Create a Ticket, Update a User, Invalidate a Queue, Send a Notification, etc. An operation has full access to the OTRS API to perform the action.
An Invoker is an action that OTRS performs against a Remote System. Invokers use the OTRS Core modules to process and collect the needed information to create the request. When the information is ready it has to be mapped to the Remote System format in order to be sent to the Remote System, that will process the information execute the action and send the response back, to either process the success or handle errors.
Das Generic Interface hat einen definierten Fluss um Aktionen als Provider und Requester auszuführen.
Diese Flüsse sind wie folgt beschrieben:
HTTP-Anfrage
OTRS empfängt HTTP-Anfragen und leitet sie durch die verschiedenen Schichten weiter.
Die Provider-Modul ist für die Ausführung und Kontrolle dieser Maßnahmen vorhanden.
Netzwerk-Transport
Das Netzwerktransportmodul dekodiert den Daten-Payload und trennt den Operationsnamen aus dem Rest der Daten.
Der Operationsname und die Betriebsdaten werden an den Provider zurückgegeben
externe Daten
Daten die vom Remote-System gesendet wurden (Das ist kein Modulbasierter Layer).
Mapping
Die Daten wird aus dem Fremdsystem-Format in das interne OTRS Format, wie in der Mapping-Konfiguration für diesen Vorgang (Mapping für eingehende Anforderungsdaten) spezifiziert, umgewandelt.
Die bereits transformierten Daten werden an den Provider zurückgegeben.
interne Daten
Sobald die Daten, transformiert und aufbereitet wurden, werden diese an die Operation weitergeleitet. (Das ist kein Modulbasierter Layer).
Operation
Empfängt und prüft Daten
Führt eine Benutzerzugangskontrolle durch.
Führt die Aktion aus.
Operation
Liefert das Ergebnis an den Provider.
interne Daten
Von der Operation zurückgegebene Daten.
Mapping
The data is transformed back to the Remote system format as specified in the mapping configuration (Mapping for outgoing response data).
Die bereits transformierten Daten werden an den Provider zurückgegeben.
externe Daten
Data as transformed and prepared to be passed to Network Transport as response.
Netzwerk-Transport
Empfängt die Daten im Format des Remote-Systems.
Constructs a valid response for this network transport type.
HTTP-Antwort
The response is sent back to the web service client.
In the case of an error, an error response is sent to the remote system (e.g. SOAP fault, HTTP error, etc).
Event-Trigger-Steuerungsprogramm
Basierend auf der Konfiguration des Webservices wird entschieden ob der Request synchron oder asynchron ist.
synchron
A direct call to the Requester is made in order to create a new request and to pass it through the layers.
asynchron
Create a new Generic Interface (Requester) task for the OTRS Scheduler (by delegating the request execution to the Scheduler, the user experience could be highly improved, otherwise all the time needed to prepare the request and the remote execution will be added to the OTRS Events that trigger those requests).
In its next cycle the Scheduler process reads the new task and creates a call to the Requester that will create a new request and then passes it through the layers.
Invoker
Empfängt Daten von dem Event.
Überprüft empfangene Daten (wenn benötigt).
Call core modules to complement the data (if needed).
Return the request data structure or send a Stop Communication signal to the requester, to gracefully cancel the request.
interne Daten
Data as passed from the invoker (This is not a module based layer).
Mapping
The data is transformed to the Remote system format as specified in the mapping configuration (Mapping for outgoing response data).
The already transformed data is returned to the requester.
externe Daten
Data as transformed and prepared for sending to the remote system.
Netzwerk-Transport
Receives the remote operation name and the data already transformed to the Remote System format from the requester.
Konstruiert eine gültige Anfrage für die Netzwerkübertragung.
Sendet die Anfrage zum Remote-System und wartet auf eine Antwort
Netzwerkübertragung
Empfängt die Antwort und dekodiert den Daten-Payload.
Sendet die Daten zurück zu dem Requester.
externe Daten
Daten, die vom Remote-System empfangen wurden
Mapping
Die Daten wird aus dem Fremdsystem-Format in das interne OTRS Format, wie in der Mapping-Konfiguration für diesen Vorgang (Mapping für eingehende Anforderungsdaten) spezifiziert, umgewandelt.
The already transformed data is returned to the requester.
interne Daten
Sobald die Daten, transformiert und aufbereitet wurden, werden diese an die Requester zurückgeschickt.
Invoker
Empfängt die zurückgegebenen Daten.
Verarbeitet die Daten als speziell von jedem Invoker benötigt werden (inklusive Fehlerbehandlung falls vorhanden).
Gibt das Ergebnis und die Daten des Invokers an den Requester.
Event-Steuerungsprogramm oder Scheduler
Empfängt die Daten vom Requester, im Falle des Schedulers beinhalten die Daten Informationen darüber ob der Task sofort oder in der Zukunft wieder ausgeführt werden soll.
A Web Service is a communication method between two systems, in our case OTRS and a Remote System.
The heart of the Web Service is its configuration, where it is defined what actions the web service can perform internally (Operation), what actions the OTRS request can perform Remote System (Invokers), how data is converted from one system to the other (Mapping), and over which protocol the communication will take place (Transport)
The Generic Interface is the framework that makes it possible to create Web Services for OTRS in a predefined way, using already made building blocks that are independent from each other and interchangeable.
Die grafische Benutzeroberfläche (GUI) des Webservice ist ein Werkzeug, dass es erlaubt komplexe Webservice-Konfigurationen mit einer benutzerfreundlichen und komfortablen Oberfläche zu erstellen. Es erlaubt folgendes:
Erstellen und Löschen von Webservices
Importieren und Exportieren von Konfigurationen (im YAML Dateiformat) für existierende Webservices.
Zeige, exportiere und setze alte Konfigurationen für existierende Webservices in der Web Service History - Anzeige zurück.
Verfolge alle Kommunikations-Protokolle für alle Webservices in der Debugger-Anzeige.
Der "Web-Services"-Link im Hauptbildschirm der Admin-Oberfläche (in der "System Administration"-Box) führt zum Webservices-Überblick-Bildschirm, wo alle Webservice-Konfigurationen verwaltet werden können. Neue Webservices können hinzugefügt oder schon vorhandene Konfigurationen geändert werden.
Jede Webservice-Konfigurationsanzeige hat im oberen Teil des Bildschirms einen Navigationspfad im "Brotkrumen"-Stil. Dieser Navigationspfad ist nützlich um genau zu wissen, in welchem Teil der Webservice-Konfiguration man sich befindet und erlaubt dem Nutzer jederzeit zu irgendeinem Teil des Konfigurationsprozesses zurückzuspringen (jegliche Änderungen werden nicht gespeichert).
Anmerkung
Drücken Sie den Knopf "Webservice hinzufügen" um einen neuen Webservice zu erstellen, und geben Sie die erforderlichen Informationen an.

Abbildung: Überblick Webservices
The only required field in this part is the web service "Name" that needs to be unique in the system and can not be left empty. Other fields are also necessary for the configuration like the "Debug Threshold" and "Validity" but these fields are already populated with the default value for each list.
The default value for "Debug Threshold" is "debug". When configured in this manner all communication logs are registered in the database. Each subsequent Debug Threshold value is more restrictive and discards communication logs of lower order than the one set in the system.
Schwellenwerte der Fehlersuche (von niedrig nach hoch)
Fehlersuche
Info
Notiz
Error
Es ist ebenfalls möglich das Netzwerkübertragungsprotokoll für "OTRS als Provider" und "OTRS als Requester" zu definieren.
Klicken Sie auf "Speichern" um den neuen Webservice in der Datenbank zu registrieren oder klicken Sie auf "Abbrechen" um die Änderungen zu verwerfen. Anschließend werden Sie auf die Übersichtsseite der Webservices weitergeleitet.
Wenn Sie bereits eine Webservice Konfigurationsdatei im YAML Format haben, können sie auf der linken Seite den "Webservice importieren"-Button klicken. Weitere Informationen über das importieren von Werbservices finden Sie im nächsten Abschnitt "Webservice ändern".
Anmerkung
To change or add more details to a web service, click on the web service name in the web service overview screen.
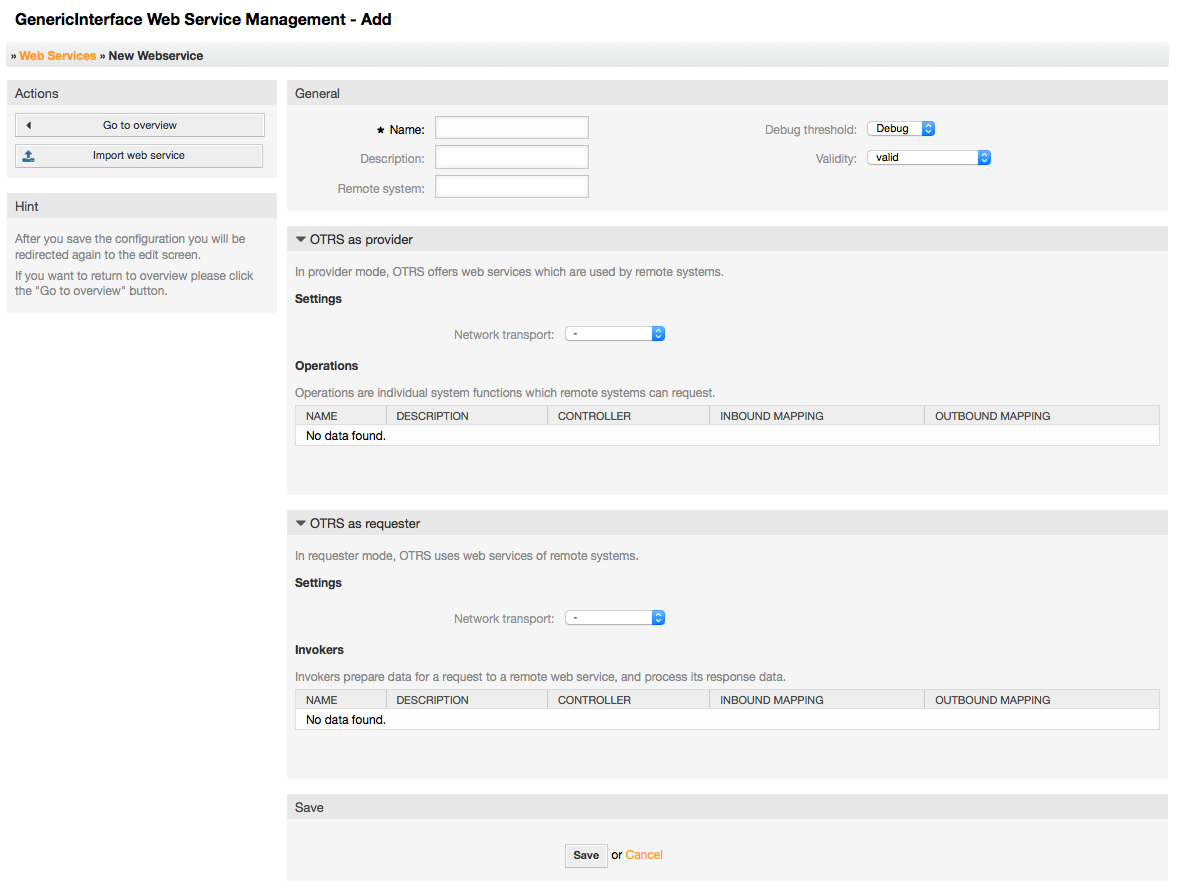
Abbildung: Webservice hinzufügen.
On this screen you have a complete set of functions to handle every part of a web service. On the left side in the action column you can find some buttons that allows you to perform all possible actions on a web service:
Webservice kopieren
Webservice exportieren
Webservice importieren.
Konfigurationschronik.
Webservice löschen
Debugger.
Anmerkung
"Configuration history" and "Debugger" will lead you to different screens.
To clone a web service, you need to click on the "Clone web service" button. A dialog will be shown where you can use the default name or set a new name for the (cloned) web service.
Anmerkung
Remember that the name of the web service must be unique within the system.
Click on "Clone" button to create the web service clone or "Cancel" to close the dialog.
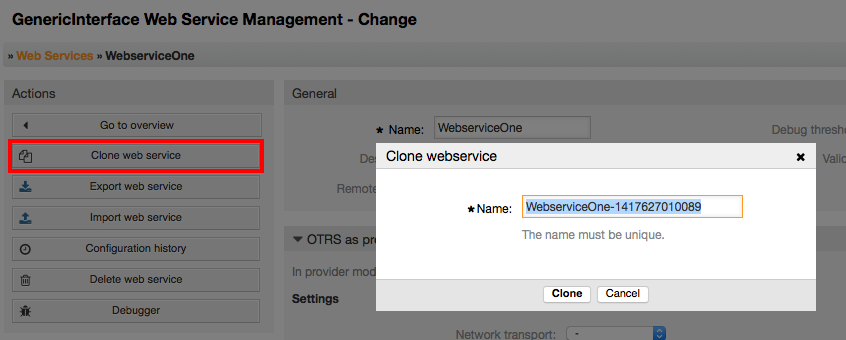
Abbildung: Webservice kopieren.
The "Export web service" button gives you the opportunity to dump the configuration of the current web service into a YAML file, to download it and to store it on your file system. This can be specially useful if you want to migrate the web service from one server to another, for example from a testing environment to a production system.
Warnung
Alle in der Webservice-Konfiguration gespeicherten Passwörter werden im Klartext exportiert.
Right after clicking the "Export web service" button a save dialog of your browser will appear, just like when you click on a file download link on a web page.
Anmerkung
Jeder Browser auf den verschiedenen Betriebssystemen hat seinen eigenen Speicher-Dialog und -Stil. Je nachdem welcher Browser mit welcher Konfiguration vorhanden ist, kann es sein, dass überhaupt kein Dialog angezeigt wird und die Datei direkt im Standard-Verzeichnis auf Ihrem Dateisystem gespeichert wird. Bitte überprüfen Sie Ihre Browser-Anleitung wenn Sie genauere Anweisungen benötigen.
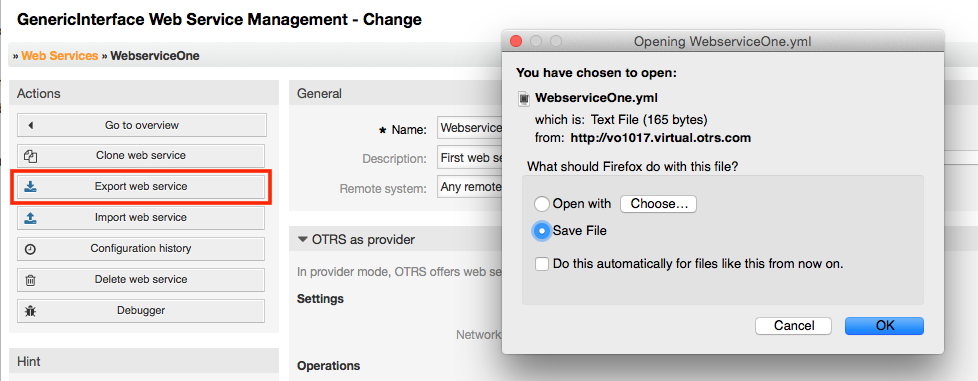
Abbildung: Webservice exportieren.
A valid web service configuration YAML file is required to use the import web service feature. Click on the "Import web service" button, browse for the configuration file or provide the complete path in the input box.
Click "Import" button to create a new web service from a file or "Cancel" to close the dialog.
Anmerkung
The web service name will be taken from the configuration file name (e.g. if the file name is MyWebservice.yml the resulting web service will be named MyWebservice). If a web service is registered in the system with the same name as the web service that you want to import, the system will lead you to the web service change screen to let you change the name of the imported web service.

Abbildung: Webservice importieren.
Every change to the web service configuration creates a new entry in the web service history (as a journal). The web service history screen displays a list of all configuration versions for a web service. Each row (version) in the "Configuration History List" represents a single revision in the web service history.
Click on one of the rows to show the whole configuration as it was on that particular date / time. The configuration will be shown in the "History details" section of this screen. Here you are also able to export the selected web service configuration version or to restore that version into the current web service configuration.
The "Export web service configuration" behaves exactly as the "Export web service" feature in the web service change screen. For more information refer to that section.
If changes to the current web service configuration do not work as expected and it is not easy to revert the changes manually, you can click on the "Revert web service configuration" button. This will open a dialog to ask you if you are sure to revert the web service configuration. Click "Revert web service configuration" in this dialog to replace the current configuration with the selected version, or click "Cancel" to close the dialog.
Warnung
Remember that any passwords stored in the web service configuration will be exported in plain text format.
Bitte seien Sie vorsichtig, wenn Sie eine Konfiguration wiederherstellen, dieser Prozess ist unumkehrbar.
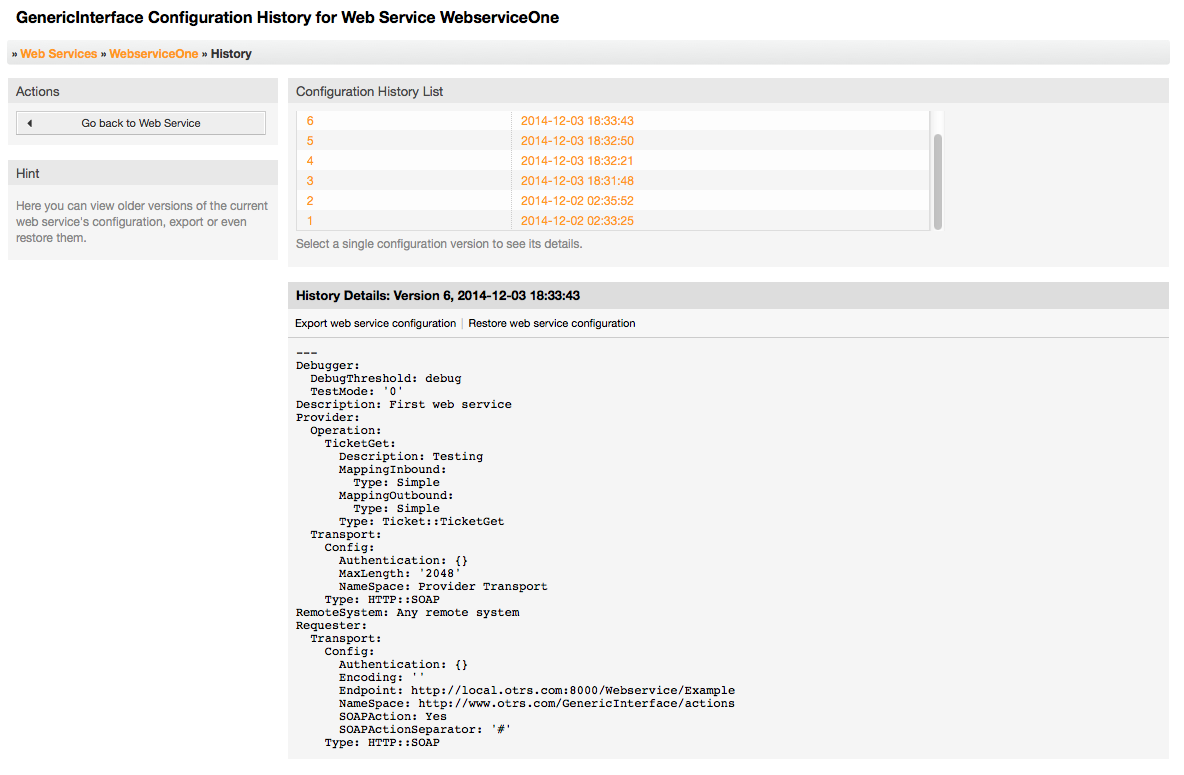
Abbildung: Webservice Historie.
Sometimes it is necessary to delete a web service completely. To do this you can press on the "Delete web service" button and a new dialog will appear asking for confirmation.
Click on "Delete" to confirm the removal of the web service or on "Cancel" to close the dialog.
Warnung
Deleting a web service can't be undone, please be careful when deleting a web service.

Abbildung: Webservice löschen.
The Debugger stores the log of a web service. In the debugger screen you can track all the web service communications for either provider or requester types.
When this screen is shown the request list starts to load. After the list is fully filled you can choose one of the rows (that means a communication sequence) to check its details. This details will appear in a box below.
You can narrow the communication list using the filter on the right part of the screen. You can filter by:
Kommunikationstyp (Provider oder Requester)
Datum: vor und/oder nach einem bestimmten Datum
Die Remote-IP-Adresse
Eine Kombination von allem.
After filter settings are set, push the "Refresh" button and a new list will be displayed meeting your search criteria.
Anmerkung
Depending on the search criteria for the filters the new list could return no results.
On the left part of the screen under the action column you can select "Go back to the web service" or clear the debugger log by pushing the "Clear" button. This will open a dialog that ask you to confirm erasing of the log. Click "Clear" in the dialog button to perform the action or click on "Cancel" to close this dialog.
In the "Request details" section you can see all the details for the selected communication. Here you can track the complete flow and check for possible errors or confirm success responses.
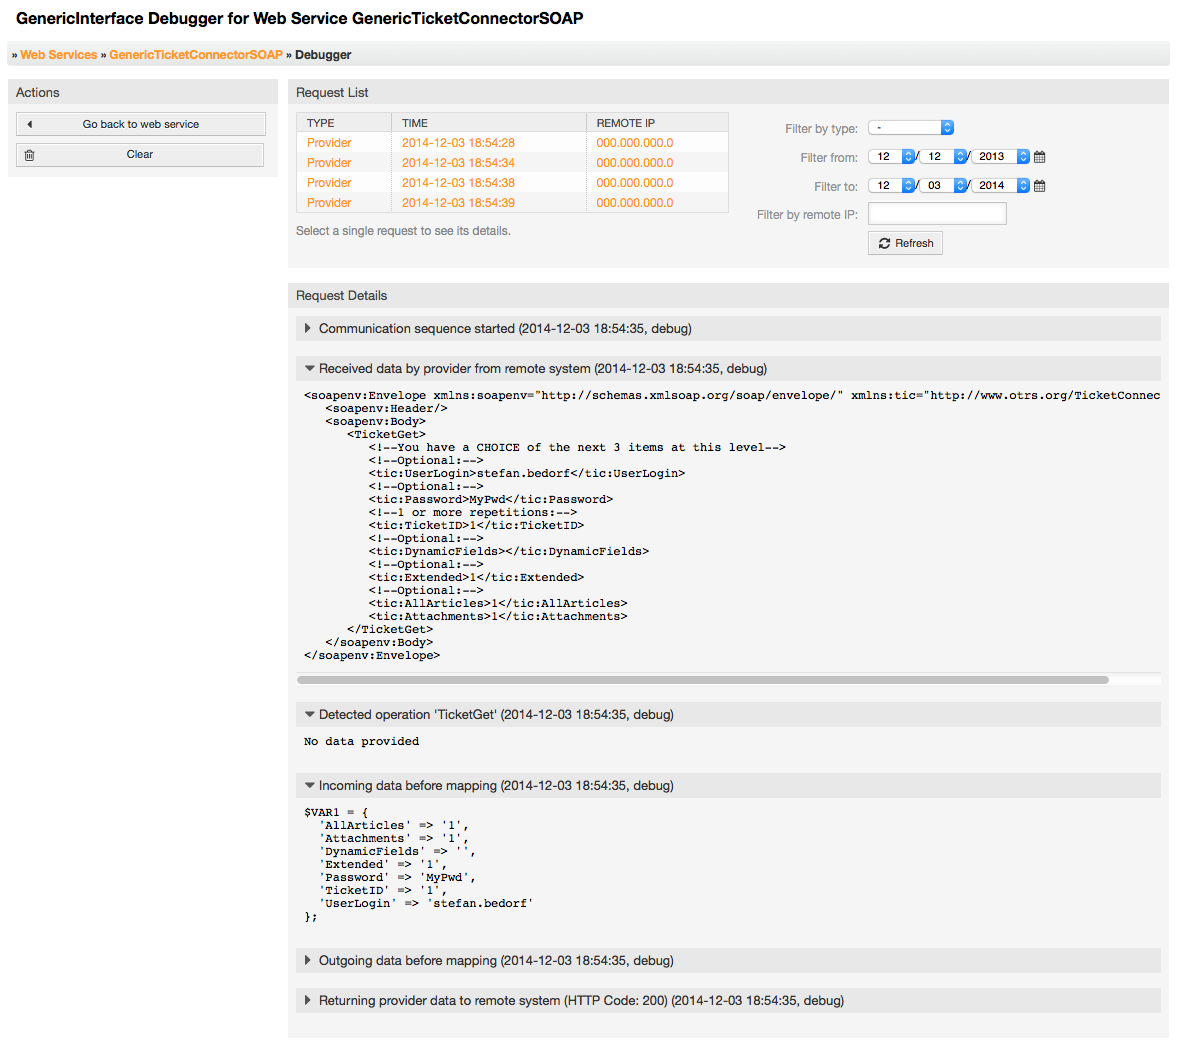
Abbildung: Webservice Debugger.
Returning to the web service change screen, now we are going to review the right side of it. Here we have the possibility to modify all the general data for a web service such as name, description, debug threshold, etc. Also there are two more sections below that allows us to modify specific parameters for communication types "OTRS as Provider" and "OTRS as Requester".
The web service configuration needs to be saved on each level. This means that if a setting is changed, links to other, deeper parts of the configuration will be disabled forcing you to save the current configuration level. After saving the disabled links will be re-enabled again allowing you to continue with the configuration.
On the "OTRS as provider" section it is possible to set or configure the network transport protocol. Only network transport back-ends that are registered are shown on the list. To configure the network transport click on the "Configure" button. It is also possible to add new operations in this box. To do this select one of the available operations from the "Add Operation" list. This will lead you to the operation configuration screen. After saving the new operation it will be listed in the table above.
"OTRS as requester" is very similar to the previous one, but instead of "operations" you can add invokers here.
Click the "Save" button to save and continue configuring the web service, "Save and finish" to save and return to the web service overview screen, or "Cancel" to discard current configuration level changes and return to web service overview screen.
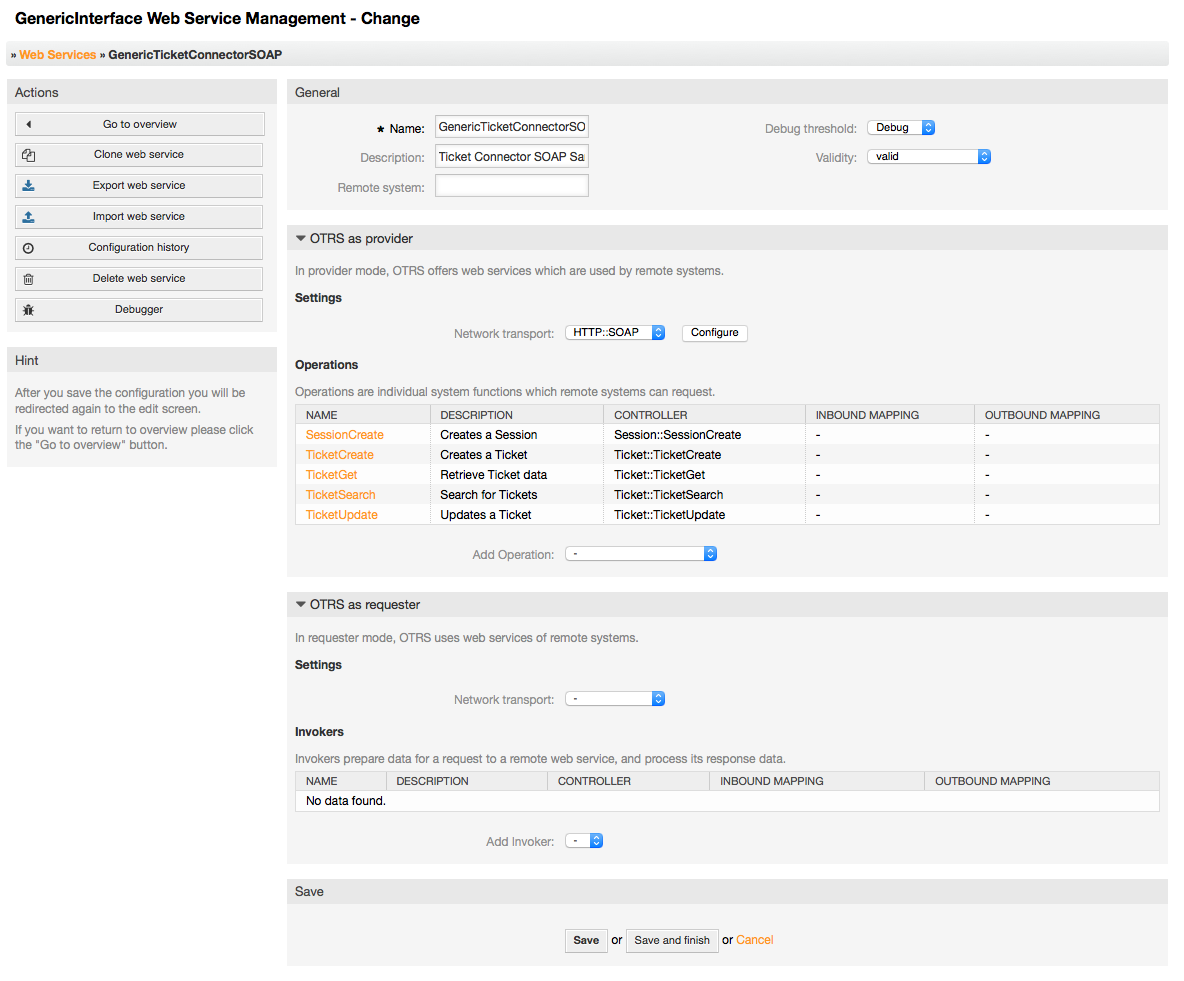
Abbildung: Webservice ändern.
Anmerkung
Like the other Generic Interface configuration screens such as Network Transport, Operation, Invoker and Mapping, the initial configuration (add) screen will only present two options: "Save" and "Cancel". If the configuration is re-visited, a new option "Save and Finish" will appear. The behavior of this feature is defined below.
"Save" will store the current configuration level in the database and it will return to the previous screen to review your changes or to configure deeper settings.
"Save and Finish" will store the current configuration level in the database and it will return to the previous screen in the configuration hierarchy (to the immediate upper configuration level).
"Cancel" will discard any configuration change to the current configuration level and will return to the previous screen in the configuration hierarchy.
In future the list of available network transports will be increased. Currently only "HTTP::SOAP" and "HTTP::REST" transports are available. Each transport has different configuration options to setup and they might use different frontend modules to configure them,
It is quite simple to configure the "HTTP::SOAP" protocol as provider. There are only two settings: "Namespace" and "Maximum message length". These fields are required. The first one is a URI to give SOAP methods a context, reducing ambiguities, and the second one is a field where you can specify the maximum size (in bytes) for SOAP messages that OTRS will process.
Figure: Web service provider network transport HTTP::SOAP.
For "HTTP::REST" the configuration might be a bit more complicated, as it grows dynamically for each configured operation by adding: "Route mapping for Operation '<OperationName>':" and "Valid request methods for Operation '<OperationName>':" settings to the default transport settings "Maximum message length:" and "Send Keep-Alive:"
Route mapping for Operation '<OperationName>':
In this setting a resource path is set. This path must be defined according to the needs of the web service considering that the path in conjunction with the HTTP request method determines the Generic Interface operation to be executed.
Path can contain variables in the form of ':<VariableName>' each path string that fits on the position of the variable name will be added to the request payload using the variable name defined in this setting.
Beispiele:
Route mapping: /Resource
Gültige Anfragen:
http://localhost/otrs/nph-genericinterface.pl/Webservice/Test/Resource
http://localhost/otrs/nph-genericinterface.pl/Webservice/Test/Resource?Param1=One
Ungültige Anfragen:
http://localhost/otrs/nph-genericinterface.pl/Webservice/Test/Resource/
http://localhost/otrs/nph-genericinterface.pl/Webservice/Test/Resource/OtherResource
http://localhost/otrs/nph-genericinterface.pl/Webservice/Test/Resource/OtherResource?Param1=One
Route mapping: /Resource/:ID
Gültige Anfragen:
http://localhost/otrs/nph-genericinterface.pl/Webservice/Test/Resource/1
http://localhost/otrs/nph-genericinterface.pl/Webservice/Test/Resource/1?Param1=One
In both cases ID = 1 will be sent to the operation as part of the payload. In the second case also Param1 = One will be added, depending on the HTTP request method other parameters will be added if they come as a JSON string in the request header.
Ungültige Anfragen:
http://localhost/otrs/nph-genericinterface.pl/Webservice/Test/Resource
http://localhost/otrs/nph-genericinterface.pl/Webservice/Test/Resource?Param1=One
Route mapping: /Resource/OtherResource/:ID/:Color
Gültige Anfragen:
http://localhost/otrs/nph-genericinterface.pl/Webservice/Test/Resource/OtherResource/1/Red
http://localhost/otrs/nph-genericinterface.pl/Webservice/Test/Resource/OtherReosurce/123/Blue?Param1=One
In the first example ID = 1 and Color = Red, while in the second ID = 123 and Color = Blue.
Ungültige Anfragen:
http://localhost/otrs/nph-genericinterface.pl/Webservice/Test/Resource/1
http://localhost/otrs/nph-genericinterface.pl/Webservice/Test/Resource/OtherResource/1
http://localhost/otrs/nph-genericinterface.pl/Webservice/Test/Resource/OtherResource/1?Param1=One
In the first example the part of the path '/OtherResource' is missing as well as the :Color variable, on the second example just :Color variable is missing.
Valid request methods for Operation '<OperationName>':
The HTTP request methods to determine the operation to use together with the route mapping, possible options: CONNECT, DELETE, GET, HEAD, OPTIONS, PATCH, POST, PUT and TRACE.
Totally different operations can share exactly the same mapping path, but the request method must be unique for each operation, in order to determine correctly the operation to use on each request.
Abbildung: Webservice Provider Übertragung HTTP::REST.
The actions that can be performed when you are using OTRS as a provider are called "Operations". Each operation belongs to a controller. Controllers are collections of operations or invokers, normally operations from the same controller need similar settings and share the same configuration dialog. But each operation can have independent configuration dialogs if needed.
Name, Description, Backend, and Mappings are fields that normally appear on every operation, other special fields can appear in non default configuration dialogs to fulfill specific needs of the operation.
Normalerweise gibt es zwei Mapping-Konfigurationsabteilungen bei jeder Operation, eine für die ankommenden Daten und eine für die ausgehenden Daten. Sie können verschiedene Mapping-Arten (Backends) für jede Mapping-Richtung auswählen, da deren Konfiguration unabhängig voneinander und unabhängig vom Operations-Backend ist. Die normale und am meisten übliche Praxis ist es, dass die Operation in beiden Fällen die gleiche Mapping-Art nutzt (mit umgekehrter Konfiguration). Die komplette Mapping-Konfiguration wird in einer extra Anzeige, die auf die Mapping-Art drauf ankommt, gemacht.
The operation backend is pre-populated and is not editable. You will see this parameter when you choose the operation on the web service edit screen. The field is only informative.
In the left part of the screen on the action column you have the options: "Go back to web service" (discarding all changes since the last save) and "Delete". If you click on the last one, a dialog will open and ask you if you like to remove the operation. Click on "Delete" button to confirm the removal of the operation and it configuration or "Cancel" to close the delete dialog.
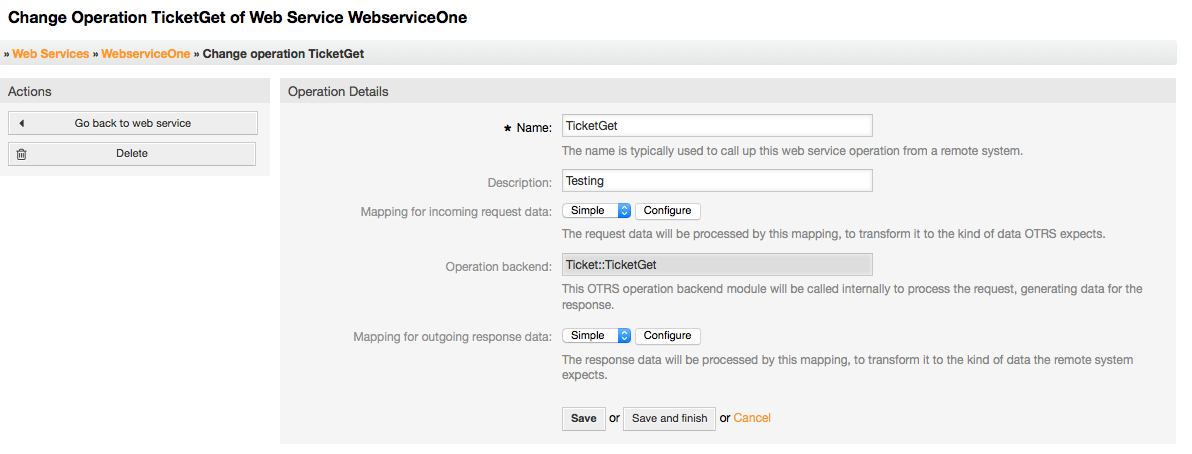
Abbildung: Webservice Operation.
The network transport configuration for the requester is similar to the configuration for the provider. For the Requester "HTTP::SOAP" network transport there are more fields to be set.
Apart from the "Endpoint" (URI of the Remote System web service interface to accept requests) and "Namespace" which are required fields, you can also specify:
Verschlüsselung (z. B. utf-8, latin1, iso-8859-1, cp1250, usw.) für die SOAP-Nachricht.
SOAPAction Header: you can use this to send an empty or filled SOAPAction header. Set to "No" and the SOAPAction header on the SOAP message will be an empty string, or set to "Yes" to send the soap action in Namespace#Action format and define the separator (typically "/" for .Net web services and "#" for the rest).
Authentication: to set the authentication mechanism, set to "-" to not use any authentication or select one from the list and the detail fields will appear.
Anmerkung
Currently only the "BasicAuth" (HTTP) authentication mechanism is implemented. You can decide whether or not to use it depending on the Remote System configuration. If used, you must provide the User Name and the Password to access the remote system.
Warnung
If you supply a password for authentication and after you export the web service to a YAML file this password will be revealed and will be written into a plain text string inside the YAML file. Be aware of it and take precautions if needed.
Abbildung: Webservice Requester Übertragung (HTTP::SOAP).
In the case of HTTP::Rest, this configuration also grows dynamically depending on the configured invokers by adding "Controller mapping for Invoker '<InvokerName>':" and "Valid request command for Invoker '<InvokerName>':" for each invoke. Authentication and SSL options are similar to the ones in HTTP::SOAP
Host
The host name or IP Address and port of the remote system, if no port is specified, port 80 is used by default.
Controller-Mapping für Invoker '<InvokerName>':
In this setting a resource path is set. This path must be defined according to the needs of the remote web service and following its definition.
Path can contain variables in the form of ':<VariableName>' for each variable name that matches the current data (to be sent), will be replaced by the corresponding data value. This matched variable names and values will be remove from the current data. Depending on the HTTP request command the remaining data could be sent as a JSON string in the request body or as query parameters within the URI.
Beispiele:
Für Daten: Var1 = Eins, Var2 = Zwei, Var3 = Drei und Var4 = Vier.
Controller mapping: /Resource
After Replacements:
/Ressource
Verbleibende Daten:
Var1 = Eins, Var2 = Zwei, Var3 = Drei und Var4 = Vier
Controller mapping: /Resource/:Var1
After Replacements:
/Ressource/Eins
Verbleibende Daten:
Var2 = Zwei, Var3 = Drei und Var4 = Vier
Controller mapping: /Resource/:Var1?Param1=:Var2&Var3=:Var3
After Replacements:
/Ressource/Eins?Param1=Zwei&Var3=Drei
Verbleibende Daten:
Var4 = Vier
Valid request command for Invoker '<InvokerName>':
This determine the HTTP request method to use, possible options: CONNECT, DELETE, GET, HEAD, OPTIONS, PATCH, POST, PUT and TRACE. If no command is selected, Default command is used.
Standardbefehl
Used as a fall-back for all Invokers with out a defined request command
Abbildung: Webservice Provider Übertragung HTTP::REST.
The actions that can be performed when you are using OTRS as a requester are called "Invokers". Each invoker belongs to a controller (controllers are collections of operations or invokers). Usually invokers from the same controller need similar settings and share the same configuration dialogs. Each invoker can have independent configuration dialogs if needed.
Name, Description, Backend, and Mappings are fields that normally appear on every invoker. Additionally the list of event triggers and other special fields can appear on non default configuration dialogs to fulfill special needs of the invoker.
Normally there are two mapping configuration sections for each invoker, one for the incoming data and another one for the outgoing data. You can choose different mapping types (backends) for each mapping direction, since their configuration is independent from each other and also independent from the invoker backend. The normal and most common practice is that the invoker uses the same mapping type in both cases, with inverted configuration. The complete mapping configuration is done in a separate screen, which depends on the mapping type.
The invoker backend is pre-populated and can not be edited. You will see this parameter when you choose the invoker on the web service edit screen. The field is only informative.
Event triggers are events within OTRS such as "TicketCreate", "ArticleSend", etc. These can act as triggers to execute the invoker. Each invoker needs to have at least one event trigger registered, or the invoker will be useless, because it will never be called. The asynchronous property of the event triggers define if the OTRS process will handle the invoker or if it will be delegated to the OTRS Scheduler.
Anmerkung
The OTRS Scheduler is a separate process that executes tasks in the background. Using this the OTRS process itself will not be affected if the Remote System takes a long time to respond, if it is not available or if there are network problems. If you don't use the scheduler using web services can make OTRS slow or non-responsive. Therefore it is highly recommend to use asynchronous event triggers as often as possible.
To add an Event trigger, first select the event family from the first list, then the event name from the second list, then set the asynchronous property (if unchecked means that the event trigger will not be asynchronous) and finally click on the plus button. A new event trigger will be created and it will be listed on the invoker "Event Triggers" list.
To delete an Event trigger, simply locate the event trigger to be deleted in the "Event Triggers" list and click on the trash icon at the end of the row. This will open a dialog that asks you if you are sure to delete the event trigger. Click "Delete" to remove the event trigger from the list, or "Cancel" to close the dialog.
In the left part of the screen on the action column you have the options: "Go back to web service" (discarding all changes since the last save) and "Delete". If you click on the last one, a dialog will emerge and ask you if you like to remove the invoker. Click on the "Delete" button to confirm the removal of the invoker and its configuration or "Cancel" to close the delete dialog.
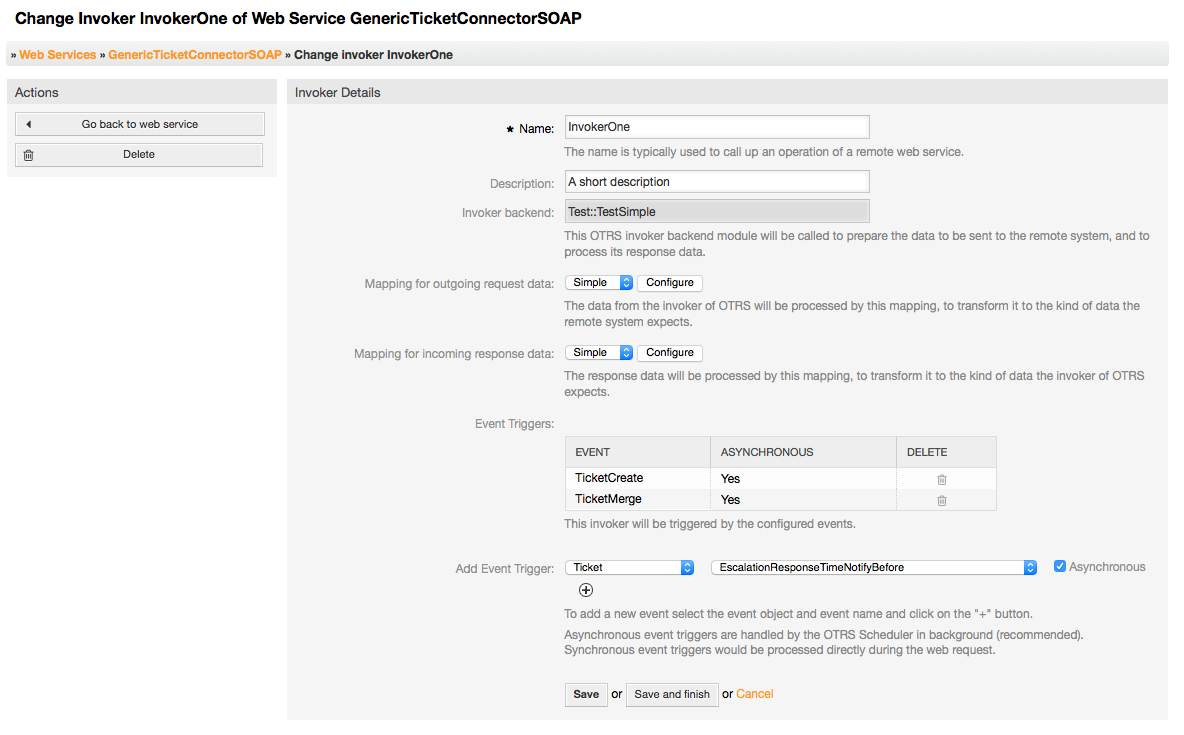
Abbildung: Webservice Invoker.
There are cases where you need to transform the data from one format to another (map or change data structure), because normally a web service is used to interact with a Remote System, that is highly probable that is not another OTRS system and / or could not understand the OTRS data structures and values. In these cases some or all values have to be changed, and sometimes even the names of the values (keys) or even the complete structure, in order to match with the expected data on the other end. To accomplish this task the Generic Interface Mapping Layer exists.
Each Remote System has it own data structures and it is possible to create new mapping modules for each case (e.g. there is a customized mapping module for SAP Solution Manager shipped with OTRS), but it is not always necessary. The module Mapping::Simple should cover most of the mapping needs.
Anmerkung
When Mapping::Simple does not cover all mapping needs for a web service, a new mapping module should be created. To learn more about how to create new mapping modules please consult the OTRS Development Manual.
This module gives you the opportunity to set default values to map for each key or value for the whole communication data.
At the beginning of the screen you will see a general section where you can set the default rules that will apply for all the unmapped keys and values. There are three options available, these options are listed below:
Keep (leave unchanged): doesn't touch the keys or values in any way.
Ignore (drop key/value pair): when this is applied to the key it deletes the key and value, because when a key is deleted then in consequence its associated value is deleted too. When this is applied to the value, only the value is deleted, keeping the key, that now will be associated to an empty value.
MapTo (use provided key or value as default): all keys and / or values without a defined map rule, will use this as default, when you select this option a new text field will appear to set this default.
Clicking on the "+" button for new key map, will display a new box for a single mapping configuration. You can add as many key mappings as needed. Just click on the "+" button again and a new mapping box will appear below the existing one. From this mapping boxes you can define a map for a single key, with the next options:
Exact value(s): the old key string will be changed to a new one if the old key matches exactly.
Regular expression: The key string will be replaced following a regular expression rule.
Pressing the new value map "+" button will display a new row for a value map. Here it is also possible to define rules for each value to be mapped with the same options as for the key map (Exact value and Regular expression). You can add as many values to map as needed, and if you want to delete one of them, just click on the "-" button for each mapping value row.
Deleting the complete key mapping section (box) is possible, just push on the "-" button located on the up right corner of each box that you want to delete.
If you need to delete a complete mapping configuration: go back to the corresponding operation or invoker screen, look for the mapping direction that you select before and set its value to "-", and save the configuration to apply changes.
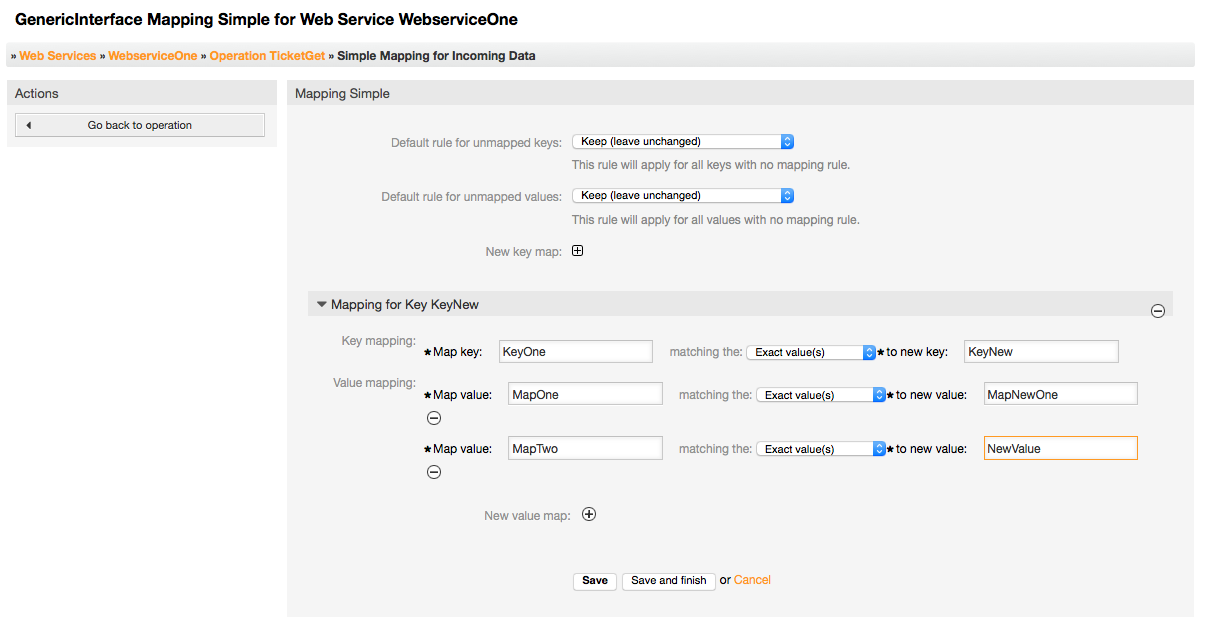
Abbildung: Webservice-Mapping.
The Command Line Interface (CLI) is a fast way to work with the web services. It consists of a set of tools that can be use to perform basic operations like:
Create, Update, Read, List and Delete web services based on YAML files.
Lesen der Debugger-Logdatei, mit gesetzten Filtern.
Anmerkung
You don't need to use the CLI to work with web services. Integrated into the Admin interface there is a complete set of screens to interact with every part of the web services. Please read the web service GUI section included in this manual.
The "WebserviceConfig.pl" was developed in order to create basic, but fast and powerful tool to work with web service configurations. It gives you the ability to perform the following actions:
Add: Um einen Webservice mit einer YAML-Datei als Konfigurationsquelle zu erstellen.
Update: to change an existing web service, the configuration can be changed using a different or modified YAML file.
Read: to get the current web service configuration displayed on the screen.
List: to get a complete list of all the web services registered in system.
Delete: to delete a web service from the system. Be careful when you use it, because this action can't be undone.
Warnung
A web service READ operation will display all the configuration as plain text on the screen, including any stored passwords. Please be aware of this and take the needed precautions!
Beispiel: Eine neue Webservice-Konfiguration erstellen:
shell> OTRS_HOME/bin/otrs.WebserviceConfig.pl -a write -n <webservice_name> -f /path/to/yaml/file
Ebenso können Sie 'otrs.WebserviceConfig.pl' mit den folgenden Optionen benutzen:
-a read -i <webservice_id> - um eine gespeicherte Konfiguration einzulesen.
-a write -n <webservice_name> -f /path/to/yaml/file - um einen neuen Webservice zu erstellen.
-a write -i <webservice_id> -f /path/to/yaml/file - um einen Webservice upzudaten.
-a list - um alle verfügbaren Webservices anzuzeigen.
-a delete -i <webservice_id> - Um einen Webservice zu löschen.
Another available tool via the command line interface is the "otrs.GenericInterfaceDebugRead.pl" script, which is an interface to search for web service debugger log entries.
Beispiel: Suche nach Debugger-Logeinträgen:
shell> bin/otrs.GenericInterfaceDebugRead.pl
Optional parameters can be used for the "otrs.GenericInterfaceDebugRead.pl" script:
-c - Um nach der Kommunikations-ID zu filtern (md5sum-Format).
-t - Um nach dem Kommunikationstyp zu filtern ('Provider' or 'Requester').
-a - Um nach einem Datum zu filtern ('bestimmtes Datum' oder 'Nach einem bestimmten Datum').
-b - Um nach einem Datum zu filtern ('bestimmtes Datum' oder 'Vor einem bestimmten Datum').
-i - Um nach einer IP-Adresse zu filtern (muss eine gültige IPv4 oder IPv6 Adresse sein).
-w - Um nach der Webservice ID zu filtern.
-d - Um die detailierten Kommunikationsdaten anzufügen.
Beispiel: Suche nach Debugger-Logeinträgen mit allen Parametern:
shell> ./otrs.GenericInterfaceDebugRead.pl -c a7cc4d9f5c70387a9bfbe1351bc88966 -t Provider -a '2011-07-22 00:00:00' -b '2011-07-26 00:00:00' -i 127.0.0.1 -w 123 -d 1
Anmerkung
It is highly recommended to include at least one of the filter options listed above, and even more if the "-d" option is selected, because a lot of information can be retrieved from the data base and displayed on the screen, this could result in slow response times and much more information than what you really needed.
From its design the web services were conceived to be portable from one OTRS system to another, e.g. from a test or development environment to a production system. Therefore it was needed to have an easy way to extract the web service configuration from the database, and import it to another. To accomplish this task the Generic Interface uses YAML files as the web services configuration basis.
Why YAML? YAML is a markup language designed to be human friendly to read and write (it is easier to understand than JSON), it does not have some of the limitations of XML like numeric tags, it is open, standardized, and is complete enough to store the whole web service configuration.
Anmerkung
To learn more about YAML please visit http://www.yaml.org/.
Im folgenden finden Sie eine Webservice-Konfigurationsdatei im YAML-Format:
---
Debugger:
DebugThreshold: debug
Description: This an example of a web service configuration
Provider:
Operation:
CloseIncident:
Description: This is a test operation
MappingInbound: {}
MappingOutbound: {}
RemoteSystemGuid: ''
Type: Test::Test
Test:
Description: This is a test operation
MappingInbound:
Config:
KeyMapDefault:
MapTo: ''
MapType: Keep
KeyMapExact:
Prio: Priority
ValueMap:
Priority:
ValueMapExact:
Critical: 5 Very High
Information: 1 Very Low
Warning: 3 Normal
ValueMapDefault:
MapTo: 3 Normal
MapType: MapTo
Type: Simple
MappingOutbound:
Config:
KeyMapDefault:
MapTo: ''
MapType: Ignore
KeyMapExact:
Priority: Prio
ValueMap:
Prio:
ValueMapExact:
1 Very Low: Information
3 Normal: Warning
5 Very High: Critical
ValueMapDefault:
MapTo: ''
MapType: Ignore
Type: Simple
Type: Test::Test
Transport:
Config:
MaxLength: 10000000
NameSpace: http://www.example.com/actions
Type: HTTP::SOAP
RemoteSystem: remote.system.description.example.com
Requester:
Invoker:
Test:
Description: This is a test invoker
Events:
- Asynchronous: 1
Event: TicketCreate
- Asynchronous: 0
Event: ArticleUpdate
MappingInbound:
Type: Simple
MappingOutbound:
Type: Simple
Type: Test::Test
Transport:
Config:
Authentication:
Password: '*******'
Type: BasicAuth
User: otrs
Encoding: utf-8
Endpoint: http://www.example.com:8080/endpoint
NameSpace: http://www.example.com/actions
SOAPAction: Yes
SOAPActionSeparator: '#'
Type: HTTP::SOAP
Beschreibung: ein kurzer Text, der den Webservice beschreibt.
RemoteSystem: eine kurze Beschreibung des Remote-Systems.
Debugger: ein Behälter für die Debugger-Einstellungen.
Provider: ein Behälter für die Anbieter-Einstellungen.
Requester: ein Behälter für die Anforderer-Einstellungen.
DebugThreshold: das Debugger-Level
mögliche Werte
debug: alle Protokolle werden in der Datenbank gespeichert.
info: info, notice und error level - Protokolle werden in der Datenbank gespeichert.
notice: notice und error level - Protokolle werden in der Datenbank gespeichert.
error: nur error level - Protokolle werden in der Datenbank gespeichert.
Operation: ein Behälter für alle Operations-Einstellungen.
Transport: ein Behälter für Provider-Netzwerk-Transport-Einstellungen.
<OperationName>: eindeutiger Name für die Operation, eigener Container für eigene Operationseinstellungen (Kardinalität 0 ..n, aber nicht mehrfach).
Dieser Abschnitt basiert auf Operationen vom Typ "Test::Test" andere Operationen können unterschiedliche Einstellungen beinhalten.
Beschreibung: ein kurzer Text, der die Operation beschreibt.
MappingInbound: Ein Container für die Mapping-Einstellung für eingehende Anfragen.
MappingOutbound: Ein Container für die Mapping-Einstellung für ausgehende Anfragen.
Type: Das Operation-Backend, im Format Controller::Operation.
Dieser Abschnitt basiert auf Mappings vom Typ "Simple". Andere Mappings können eventuell mehr oder andere Einstellungen beinhalten.
Config: Ein Container für diese Mapping-Einstellungen.
Type: Das Mapping-Backend.
KeyMapDefault: Ein Container für alle nicht gemappten Key-Einstellungen.
ValueMapDefault: Ein Container für alle nicht gemappten Wert-Einstellungen.
KeyMapExact: Ein Container für alle exakten Key-Mappings (Kardinalität 0 .. 1).
KeyMapRegEx: Ein Container für alle regulären Regular Expression Key-Mappings (Kardinalität 0 .. 1).
ValueMap: Ein Contanier für alle Werte-Mappings (Kardinalität 0 .. 1).
MapTo: Der neue Wert welcher benutzt werden soll (nur anwendbar wenn der MapType auf MapTo gesetzt ist).
MapType: Die Regel für das Mapping.
mögliche Werte
Keep: unverändert lassen.
Ignore: verwerfen.
MapTo: Ändern auf den MapTo-Wert.
<newkey>: Ein Container für das Werte-Mapping für diesen neuen Key (Kardinalität hängt von den neuen Keys aus KeyMapExact und KeyMapRegEx ab).
ValueMapExact: Ein Container für alle exakten Werte-Mappings (Kardinalität 0 .. 1).
ValueMapRegEx: Ein Container für alle Regular Expression Werte-Mappings (Kardinalität 0 .. 1).
Dieser Abschnitt basiert auf Provider-Übertragungsart HTTP::SOAP, andere Übertragungsarten können unterschiedliche Einstellungen beinhalten.
Config: Ein Container für die spezifischen Netzwerk-Transport-Einstellungen.
Type: Netzwerk-Transport-Backend des Providers.
Invoker: ein Container für jede 'Invoker'-Einstellung.
Transport: ein Container für Netzwerk-Transport-Einstellungen für Requester.
<InvokerName>: eindeutiger Name für den Invoker, Container für eigene Invoker-Einstellungen (Kardinalität 0..n, aber nicht mehrfach).
Dieser Abschnitt basiert auf Invoker vom Typ "Test::Test" andere Operationen können unterschiedliche Einstellungen beinhalten.
Beschreibung: ein kurzer Text, der den Aufrufer beschreibt
Events: ein Container für Eventtrigger-Einstellungen, die keinen Namen besitzen.
MappingInbound: Ein Container für die Mapping-Einstellung für eingehende Anfragen.
MappingOutbound: Ein Container für die Mapping-Einstellung für ausgehende Anfragen.
Type: Das Invoker-Backend, im Format Controller::Invoker
Auflistung der Elemente: (Kardinalität 0 .. n)
Asynchron: bestimmt ob die Invoker-Ausführung an den Scheduler delegiert werden
mögliche Werte
0: nicht vom Scheduler verarbeitet
1: vom Scheduler verarbeitet.
Event: Der Name des Event-Triggers.
Mögliche Werte (für TicketEvents)
TicketCreate
TicketDelete
TicketTitleUpdate
TicketUnlockTimeoutUpdate
TicketQueueUpdate
TicketTypeUpdate
TicketServiceUpdate
TicketSLAUpdate
TicketCustomerUpdate
TicketFreeTextUpdate
TicketFreeTimeUpdate
TicketPendingTimeUpdate
TicketLockUpdate
TicketArchiveFlagUpdate
TicketStateUpdate
TicketOwnerUpdate
TicketResponsibleUpdate
TicketPriorityUpdate
HistoryAdd
HistoryDelete
TicketAccountTime
TicketMerge
TicketSubscribe
TicketUnsubscribe
TicketFlagSet
TicketFlagDelete
TicketSlaveLinkAdd
TicketSlaveLinkDelete
TicketMasterLinkDelete
Mögliche Werte (für Artikel-Events)
Article Events
ArticleCreate
ArticleFreeTextUpdate
ArticleUpdate
ArticleSend
ArticleBounce
ArticleAgentNotification
ArticleCustomerNotification
ArticleAutoResponse
ArticleFlagSet
ArticleFlagDelete
ArticleAgentNotification
ArticleCustomerNotification
Dieser Abschnitt basiert auf Requester-Übertragungsart HTTP::SOAP, andere Übertragungsarten können unterschiedliche Einstellungen beinhalten.
Config: Ein Container für die spezifischen Netzwerk-Transport-Einstellungen.
Type: Netzwerk-Transport-Backend des Requesters.
Authentifizierung: ein Behälter für die Authentifizierungs-Einstellungen.
Enkodieren: die SOAP-Nachrichtenanfrage enkodieren
Endpoint: the URI of the Remote Server web service to accept OTRS requests
NameSpace: an URI that gives a context to all invokers that belongs to this web service.
SOAPAction: to send an empty or filled SOAPAction header in the SOAP Message (in "<NameSpace> <Separator> <Action>" format).
mögliche Werte
JA: um einen befüllten SOAPAction-Header zu senden.
Nein: um einen leeren SOAPAction-Header zu senden.
SOAPActionSeparator: Für das setzen eines <Separator> eines SOAPAction Headers.
mögliche Werte
'/': genutzt für .net-Webservices.
'#': genutzt für alle anderen Webservices.
A Connector is in essence a set of actions that are either called Operations if OTRS acts as a web service provider or Invokers if OTRS acts as a web service requester. But it can also include special Mappings or Transports.
One Connector can either have only Operations, Only Invokers or both. A connector can even use parts of other connectors like the Mappings or Transports if they are not to specific for the Connector that is trying to implement them.
In other words a Connector is not limited to just the Controller layer but it can be extended to Data Mapping or Network Transport layers if needed.
Due to the modular design of the Generic Interface a Connector can be seen as a plug-in; this means that by adding Connectors the capabilities of the generic interface can be extended using: OTRS Feature add ons, OTRS Custom modules, 3rd Party modules, and so on.
In dieser OTRS Version sind die folgenden Verbinder verfügbar.
Sitzung
Ticket
This connector is capable to create a valid SessionID that can be used in any other operation.
Liefert:
Operationen:
SessionCreate
Creates a new new valid SessionID to be used in other operations from other connectors like TicketCreate.
Anmerkung
To use the SessionID in other operations from other connectors it is necessary that the operation implements authentication by SessionID. All the rest of the bundled operations are capable of accepting a valid SessionID as an authentication method.
Mögliche Attribute:
 <SessionCreate>
<!--You have a MANDATORY CHOICE of the next 2 items at this level-->
<!--Optional:-->
<UserLogin>?</UserLogin>
<!--Optional:-->
<CustomerUserLogin>?</CustomerUserLogin>
<!--Optional:-->
<Password>?</Password>
</SessionCreate>
Dieser Connector liefert die Basisfunktionalität um mit Tickets zu interagieren.
Liefert:
Operationen:
TicketCreate
TicketUpdate
TicketGet
TicketSearch
Provides an interface to create a ticket in OTRS. A ticket must contain an Article and can contain several attachments, all defined Dynamic Fields can be also set on TicketCreate operation.
Mögliche Attribute:
<TicketCreate>
<!--You have a MANDATORY CHOICE of the next 3 items at this level-->
<!--Optional:-->
<UserLogin>?</UserLogin>
<!--Optional:-->
<CustomerUserLogin>?</CustomerUserLogin>
<!--Optional:-->
<SessionID>?</SessionID>
<!--Optional:-->
<Password>?</Password>
<Ticket>
<Title>?</Title>
<!--You have a MANDATORY CHOICE of the next 2 items at this level-->
<!--Optional:-->
<QueueID>?</QueueID>
<!--Optional:-->
<Queue>?</Queue>
<!--You have a CHOICE of the next 2 items at this level-->
<!--Optional:-->
<TypeID>?</TypeID>
<!--Optional:-->
<Type>?</Type>
<!--You have a CHOICE of the next 2 items at this level-->
<!--Optional:-->
<ServiceID>?</ServiceID>
<!--Optional:-->
<Service>?</Service>
<!--You have a CHOICE of the next 2 items at this level-->
<!--Optional:-->
<SLAID>?</SLAID>
<!--Optional:-->
<SLA>?</SLA>
<!--You have a MANDATORY CHOICE of the next 2 items at this level-->
<!--Optional:-->
<StateID>?</StateID>
<!--Optional:-->
<State>?</State>
<!--You have a MANDATORY CHOICE of the next 2 items at this level-->
<!--Optional:-->
<PriorityID>?</PriorityID>
<!--Optional:-->
<Priority>?</Priority>
<!--You have a CHOICE of the next 2 items at this level-->
<!--Optional:-->
<OwnerID>?</OwnerID>
<!--Optional:-->
<Owner>?</Owner>
<!--You have a CHOICE of the next 2 items at this level-->
<!--Optional:-->
<ResponsibleID>?</ResponsibleID>
<!--Optional:-->
<Responsible>?</Responsible>
<CustomerUser>?</CustomerUser>
<!--Optional:-->
<CustomerID>?</CustomerID>
<!--Optional:-->
<PendingTime>
<Year>?</Year>
<Month>?</Month>
<Day>?</Day>
<Hour>?</Hour>
<Minute>?</Minute>
</PendingTime>
</Ticket>
<Article>
<!--You have a CHOICE of the next 2 items at this level-->
<!--Optional:-->
<ArticleTypeID>?</ArticleTypeID>
<!--Optional:-->
<ArticleType>?</ArticleType>
<!--You have a CHOICE of the next 2 items at this level-->
<!--Optional:-->
<SenderTypeID>?</SenderTypeID>
<!--Optional:-->
<SenderType>?</SenderType>
<!--Optional:-->
<From>?</From>
<Subject>?</Subject>
<Body>?</Body>
<!--You have a CHOICE of the next 2 items at this level-->
<!--Optional:-->
<ContentType>?</ContentType>
<Charset>?</Charset>
<MimeType>?</MimeType>
<!--Optional:-->
<HistoryType>?</HistoryType>
<!--Optional:-->
<HistoryComment>?</HistoryComment>
<!--Optional:-->
<AutoResponseType>?</AutoResponseType>
<!--Optional:-->
<TimeUnit>?</TimeUnit>
<!--Optional:-->
<NoAgentNotify>?</NoAgentNotify>
<!--Zero or more repetitions:-->
<ForceNotificationToUserID>?</ForceNotificationToUserID>
<!--Zero or more repetitions:-->
<ExcludeNotificationToUserID>?</ExcludeNotificationToUserID>
<!--Zero or more repetitions:-->
<ExcludeMuteNotificationToUserID>?</ExcludeMuteNotificationToUserID>
</Article>
<!--Zero or more repetitions:-->
<DynamicField>
<Name>?</Name>
<!--1 or more repetitions:-->
<Value>?</Value>
</DynamicField>
<!--Zero or more repetitions:-->
<Attachment>
<Content>cid:61886944659</Content>
<ContentType>?</ContentType>
<Filename>?</Filename>
</Attachment>
</TicketCreate>
TicketUpdate operation adds the capability to modify attributes from an existing ticket or to add a new article, including attachments and all defined dynamic fields for the ticket and the new article.
Anmerkung
It is not necessary to create a new article to modify a ticket attribute.
Mögliche Attribute:
<TicketUpdate>
<!--You have a MANDATORY CHOICE of the next 3 items at this level-->
<!--Optional:-->
<UserLogin>?</UserLogin>
<!--Optional:-->
<CustomerUserLogin>?</CustomerUserLogin>
<!--Optional:-->
<SessionID>?</SessionID>
<!--Optional:-->
<Password>?</Password>
<!--You have a CHOICE of the next 2 items at this level-->
<TicketID>?</TicketID>
<TicketNumber>?</TicketNumber>
<!--Optional:-->
<Ticket>
<!--Optional:-->
<Title>?</Title>
<!--You have a CHOICE of the next 2 items at this level-->
<!--Optional:-->
<QueueID>?</QueueID>
<!--Optional:-->
<Queue>?</Queue>
<!--You have a CHOICE of the next 2 items at this level-->
<!--Optional:-->
<TypeID>?</TypeID>
<!--Optional:-->
<Type>?</Type>
<!--You have a CHOICE of the next 2 items at this level-->
<!--Optional:-->
<ServiceID>?</ServiceID>
<!--Optional:-->
<Service>?</Service>
<!--You have a CHOICE of the next 2 items at this level-->
<!--Optional:-->
<SLAID>?</SLAID>
<!--Optional:-->
<SLA>?</SLA>
<!--You have a CHOICE of the next 2 items at this level-->
<!--Optional:-->
<StateID>?</StateID>
<!--Optional:-->
<State>?</State>
<!--You have a CHOICE of the next 2 items at this level-->
<!--Optional:-->
<PriorityID>?</PriorityID>
<!--Optional:-->
<Priority>?</Priority>
<!--You have a CHOICE of the next 2 items at this level-->
<!--Optional:-->
<OwnerID>?</OwnerID>
<!--Optional:-->
<Owner>?</Owner>
<!--You have a CHOICE of the next 2 items at this level-->
<!--Optional:-->
<ResponsibleID>?</ResponsibleID>
<!--Optional:-->
<Responsible>?</Responsible>
<!--Optional:-->
<CustomerUser>?</CustomerUser>
<!--Optional:-->
<CustomerID>?</CustomerID>
<!--Optional:-->
<PendingTime>
<Year>?</Year>
<Month>?</Month>
<Day>?</Day>
<Hour>?</Hour>
<Minute>?</Minute>
</PendingTime>
</Ticket>
<!--Optional:-->
<Article>
<!--You have a CHOICE of the next 2 items at this level-->
<!--Optional:-->
<ArticleTypeID>?</ArticleTypeID>
<!--Optional:-->
<ArticleType>?</ArticleType>
<!--You have a CHOICE of the next 2 items at this level-->
<!--Optional:-->
<SenderTypeID>?</SenderTypeID>
<!--Optional:-->
<SenderType>?</SenderType>
<!--Optional:-->
<From>?</From>
<Subject>?</Subject>
<Body>?</Body>
<!--You have a CHOICE of the next 2 items at this level-->
<!--Optional:-->
<ContentType>?</ContentType>
<Charset>?</Charset>
<MimeType>?</MimeType>
<!--Optional:-->
<HistoryType>?</HistoryType>
<!--Optional:-->
<HistoryComment>?</HistoryComment>
<!--Optional:-->
<AutoResponseType>?</AutoResponseType>
<!--Optional:-->
<TimeUnit>?</TimeUnit>
<!--Optional:-->
<NoAgentNotify>?</NoAgentNotify>
<!--Zero or more repetitions:-->
<ForceNotificationToUserID>?</ForceNotificationToUserID>
<!--Zero or more repetitions:-->
<ExcludeNotificationToUserID>?</ExcludeNotificationToUserID>
<!--Zero or more repetitions:-->
<ExcludeMuteNotificationToUserID>?</ExcludeMuteNotificationToUserID>
</Article>
<!--Zero or more repetitions:-->
<DynamicField>
<Name>?</Name>
<!--1 or more repetitions:-->
<Value>?</Value>
</DynamicField>
<!--Zero or more repetitions:-->
<Attachment>
<Content>cid:166861569966</Content>
<ContentType>?</ContentType>
<Filename>?</Filename>
</Attachment>
</TicketUpdate>
This operation is used to get all the attributes of a ticket including the dynamic fields, all articles and all of the attachments that belong to the ticket.
Mögliche Attribute:
      <TicketGet>
         <!--You have a MANDATORY CHOICE of the next 3 items at this level-->
         <!--Optional:-->
         <UserLogin>?</UserLogin>
         <!--Optional:-->
         <CustomerUserLogin>?</CustomerUserLogin>
         <!--Optional:-->
         <SessionID>?</SessionID>
         <!--Optional:-->
         <Password>?</Password>
         <!--1 or more repetitions:-->
         <TicketID>?</TicketID>
         <!--Optional:-->
         <DynamicFields>?</DynamicFields>
         <!--Optional:-->
         <Extended>?</Extended>
         <!--Optional:-->
         <AllArticles>?</AllArticles>
         <!--Optional:-->
         <ArticleSenderType>?</ArticleSenderType>
         <!--Optional:-->
         <ArticleOrder>?</ArticleOrder>
         <!--Optional:-->
         <ArticleLimit>?</ArticleLimit>
         <!--Optional:-->
         <Attachments>?</Attachments>
         <!--Optional:-->
         <HTMLBodyAsAttachment>?</HTMLBodyAsAttachment>
      </TicketGet>
Die Operation TicketSearch liefert eine Liste mit TicketIDs die auf die eingegebenen Suchkriterien passen.
Mögliche Attribute:
      <TicketSearch>
         <!--You have a MANDATORY CHOICE of the next 3 items at this level-->
         <!--Optional:-->
         <UserLogin>?</UserLogin>
         <!--Optional:-->
         <CustomerUserLogin>?</CustomerUserLogin>
         <!--Optional:-->
         <SessionID>?</SessionID>
         <!--Optional:-->
         <Password>?</Password>
         <!--Optional:-->
         <Limit>?</Limit>
         <!--Zero or more repetitions:-->
         <TicketNumber>?</TicketNumber>
         <!--Zero or more repetitions:-->
         <Title>?</Title>
         <!--Zero or more repetitions:-->
         <Queues>?</Queues>
         <!--Zero or more repetitions:-->
         <QueueIDs>?</QueueIDs>
         <!--Optional:-->
         <UseSubQueues>?</UseSubQueues>
         <!--Zero or more repetitions:-->
         <Types>?</Types>
         <!--Zero or more repetitions:-->
         <TypeIDs>?</TypeIDs>
         <!--Zero or more repetitions:-->
         <States>?</States>
         <!--Zero or more repetitions:-->
         <StateIDs>?</StateIDs>
         <!--Zero or more repetitions:-->
         <StateType>?</StateType>
         <!--Zero or more repetitions:-->
         <StateTypeIDs>?</StateTypeIDs>
         <!--Zero or more repetitions:-->
         <Priorities>?</Priorities>
         <!--Zero or more repetitions:-->
         <PriorityIDs>?</PriorityIDs>
         <!--Zero or more repetitions:-->
         <Services>?</Services>
         <!--Zero or more repetitions:-->
         <ServiceIDs>?</ServiceIDs>
         <!--Zero or more repetitions:-->
         <SLAs>?</SLAs>
         <!--Zero or more repetitions:-->
         <SLAIDs>?</SLAIDs>
         <!--Zero or more repetitions:-->
         <Locks>?</Locks>
         <!--Zero or more repetitions:-->
         <LockIDs>?</LockIDs>
         <!--Zero or more repetitions:-->
         <OwnerIDs>?</OwnerIDs>
         <!--Zero or more repetitions:-->
         <ResponsibleIDs>?</ResponsibleIDs>
         <!--Zero or more repetitions:-->
         <WatchUserIDs>?</WatchUserIDs>
         <!--Zero or more repetitions:-->
         <CustomerID>?</CustomerID>
         <!--Zero or more repetitions:-->
         <CustomerUserLogin>?</CustomerUserLogin>
         <!--Zero or more repetitions:-->
         <CreatedUserIDs>?</CreatedUserIDs>
         <!--Zero or more repetitions:-->
         <CreatedTypes>?</CreatedTypes>
         <!--Zero or more repetitions:-->
         <CreatedTypeIDs>?</CreatedTypeIDs>
         <!--Zero or more repetitions:-->
         <CreatedPriorities>?</CreatedPriorities>
         <!--Zero or more repetitions:-->
         <CreatedPriorityIDs>?</CreatedPriorityIDs>
         <!--Zero or more repetitions:-->
         <CreatedStates>?</CreatedStates>
         <!--Zero or more repetitions:-->
         <CreatedStateIDs>?</CreatedStateIDs>
         <!--Zero or more repetitions:-->
         <CreatedQueues>?</CreatedQueues>
         <!--Zero or more repetitions:-->
         <CreatedQueueIDs>?</CreatedQueueIDs>
         <!--Zero or more repetitions:-->
         <DynamicFields>
            <!--You have a MANDATORY CHOICE of the next 6 items at this level-->
            <!--Optional:-->
            <Equals>?</Equals>
            <!--Optional:-->
            <Like>?</Like>
            <!--Optional:-->
            <GreaterThan>?</GreaterThan>
            <!--Optional:-->
            <GreaterThanEquals>?</GreaterThanEquals>
            <!--Optional:-->
            <SmallerThan>?</SmallerThan>
            <!--Optional:-->
            <SmallerThanEquals>?</SmallerThanEquals>
         </DynamicFields>
         <!--Optional:-->
         <Ticketflag>
            <!--Optional:-->
            <Seen>?</Seen>
         </Ticketflag>
         <!--Optional:-->
         <From>?</From>
         <!--Optional:-->
         <To>?</To>
         <!--Optional:-->
         <Cc>?</Cc>
         <!--Optional:-->
         <Subject>?</Subject>
         <!--Optional:-->
         <Body>?</Body>
         <!--Optional:-->
         <FullTextIndex>?</FullTextIndex>
         <!--Optional:-->
         <ContentSearch>?</ContentSearch>
         <!--Optional:-->
         <ConditionInline>?</ConditionInline>
         <!--Optional:-->
         <ArticleCreateTimeOlderMinutes>?</ArticleCreateTimeOlderMinutes>
         <!--Optional:-->
         <ArticleCreateTimeNewerMinutes>?</ArticleCreateTimeNewerMinutes>
         <!--Optional:-->
         <ArticleCreateTimeNewerDate>?</ArticleCreateTimeNewerDate>
         <!--Optional:-->
         <ArticleCreateTimeOlderDate>?</ArticleCreateTimeOlderDate>
         <!--Optional:-->
         <TicketCreateTimeOlderMinutes>?</TicketCreateTimeOlderMinutes>
         <!--Optional:-->
         <ATicketCreateTimeNewerMinutes>?</ATicketCreateTimeNewerMinutes>
         <!--Optional:-->
         <TicketCreateTimeNewerDate>?</TicketCreateTimeNewerDate>
         <!--Optional:-->
         <TicketCreateTimeOlderDate>?</TicketCreateTimeOlderDate>
         <!--Optional:-->
         <TicketLastChangeTimeOlderMinutes>?</TicketLastChangeTimeOlderMinutes>
         <!--Optional:-->
         <TicketLastChangeTimeNewerMinutes>?</TicketLastChangeTimeNewerMinutes>
         <!--Optional:-->
         <TicketLastChangeTimeNewerDate>?</TicketLastChangeTimeNewerDate>
         <!--Optional:-->
         <TicketLastChangeTimeOlderDate>?</TicketLastChangeTimeOlderDate>
         <!--Optional:-->
         <TicketChangeTimeOlderMinutes>?</TicketChangeTimeOlderMinutes>
         <!--Optional:-->
         <TicketChangeTimeNewerMinutes>?</TicketChangeTimeNewerMinutes>
         <!--Optional:-->
         <TicketChangeTimeNewerDate>?</TicketChangeTimeNewerDate>
         <!--Optional:-->
         <TicketChangeTimeOlderDate>?</TicketChangeTimeOlderDate>
         <!--Optional:-->
         <TicketCloseTimeOlderMinutes>?</TicketCloseTimeOlderMinutes>
         <!--Optional:-->
         <TicketCloseTimeNewerMinutes>?</TicketCloseTimeNewerMinutes>
         <!--Optional:-->
         <TicketCloseTimeNewerDate>?</TicketCloseTimeNewerDate>
         <!--Optional:-->
         <TicketCloseTimeOlderDate>?</TicketCloseTimeOlderDate>
         <!--Optional:-->
         <TicketPendingTimeOlderMinutes>?</TicketPendingTimeOlderMinutes>
         <!--Optional:-->
         <TicketPendingTimeNewerMinutes>?</TicketPendingTimeNewerMinutes>
         <!--Optional:-->
         <TicketPendingTimeNewerDate>?</TicketPendingTimeNewerDate>
         <!--Optional:-->
         <TicketPendingTimeOlderDate>?</TicketPendingTimeOlderDate>
         <!--Optional:-->
         <TicketEscalationTimeOlderMinutes>?</TicketEscalationTimeOlderMinutes>
         <!--Optional:-->
         <TTicketEscalationTimeNewerMinutes>?</TTicketEscalationTimeNewerMinutes>
         <!--Optional:-->
         <TicketEscalationTimeNewerDate>?</TicketEscalationTimeNewerDate>
         <!--Optional:-->
         <TicketEscalationTimeOlderDate>?</TicketEscalationTimeOlderDate>
         <!--Optional:-->
         <ArchiveFlags>?</ArchiveFlags>
         <!--Zero or more repetitions:-->
         <OrderBy>?</OrderBy>
         <!--Zero or more repetitions:-->
         <SortBy>?</SortBy>
         <!--Zero or more repetitions:-->
         <CustomerUserID>?</CustomerUserID>
      </TicketSearch>
The following is a basic but complete web service configuration file in YAML format to use all the Ticket Connector operations with the SOAP network transport. In order to use it in OTRS you need to copy the content, save it into a file and call it GenericTicketConnectorSOAP.yml, and import it into OTRS in the Web Services screen in the Admin panel by clicking in the "Add web service" action from the overview screen and then clicking in the "Import web service" action in the add screen.
---
Debugger:
  DebugThreshold: debug
  TestMode: 0
Description: Ticket Connector SOAP Sample
FrameworkVersion: 3.4.x git
Provider:
  Operation:
    SessionCreate:
      Description: Creates a Session
      MappingInbound: {}
      MappingOutbound: {}
      Type: Session::SessionCreate
    TicketCreate:
      Description: Creates a Ticket
      MappingInbound: {}
      MappingOutbound: {}
      Type: Ticket::TicketCreate
    TicketUpdate:
      Description: Updates a Ticket
      MappingInbound: {}
      MappingOutbound: {}
      Type: Ticket::TicketUpdate
    TicketGet:
      Description: Retrieve Ticket data
      MappingInbound: {}
      MappingOutbound: {}
      Type: Ticket::TicketGet
    TicketSearch:
      Description: Search for Tickets
      MappingInbound: {}
      MappingOutbound: {}
      Type: Ticket::TicketSearch
  Transport:
    Config:
      MaxLength: 100000000
      NameSpace: http://www.otrs.org/TicketConnector/
    Type: HTTP::SOAP
RemoteSystem: ''
Requester:
  Transport:
    Type: ''
Similar example can be done for the REST network transport, REST web services uses HTTP operations such as "POST", "GET", "PUT", "PATCH" etc. This operations in conjunction with a URI path called resource defines a OTRS Generic Interface Operation or Invoker (depending on the communication way).
The following example uses /Session resource for SessionCreate, /Ticket resource for TicketSearch and TicketCreate and resource /Ticket/{TicketID} for TicketGet and TicketUpdate (Where {TicketID} is the actual TicketID value of a ticket e.g. /Ticket/123). In order to use it in OTRS you need to copy the content, save it into a file and call it GenericTicketConnectorREST.yml, and import it into OTRS in the Web Services screen in the Admin panel by clicking in the "Add web service" action from the overview screen and then clicking in the "Import web service" action in the add screen.
---
Debugger:
  DebugThreshold: debug
  TestMode: '0'
Description: Ticket Connector REST Sample
FrameworkVersion: 3.4.x git
Provider:
  Operation:
    SessionCreate:
      Description: Creates a Session
      MappingInbound: {}
      MappingOutbound: {}
      Type: Session::SessionCreate
    TicketCreate:
      Description: Creates a Ticket
      MappingInbound: {}
      MappingOutbound: {}
      Type: Ticket::TicketCreate
    TicketGet:
      Description: Retrieves Ticket data
      MappingInbound: {}
      MappingOutbound: {}
      Type: Ticket::TicketGet
    TicketSearch:
      Description: Search for Tickets
      MappingInbound: {}
      MappingOutbound: {}
      Type: Ticket::TicketSearch
    TicketUpdate:
      Description: Updates a Ticket
      MappingInbound: {}
      MappingOutbound: {}
      Type: Ticket::TicketUpdate
  Transport:
    Config:
      KeepAlive: ''
      MaxLength: '100000000'
      RouteOperationMapping:
        SessionCreate:
          RequestMethod:
          - POST
          Route: /Session
        TicketCreate:
          RequestMethod:
          - POST
          Route: /Ticket
        TicketGet:
          RequestMethod:
          - GET
          Route: /Ticket/:TicketID
        TicketSearch:
          RequestMethod:
          - GET
          Route: /Ticket
        TicketUpdate:
          RequestMethod:
          - PATCH
          Route: /Ticket/:TicketID
    Type: HTTP::REST
RemoteSystem: ''
Requester:
  Transport:
    Type: ''
The following code is a Perl script that can connect to OTRS via the generic interface. In order to perform the operations provided by the Ticket Connector, it uses two Perl CPAN modules SOAP::Lite and Data::Dumper. Please make sure that your environment is capable to use these modules before you try to run the script.
#!/usr/bin/perl -w
# --
# otrs.SOAPRequest.pl - sample to send a SOAP request to OTRS Generic Interface Ticket Connector
# Copyright (C) 2001-2018 OTRS AG, https://otrs.com/
# --
# This program is free software: you can redistribute it and/or modify
# it under the terms of the GNU General Public License as published by
# the Free Software Foundation, either version 3 of the License, or
# (at your option) any later version.
#
# This program is distributed in the hope that it will be useful,
# but WITHOUT ANY WARRANTY; without even the implied warranty of
# MERCHANTABILITY or FITNESS FOR A PARTICULAR PURPOSE. See the
# GNU General Public License for more details.
#
# You should have received a copy of the GNU General Public License
# along with this program. If not, see https://www.gnu.org/licenses/gpl-3.0.txt.
# --

use strict;
use warnings;

# use ../ as lib location
use File::Basename;
use FindBin qw($RealBin);
use lib dirname($RealBin);

use SOAP::Lite;
use Data::Dumper;

# ---
# Variables to be defined.

# this is the URL for the web service
# the format is
# <HTTP_TYPE>:://<OTRS_FQDN>/nph-genericinterface.pl/Webservice/<WEB_SERVICE_NAME>
# or
# <HTTP_TYPE>:://<OTRS_FQDN>/nph-genericinterface.pl/WebserviceID/<WEB_SERVICE_ID>
my $URL = 'http://localhost/otrs/nph-genericinterface.pl/Webservice/GenericTicketConnector';

# this name space should match the specified name space in the SOAP transport for the web service.
my $NameSpace = 'http://www.otrs.org/TicketConnector/';

# this is operation to execute, it could be TicketCreate, TicketUpdate, TicketGet, TicketSearch
# or SessionCreate. and they must to be defined in the web service.
my $Operation = 'TicketCreate';

# this variable is used to store all the parameters to be included on a request in XML format. Each
# operation has a determined set of mandatory and non mandatory parameters to work correctly. Please
# check the OTRS Admin Manual in order to get a complete list of parameters.
my $XMLData = '
<UserLogin>some user login</UserLogin>
<Password>some password</Password>
<Ticket>
    <Title>some title</Title>
    <CustomerUser>some customer user login</CustomerUser>
    <Queue>some queue</Queue>
    <State>some state</State>
    <Priority>some priority</Priority>
</Ticket>
<Article>
    <Subject>some subject</Subject>
    <Body>some body</Body>
    <ContentType>text/plain; charset=utf8</ContentType>
</Article>
';

# ---

# create a SOAP::Lite data structure from the provided XML data structure.
my $SOAPData = SOAP::Data
    ->type( 'xml' => $XMLData );

my $SOAPObject = SOAP::Lite
    ->uri($NameSpace)
    ->proxy($URL)
    ->$Operation($SOAPData);

# check for a fault in the soap code.
if ( $SOAPObject->fault ) {
    print $SOAPObject->faultcode, " ", $SOAPObject->faultstring, "\n";
}

# otherwise print the results.
else {

    # get the XML response part from the SOAP message.
    my $XMLResponse = $SOAPObject->context()->transport()->proxy()->http_response()->content();

    # deserialize response (convert it into a perl structure).
    my $Deserialized = eval {
        SOAP::Deserializer->deserialize($XMLResponse);
    };

    # remove all the headers and other not needed parts of the SOAP message.
    my $Body = $Deserialized->body();

    # just output relevant data and no the operation name key (like TicketCreateResponse).
    for my $ResponseKey ( keys %{$Body} ) {
        print Dumper( $Body->{$ResponseKey} );
    }
}
The following code is a Perl script that can connect to OTRS via the generic interface. In order to perform the operations provided by the Ticket Connector, it uses three Perl CPAN modules JSON, REST::Client and Data::Dumper. Please make sure that your environment is capable to use these modules before you try to run the script.
#!/usr/bin/perl
# --
# otrs.RESTRequest.pl - sample to send a REST request to OTRS Generic Interface Ticket Connector
# Copyright (C) 2001-2018 OTRS AG, https://otrs.com/
# --
# This program is free software: you can redistribute it and/or modify
# it under the terms of the GNU General Public License as published by
# the Free Software Foundation, either version 3 of the License, or
# (at your option) any later version.
#
# This program is distributed in the hope that it will be useful,
# but WITHOUT ANY WARRANTY; without even the implied warranty of
# MERCHANTABILITY or FITNESS FOR A PARTICULAR PURPOSE. See the
# GNU General Public License for more details.
#
# You should have received a copy of the GNU General Public License
# along with this program. If not, see https://www.gnu.org/licenses/gpl-3.0.txt.
# --

use strict;
use warnings;

## nofilter(TidyAll::Plugin::OTRS::Perl::Dumper)

# use ../ as lib location
use File::Basename;
use FindBin qw($RealBin);
use lib dirname($RealBin);

use JSON;
use REST::Client;

# ---
# Variables to be defined

# This is the HOST for the web service the format is:
# <HTTP_TYPE>:://<OTRS_FQDN>/nph-genericinterface.pl
my $Host = 'http://localhost/otrs/nph-genericinterface.pl';

my $RestClient = REST::Client->new(
    {
        host => $Host,
    }
);

# This is the Controller and Request the format is:
# /Webservice/<WEB_SERVICE_NAME>/<RESOURCE>/<REQUEST_VALUE>
# or
# /WebserviceID/<WEB_SERVICE_ID>/<RESOURCE>/<REQUEST_VALUE>
# This example will retrieve the Ticket with the TicketID = 1 (<REQUEST_VALUE>)
my $ControllerAndRequest = '/Webservice/GenericTicketConnectorREST/Ticket/1';

my $Params = {
    UserLogin     => "some user login",       # to be filled with valid agent login
    Password      => "some user password",    # to be filled with valid agent password
    DynamicFields => 1,                       # optional, if set to 1,
                                              # ticket dynamic fields included in response
    AllArticles   => 1,                       # optional, if set to 1,
                                              # all ticket articles are included in response
                                              # more options to be found in
         # /Kernel/GenericInterface/Operation/Ticket/TicketGet.pm's
         # Run() subroutine documentation.
};

my @RequestParam;

# As sample web service configuration for TicketGet uses HTTP method GET all other parameters needs
# to be sent as URI query parameters

# ----
# For GET method
my $QueryParams = $RestClient->buildQuery( %{ $Params } );

$ControllerAndRequest .= $QueryParams;

# The @RequestParam array on position 0 holds controller and request
@RequestParam = ($ControllerAndRequest);

$RestClient->GET(@RequestParam);
# ----

# # ----
# # For POST method
# my $JSONParams = encode_json $Params;

# # The @RequestParam array on position 0 holds controller and request
# # on position 1 it holds the JSON data string that gets posted
# @RequestParam = (
#   $ControllerAndRequest,
#   $JSONParams
# );

# $RestClient->POST(@RequestParam);
# # ----

# If the host isn't reachable, wrong configured or couldn't serve the requested page:
my $ResponseCode = $RestClient->responseCode();
if ( $ResponseCode ne '200' ) {
    print "Request failed, response code was: $ResponseCode\n";
    exit;
}

# If the request was answered correctly, we receive a JSON string here.
my $ResponseContent = $RestClient->responseContent();

my $Data = decode_json $ResponseContent;

# Just to print out the returned Data structure:
use Data::Dumper;
print "Response was:\n";
print Dumper($Data);
Given the above example on a REST configuration for Generic Ticket Connector we have that:
Für Ticket-Erstellung: benutzen der POST-Methode am /Ticket-Pfad.
Für Ticket-Suche: benutzen der GET-Methode am /Ticket-Pfad.
Für Ticket-Update: benutzen der PATCH-Methode am /Ticket/{TicketID}-Pfad (in der {TicketID} eine Vorlage in der Übertragungskonfiguration ist)
For Ticket Get: use GET method on /Ticket/{TicketID} path (where {TicketID} is a template represented by :TicketID in the transport configuration)
cURL Kommando:
shell> curl "http://localhost/otrs/nph-genericinterface.pl/Webservice/GenericTicketConnectorREST/Ticket?UserLogin=agent&Password=123" -H "Content-Type: application/json" -d "{\"Ticket\":{\"Title\":\"REST Create Test\", \"Type\": \"Unclassified\", \"Queue\":\"Raw\",\"State\":\"open\",\"Priority\":\"3 normal\",\"CustomerUser\":\"customer\"},\"Article\":{\"Subject\":\"Rest Create Test\",\"Body\":\"This is only a test\",\"ContentType\":\"text/plain; charset=utf8\"}}" -X POST
Antwort:
{
  "ArticleID":5484,
  "TicketNumber":"1001936",
  "TicketID":"1686"
}
cURL Kommando:
curl "http://localhost/otrs/nph-genericinterface.pl/Webservice/GenericTicketConnectorREST/Ticket/1686?UserLogin=agent&Password=123"
Antwort:
{
  "Ticket": [
    {
      "Age": 777,
      "PriorityID": 3,
      "ServiceID": "",
      "Type": "Unclassified",
      "Responsible": "root@localhost",
      "StateID": 4,
      "ResponsibleID": 1,
      "ChangeBy": 2,
      "EscalationTime": 0,
      "Changed": "2014-06-30 19:08:14",
      "OwnerID": 2,
      "RealTillTimeNotUsed": 0,
      "GroupID": 1,
      "Owner": "agent",
      "CustomerID": "OTRS",
      "TypeID": 1,
      "Created": "2014-06-30 19:08:12",
      "Priority": "3 normal",
      "UntilTime": 0,
      "EscalationUpdateTime": 0,
      "QueueID": 2,
      "Queue": "Raw",
      "State": "open",
      "Title": "REST Create Test",
      "CreateBy": 2,
      "TicketID": 1686,
      "StateType": "open",
      "EscalationResponseTime": 0,
      "UnlockTimeout": 0,
      "EscalationSolutionTime": 0,
      "LockID": 1,
      "TicketNumber": "1001936",
      "ArchiveFlag": "n",
      "Lock": "unlock",
      "CreateTimeUnix": 1404173292,
      "SLAID": "",
      "CustomerUserID": "customer"
    }
  ]
}
cURL Kommando:
curl "http://localhost/otrs/nph-genericinterface.pl/Webservice/GenericTicketConnectorREST/Ticket/1686?UserLogin=agent&Password=123" -H "Content-Type: application/json" -d "{\"Ticket\":{\"Queues\":\"Postmaster\"}}" -X PATCH
Antwort:
{
  "TicketNumber":"1001936",
  "TicketID":"1686"
}