- Calendar Management
- Exporting calendars and/or appointments
- Importing calendars and/or appointments
- Calendar Overview
- Agenda Overview
- Management of calendar appointments
- Repeating appointments
- Notifications
- Event-based appointment/calendar notifications
- Link tickets to appointments
- Managed ticket appointments
- Dashboard widget for upcoming appointments
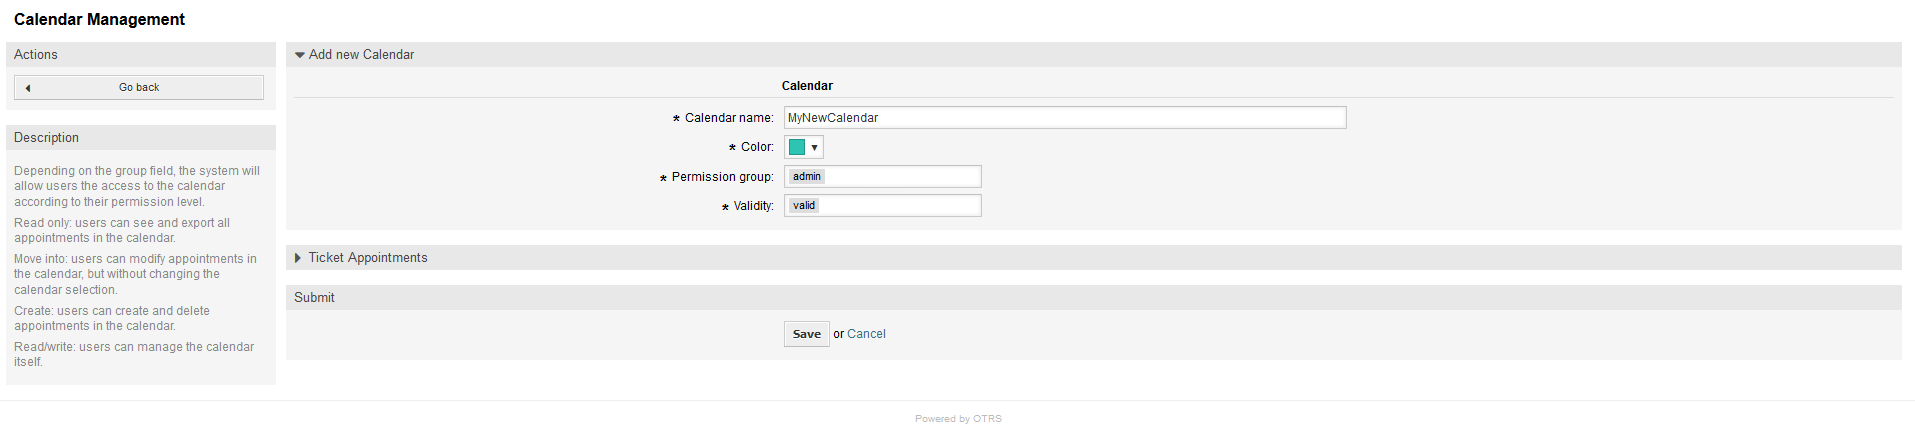
Via a management interface it is possible to add and edit calendars.
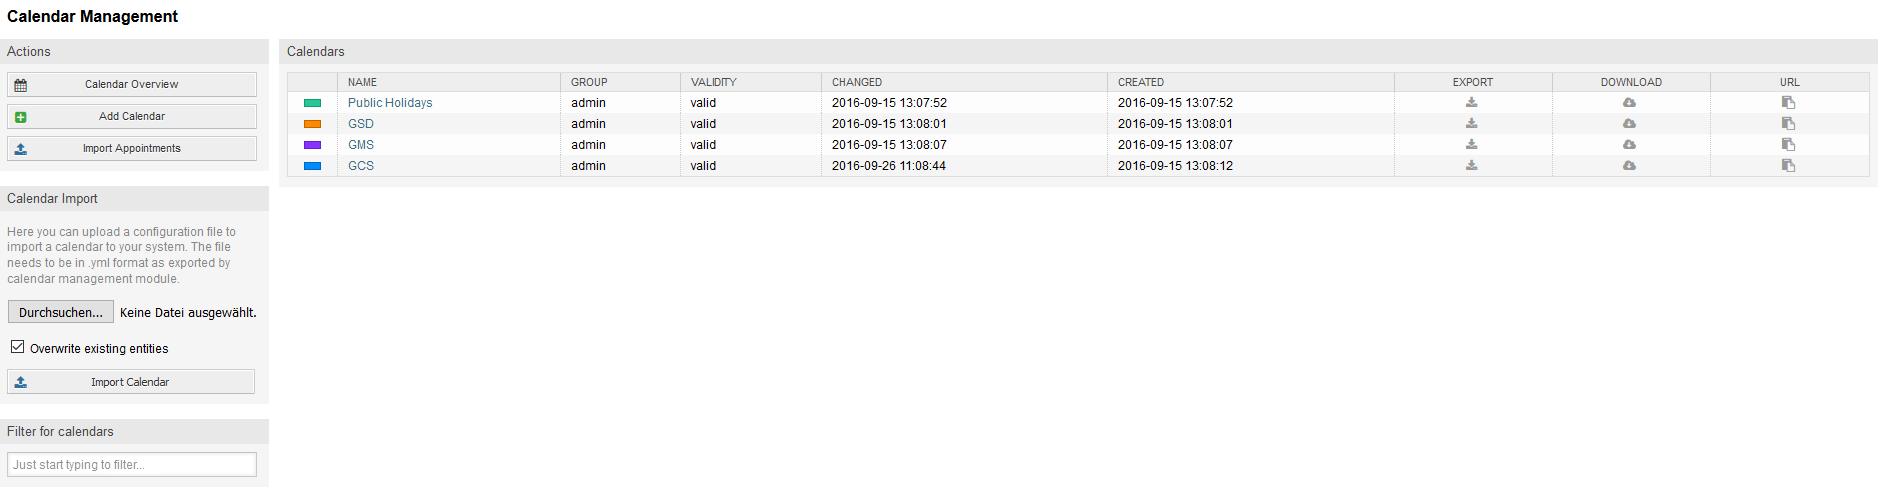
If a new calendar needs to be created or edited, it's necessary to define a calendar name, a color and the permission group the calendar belongs to. This is needed for agents to access the calendar properly with the related permissions.
The color can be selected with the built-in color picker, like in the following screenshot. There are three ways to select a color with the color picker. After clicking on the preselected color, a window opens with a set of pre-defined colors ready to be used. If your preferred color is not available, you can click on the More button to open the advanced mode.
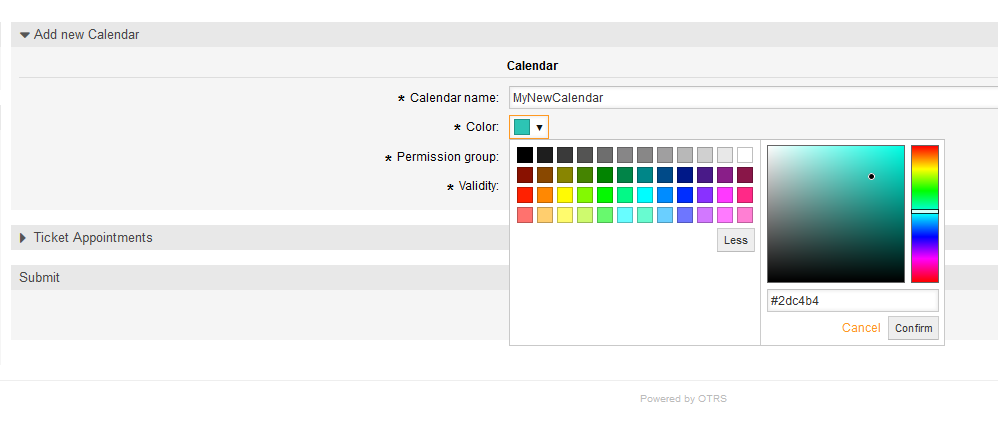
Within that mode, you can either select a certain color by using the color bar and the color field with your mouse or you're able to directly use a hexadecimal code of a desired color. By clicking on the Less button, you can shrink the color picker back again to the standard mode. Right after a click on the Confirm button, the new color is selected and visible in the preview field. Even if you selected a certain color within the advanced mode, the previous color will be selected again (and visible in the preview field) if you click on the Cancel button, but this just works if you didn't confirmed your selection yet. If that's the case (but you did not save the calendar yet), you may just reload your screen and see you current color setting again.
For the selected permission group of your calendar, an agent who should have access to, needs at least a read permission within the related group. Enclosed is a list of permissions to access certain feature-levels within the different calendars:
- RO
The related agent can see the calendar and its appointments, but can't do any changes.
- MOVE_INTO
The related agent can update existing appointments, but can't create new ones or delete existing ones.
- CREATE
The related agent can create new appointments.
- RW
The related agent is able to delete appointments.
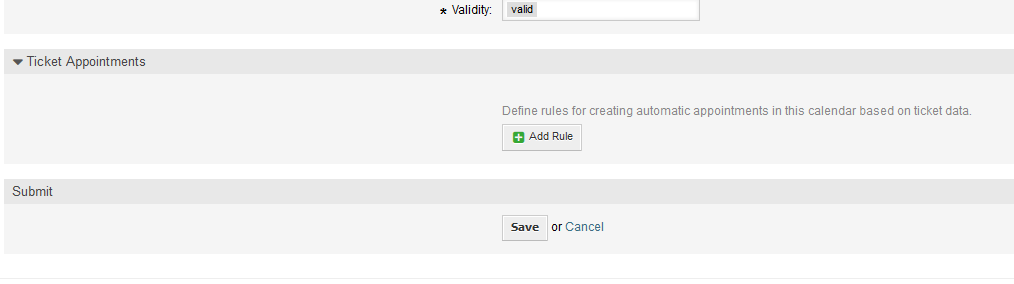
The validity field indicates if a calendar is valid. Invalid calendars won't show up in the different overviews, even if agents have access to it.
Once different calendars are created, it is possible to export either the complete calendar definition (including the calendar appointments) in the well-known YAML format or just export the related appointments of a calendar to ICS format.
To export a complete calendar structure to the YAML format, the calendar list in the
calendar management screen can be used. By clicking on the related link within column
Export, a YAML structure named Export_Calendar_CalendarName.yml,
including the calendar meta-data (calendar name, color, permission group, validity
state) can be downloaded. The structure also includes all calendar appointments. This
functionality can be used to simply backup a certain calendar and/or transfer it to a
foreign OTRS instance.
To export just the calendar appointments in ICS format, the link within column
Download can be used. After clicking on the related link, an ICS file
named CalendarName.ics can be downloaded, including all appointments of the
related calendar. This file can be used to backup just the appointments of a certain
calendar and/or transfer it to either an existing calendar on a foreign OTRS instance or
any other calendar tool, which supports the ICS standard, to display the appointments.
As an equivalent to the export function, it is possible to either import a complete calendar structure including related appointments in the YAML format, or just a set of appointments to an already existing calendar in the ICS format.
To import a complete calendar structure, the related Calendar Import widget on the left side of the calendar management screen can be used. Within this widget, a YML file can be selected and uploaded to import the calendar. The checkbox Overwrite existing entities indicates if a calendar with the same name as the imported one should be overwritten. If a calendar with the same name exists, but the checkbox is empty during the upload, a related error message will be displayed.
To import a set of appointments to an already existing calendar, the Import Appointments button can be clicked to access the appointment import screen.

Here it's needed to select an ICS file to be used for the import. Right after that, a calendar needs to be selected from the related list to import the new appointments in. The checkbox Update existing appointments indicates, if already existing appointments with the same UniqueID shall be overwritten or not. Appointments with the same UniqueID but already existing in the related calendar won't be omitted during the import process. They will be inserted again and will be available multiple times in case of doubt, if the option to overwrite appointments is not enabled.
If at least one calendar is created and accessible by a certain agent, new or already existing appointments can be managed via a calendar overview and an agenda overview.
Within the calendar overview, an agent is able to display, create, edit and/or delete appointments of different calendars, depending on their permission level to the related calendars, as described above.
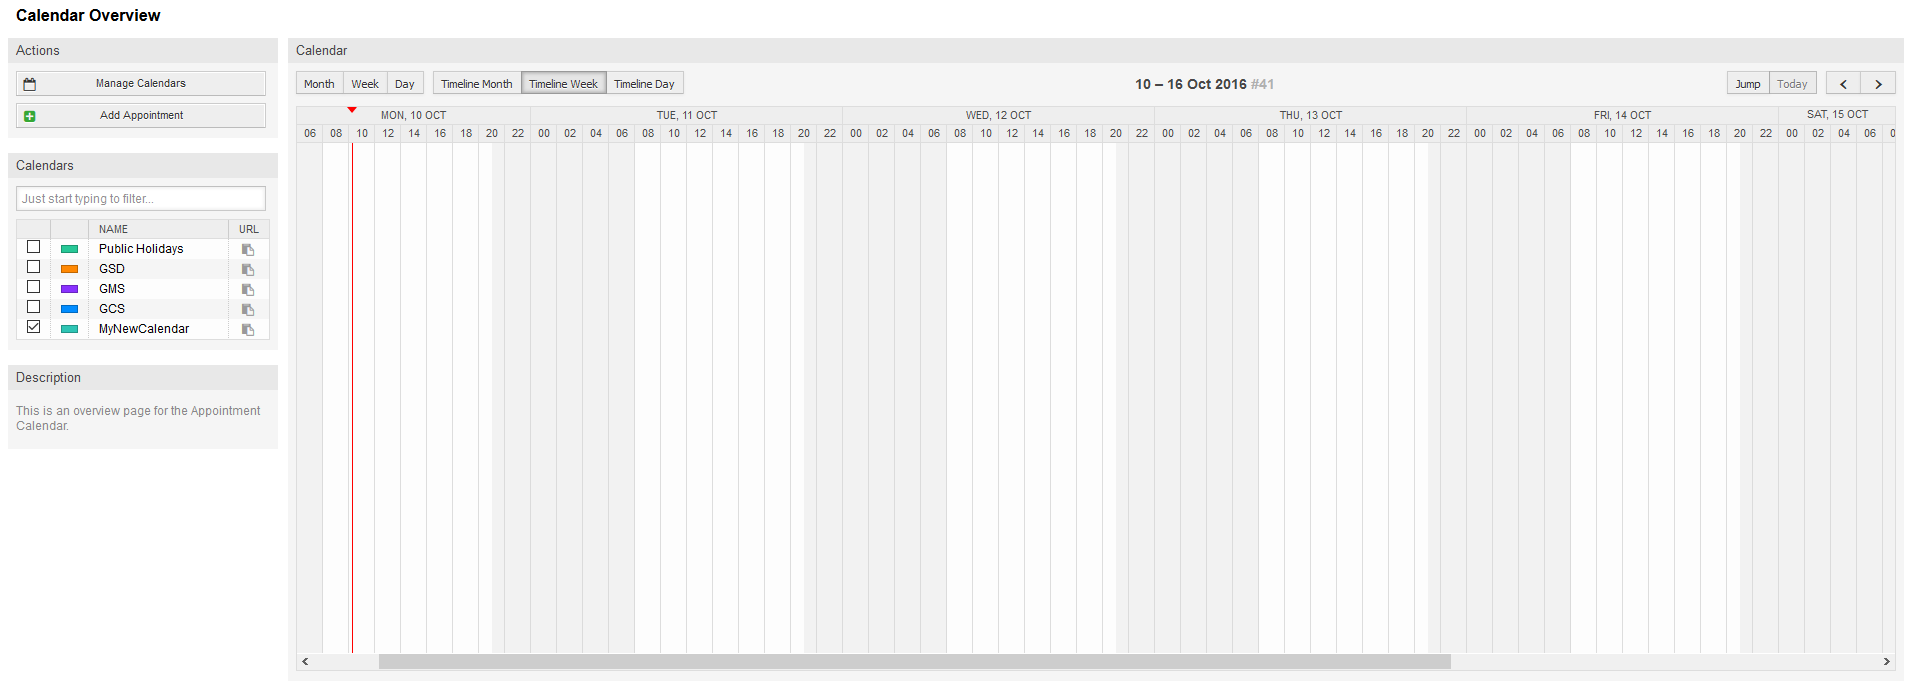
As visible in the following screenshot, the calendar overview contains the management tools for the calendars and appointments on the left side and the calendar view on the right side. With the buttons in the Actions widget it's possible to either access the calendar management directly or add a new appointment (if the agent has the permission).

The Calendars widget contains all calendars accessible by the agent. The checkboxes are used to enable or disable the view of certain calendars, like it's the case in many foreign calendar tools.
Since all appointments of any active calendar for every agent will be provided by the
server (and not stored or cached on the client), it can result in heavy load on the
server if too many calendars are active at the same time. Therefore a system configuration option
AppointmentCalendar::CalendarLimitOverview limits the maximum number of
active calendars per agent. If the limit is reached by an agent, a related error message
will be displayed, indicating there are too many active calendars.
The URL column provides an external link to the calendar, which is used to subscribe. This functionality is described later in this document.
To have a good overview of available appointments within different calendars and the related dates the appointments start or end, we provide different view modes to be used by the agents.
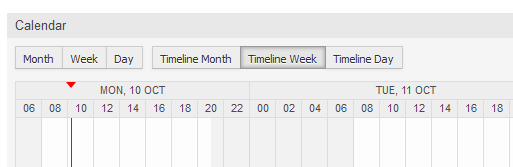
They are separated in timeline modes and non-timeline modes with different time ranges, to have the best view on different appointments for the related situations. On most of the view modes, a red line indicates the current time of the current day.
The information in the middle of the top-bar shows the current time range the agent is in, for the current view. Within the timeline views, the current calendar week will be displayed in light gray, when possible. Within the non-timeline views, the current calendar week is displayed as a single column on the left side, if possible.
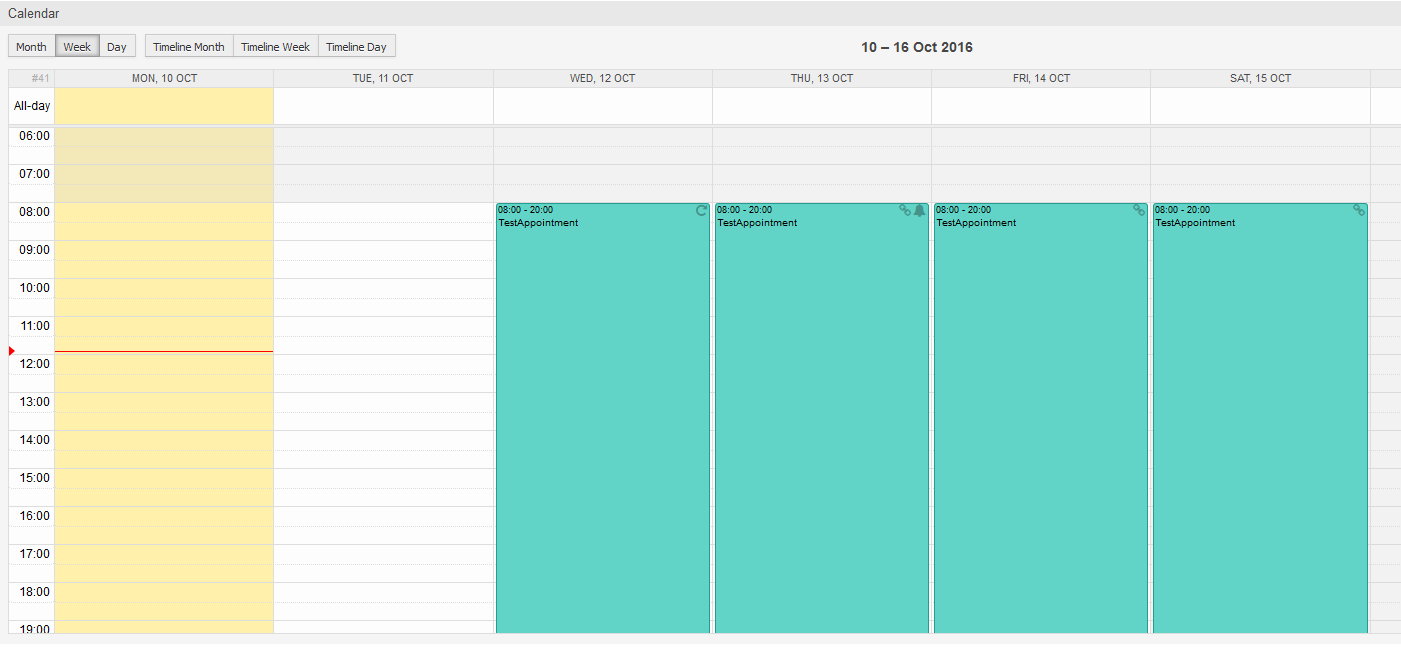
Enclosed a screenshot of the non-timeline weekly view:
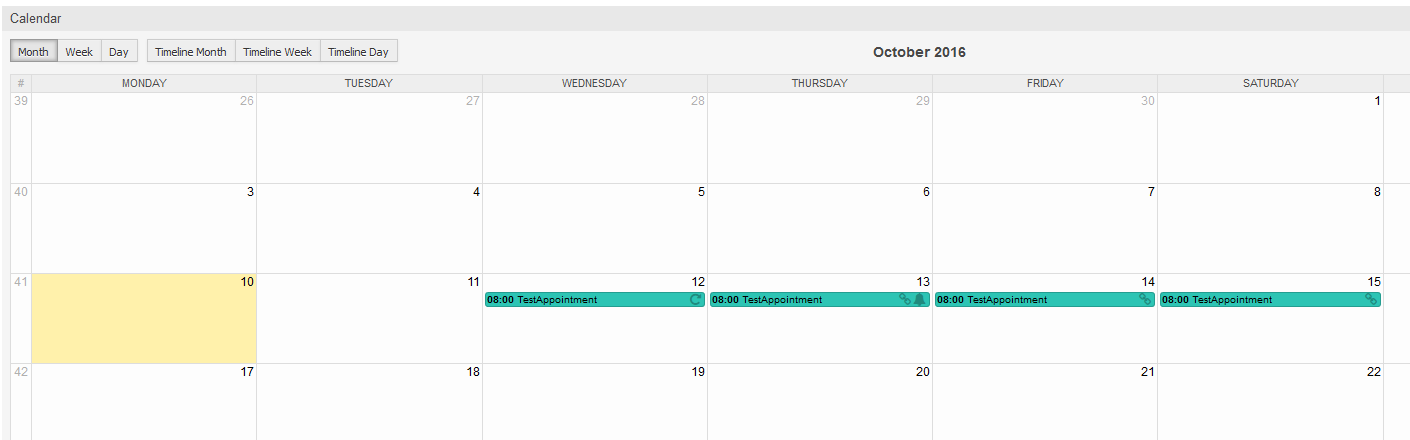
and the non-timeline monthly view:
On the upper right side, the agents can access the navigation controls.
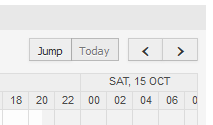
The left- and right-arrow buttons are used to navigate through the dates of the current time range. The Today button brings the agent back to the current date to save time.
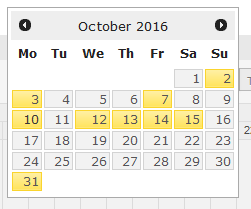
The Jump button is used to access a certain date directly without a need to go every date in between to access a certain date (maybe one year earlier or later). A click on the button opens a date picker, which highlights all dates which have already appointments stored. A mouseover shows the number of appointments with to the current date. A click on a date brings the agent to the related time range and displays all appointments.
On the right side of the main widget (on top of the navigation buttons) a gear wheel appears on mouse over, which is used to access a visibility filter:
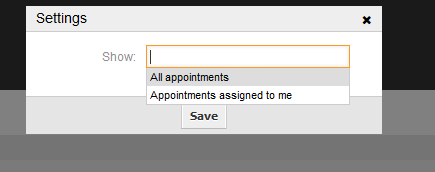
Here you can choose, if you want to see all available appointments, or just the ones that are directly assigned to you.
Within the agenda overview, an agent is able to display the appointments of all available (accessible) calendars in a table-like overview. This overview is designed to have a detailed list of upcoming appointments in a structured table. Like in the calendar overview appointments can be created, edited or deleted. This view supports a monthly, weekly and daily point of view on available appointments.

Within the calendar overview, to add new appointments it's either possible to click on the Add Appointment button or click on the overview widget. It's also possible to drag over a range of the widget to setup a rough time span. Right after that, a modal dialog appears where the data can be inserted:
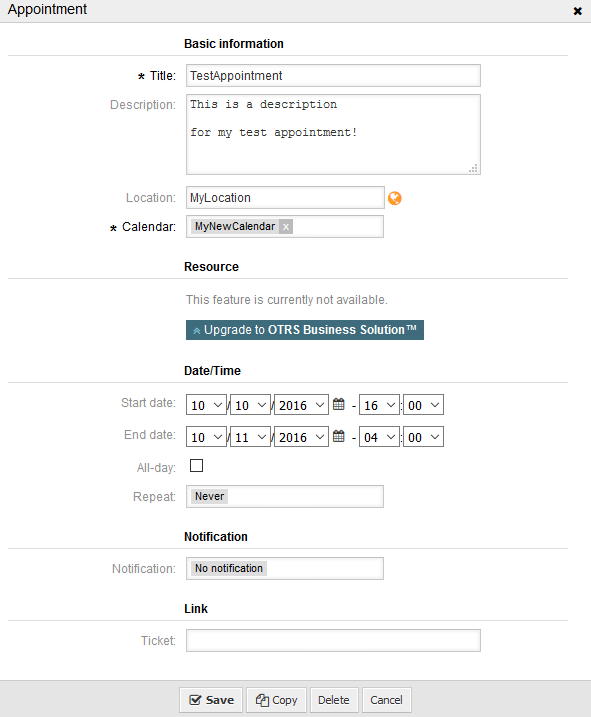
The only mandatory fields of the basic information are the appointment title and the
related calendar to assign the appointment to. The description and location are optional
fields. If the location contains a value, a related link icon will show up next to the
field which by default links to Google map to get a better picture of the location. This
link is configurable through the system configuration option
AgentAppointmentEdit::Location::Link.
Within the Date/Time section, the related start date and end date needs to be selected.
The All-day checkbox indicates that the appointment takes place on the whole day. If it's activated, time of the start date and the end date will be disabled and set to 00:00.
The Repeat option is used to define appointment recurrences and will be described separately, see section Repeating appointments below.
The Notification option is used to define appointment notifications and will be described separately, see section Notifications below.
The Link option is used to define appointment links to foreign objects (like tickets) and will be described separately, see section Link tickets to appointments below.
If the appointment already exists, the Copy and Delete buttons appear at the bottom of the modal dialog, provided that the current agent has the related permissions. The Copy button will just ignore the changes in the dialog and create a copy of the current appointment at the same time range with same information. The Delete button will delete related appointment, but the agent will face a question if they are really sure they want to delete the appointment, for security reasons.
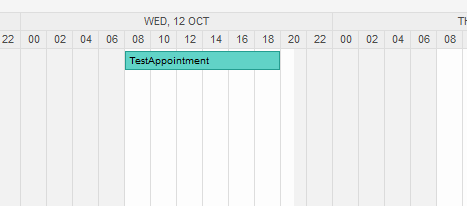
Once the appointment has been saved, it appears in the overview of the page:
With a click on the appointment, the modal dialog opens again and appointment can be edited. If the agent has the correct permission, the appointment can also be edited via drag and drop to either move the complete appointment to another place (date/time) or just increase/decrease the start- and/or the end-time by dragging the appointment on the related handles on the left or the right end.
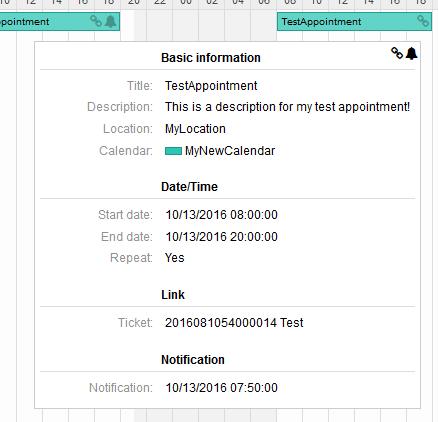
If the cursor of the mouse hovers over a certain appointment, a tooltip with the related appointment information appears:
If appointments needs to be created in a recurring manner, it is possible to setup detailed information about the occurrences of an appointment.
For this to work it is either possible to use pre-defined frequencies of the occurrences, or to define custom settings:
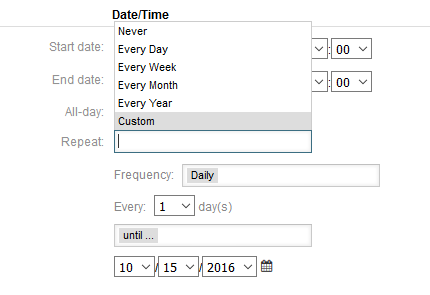
After the selection is finished, it's necessary to define the runtime of the recurrences. It's possible to choose either a date to repeat until, or an amount of times to repeat.
After all decisions are made and the settings are saved successfully, the appointment will be marked a recurring appointment. The parent appointment will be marked with circle-arrow-symbol and the child appointments with a chain-symbol.

Future changes to the parent appointment will affect the children automatically, without any further message. If an agent is about to change one of the child appointments, a message will ask what would they like to update:
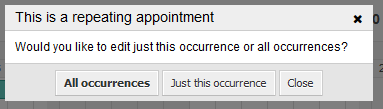
If the update affects all appointments, the behavior will be the same as with the update of the parent appointment. All options (including the recurring settings) are changeable.
If just the current (child) occurrence is affected, it's not possible to change the repeating settings, but a related message and a link to the parent appointment will be provided:

The enabled repeating option will be additionally displayed in the tooltip of the related appointment(s).
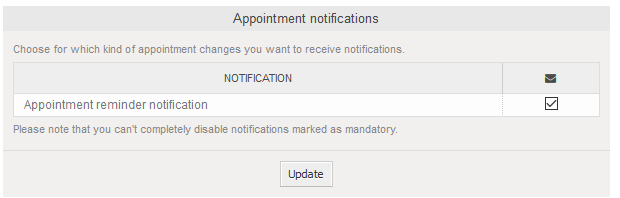
Within the edit screen of an appointment, it is possible to setup a date to notify about the appointment. As in the settings for appointment repeat, it is possible to use pre-defined templates for notifications (i.e. 5 minutes before, 15 minutes before etc.) or to setup a custom point of time:
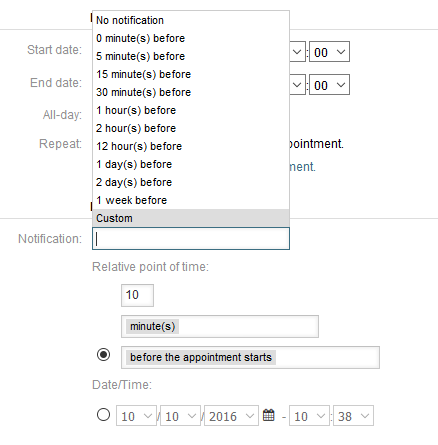
The custom settings for notifications are split into a relative point of time (like 5 minutes after the appointment has been started, 2 hours before the appointment ends etc.) and an explicit date time value, which can additionally be selected with a date picker. The related section needs to be enabled with a radio button, hence the disabled section will be ignored.
If an appointment has an active notification setting, the date/time string of the notification will be displayed in the tooltip. In addition to that, the appointment will be marked with a bell-symbol to indicate that there is an active notification set, without any mouse over actions.
As in the well-known ticket notifications, this package comes up with an event based notification mechanism, that can be handled using an administration interface. Within that interface, notification event entries can be created, updated and/or deleted to react on different OTRS events with related filters, recipients and content templates.
During the installation of the package, one default entry Appointment reminder notification will be installed.
The management frontend for notification templates can be reached using the administration menu:

In the notification overview, all available notification templates can be displayed. Within that overview, such templates can be created, edited, imported/exported and, of course, deleted.
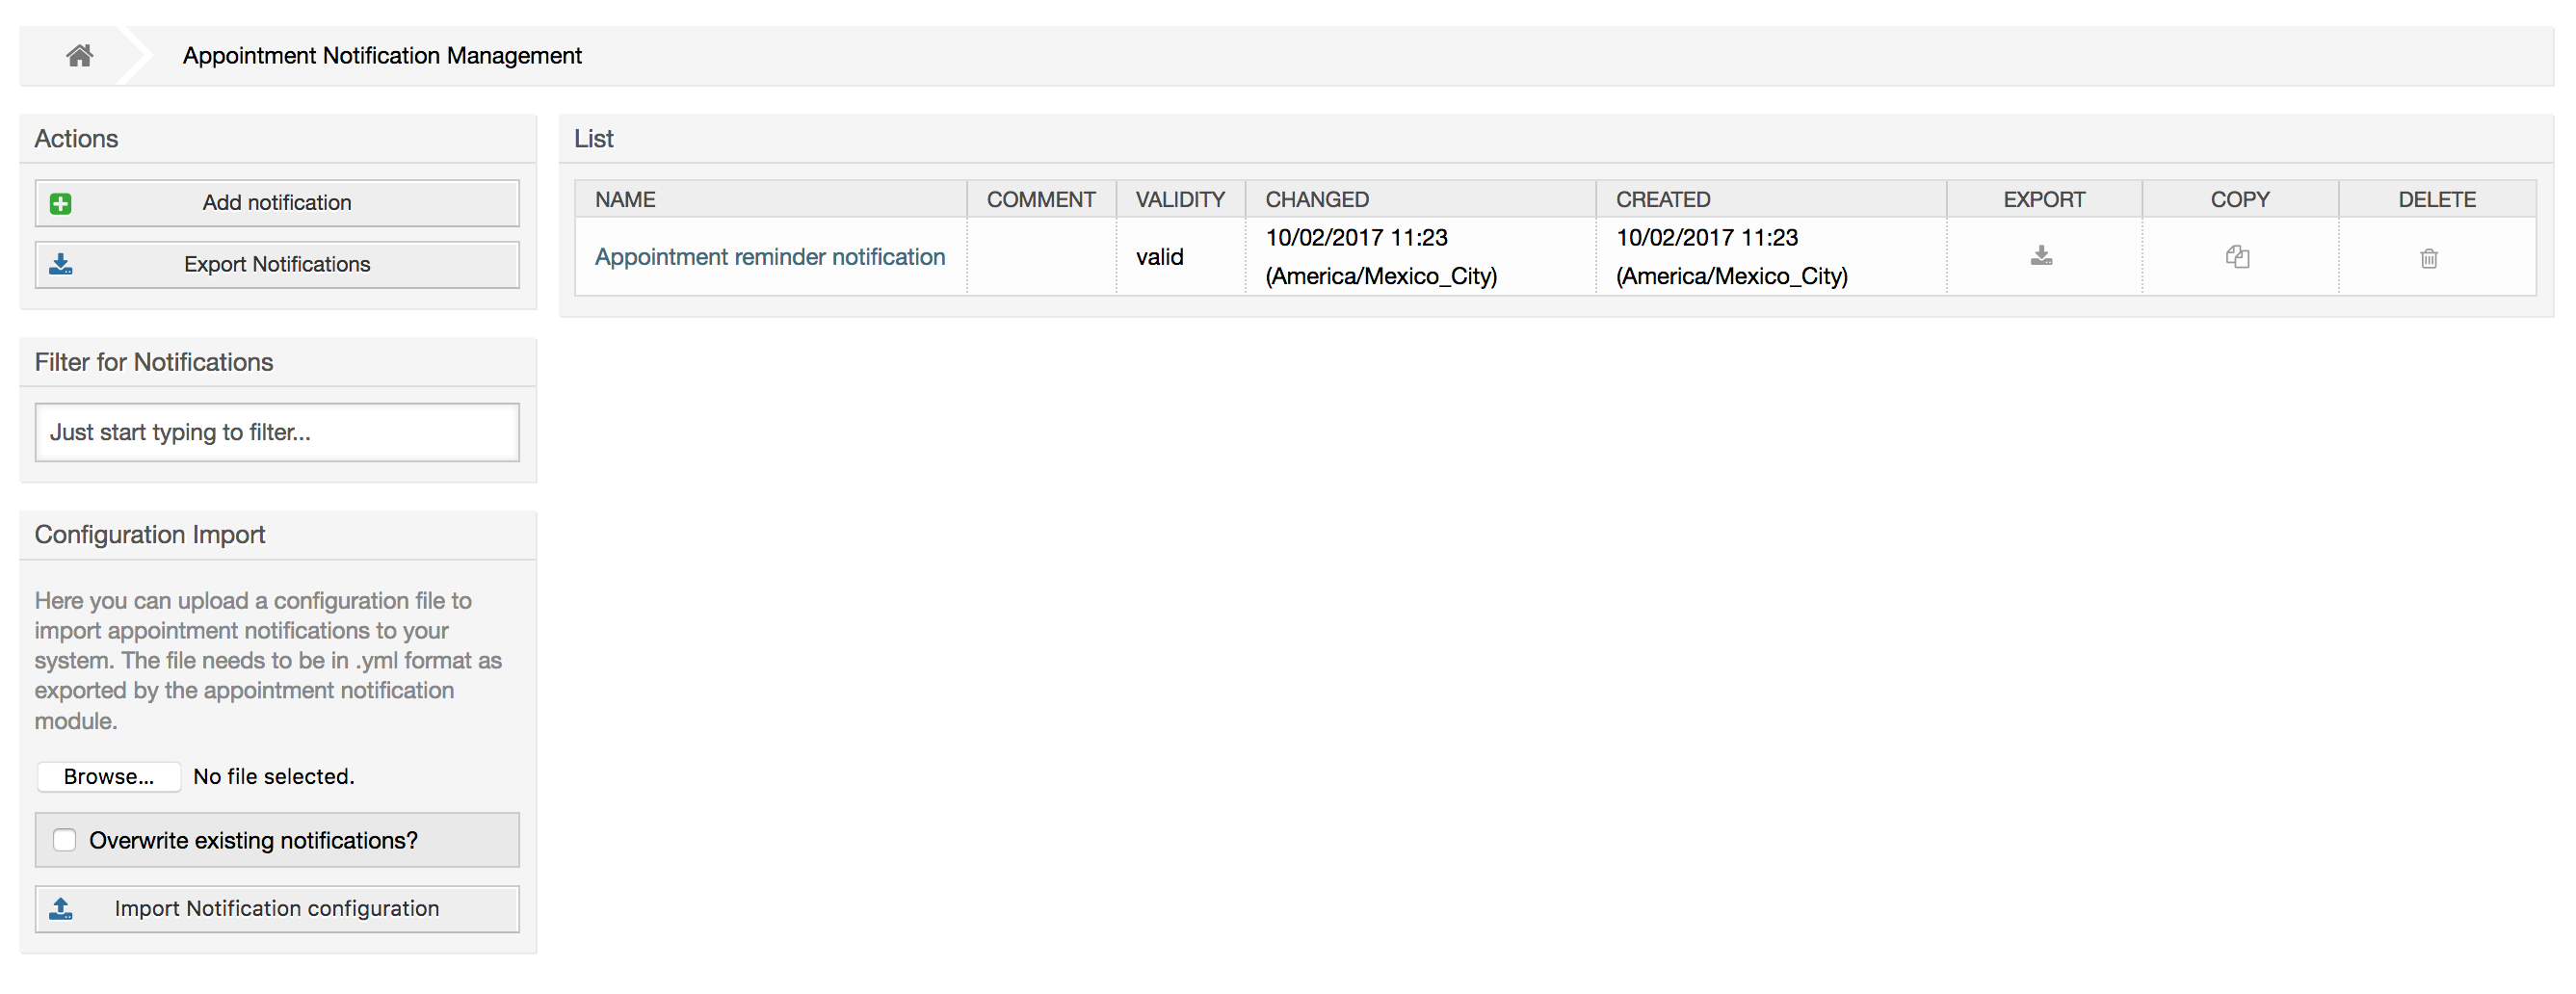
From the left sidebar, notification entries can either be created, exported or imported. The complete set of available entries can be exported, or an already exported file can be used to import notification entries.
The main table on the right side will display the available appointment notifications. For each line, the related entry can be edited by clicking on the name column, exported with a click on the export icon, copied with a click on the copy icon or even deleted. All icons relates just to the single entries (not like the export notifications button in the sidebar).

In order to create a new or update an existing entry, edit screen can be used, same as in the ticket notifications. Within that screen, it is needed to define some basic parameters, like a name, which needs to be unique for the OTRS system (it cannot even conflict with a name from the ticket notifications).
Each notification entry can be made selectable as an option in the agent preferences. Optionally, a tooltip message for the related notification entry in the user preferences can be inserted, which will be displayed to the user on mouse over.
If needed, a comment for the entry can be added which will be displayed in the overview screen of the administration interface. Last but not least, the validity state can be selected (valid by default).
To let the template react on OTRS events, at least one of the available events need to be selected from the list in Events widget.

Enclosed is a list of possible events with description:
- AppointmentCreate
Executed after an appointment has been created.
- AppointmentUpdate
Executed after an appointment has been updated.
- AppointmentDelete
Executed after an appointment has been deleted.
- AppointmentNotification
This is a special appointment event that will be executed by the OTRS daemon in time. If an appointment contains a date/time value for notifications, as already described in this documentation, and such a notification date is reached, the OTRS daemon will execute the event
AppointmentNotificationfor every related appointment separately.- CalendarCreate
Executed after a calendar has been created.
- CalendarUpdate
Executed after a calendar has been updated.
The appointment filter widget can optionally be used to narrow the list of appointments by matching configured values:

For example, here it's possible to select which calendar the related appointment needs to be part of, or a part or complete title or location of the appointment. Also, it's possible to choose from a list of teams or resources assigned to the appointments (available only with OTRS Business Solution™).
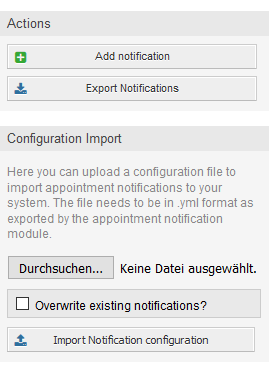
Within the Recipient widget, the related recipients can be selected which would receive generated notifications.
All resource related list entries are available only with OTRS Business Solution™.
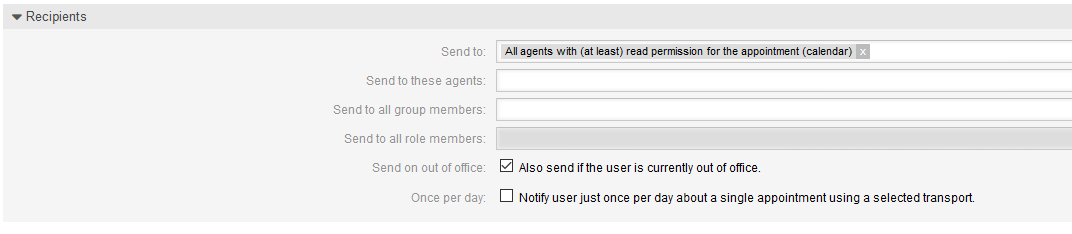
Within the Notification Methods widget, an available transport can be selected (Email, SMS or Web View), as well as additional recipients and email templates.

The main content of a notification can be defined in the localized subject and the body fields. Here it's possible to define static text content mixed with OTRS smart tags, if needed. The default notification entry shows how such a body and subject can look like.
A full list of available smart tags is provided in the Tag Reference widget at the bottom of the page.
For every added notification entry which has the option Show in agent preferences enabled, a new option will be displayed in the related user preferences widget of every agent. With these options, every agent can select which types of notifications and by which available transport method they want to receive.
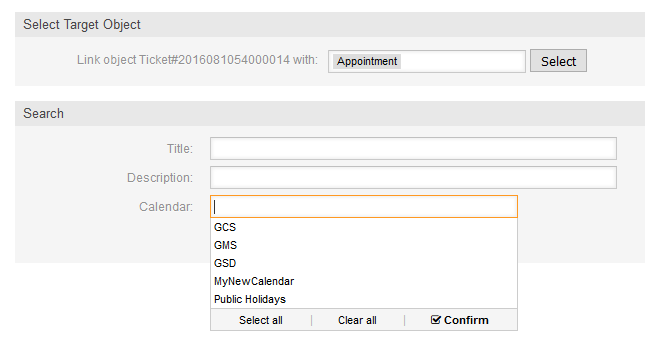
The appointment calendar comes with an abstraction layer to link external objects with appointments, using the OTRS internal link object. Those additional objects can come up with external packages without any further need to update the code of the calendar directly.
Basically, within the edit screen of an appointment it is possible to link existing tickets. Tickets can be searched by their ticket numbers and/or ticket titles via an autocompletion field. Once the agent clicks on a result, the related ticket will be saved in a result box and after the appointment has been saved, the ticket will be linked to the appointment.
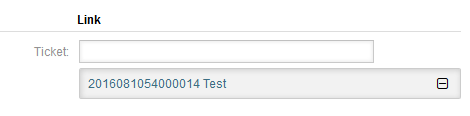
Additionally, it's possible to link multiple tickets to one appointment. Since the normal OTRS link object is used to create the connection between both objects, the link will be displayed in the ticket zoom screen as well.

Those links can either be created through an existing appointment in the related edit dialog, using the overviews or via the link feature in the ticket zoom.
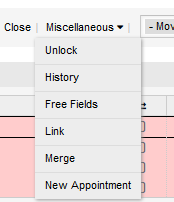
Via the ticket zoom screen, it's additionally possible to create a new appointment, which links the related ticket automatically to the newly created appointment. There is a new option New Appointment located in the ticket action menu Miscellaneous.
After a click on the link, the agent will be forwarded to the calendar overview, which automatically opens a new appointment dialog, that has the related ticket pre-linked and can be filled out as usual.
To make a step back to the calendar management, the package offers the possibility to automatically create and update appointments in calendars, using a special ticket search rule within the calendar edit screen.
Tickets can have special date/time entries like pending times, escalation times (first response time, update time etc.) or assigned dynamic field from type date/time. Logically, the calendars are able to show those date/time entries, but since the calendar appointments needs to have time ranges consisting of a start time and an end time, it's needed to define a related end time for managed appointments, as times like the pending time points to just a single date/time value.
Below the basic calendar configuration in the calendar edit screen, a special widget called Ticket Appointments takes care about the rules to be used for automatic appointment creation.
It's necessary to define rules to describe a ticket search for tickets, which will result in automatically created and managed appointments in the related calendar. It's possible to define multiple rules with different parameters to combine several types of tickets within the same calendar.
A rule consists of the following parameters to generate proper ticket searches:
- Start date
A dropdown list, that indicates the special date/time value of the related tickets. This can be either the pending time, the different escalation times or a dynamic field from type date/time assigned to the ticket.
- End date
This can be a relative time value, counted from the selected start time (like +5 minutes, +1 hour etc.) or a dynamic field from type date/time, pointing to an absolute date and time value.
- Queues
A multi-selectable dropdown list, that indicates the queues the related tickets needs to be located in. This field is mandatory and can't be left unfilled.
- Search attributes
This is a list of additional (optional) search attributes to provide more detailed filter possibilities to the agent. It acts like the search attributes in ticket search screen of the agent interface. Single attributes can be selected, added to the form and filled out with filter values.
An overview of the configuration for such a rule looks as follows:
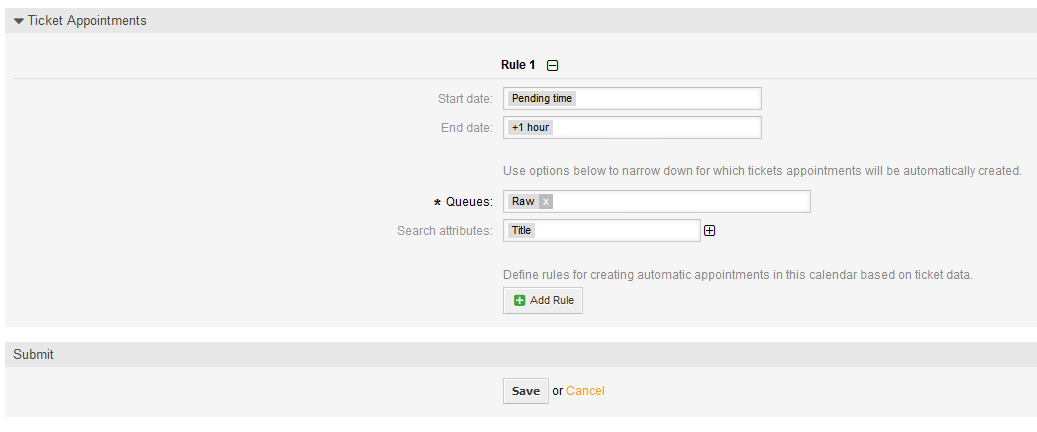
The rule in the screenshot will find all tickets that have a pending time and would add one hour to the related pending time to generate the end time and create appointments for the set of found tickets during the search. The tickets additionally needs to be located in queue Raw.
An example of an automatically added appointment looks as follows:
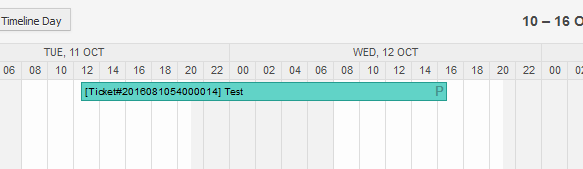
The P symbol indicates that this appointment includes a pending time as the start time value. The end time value is a dynamic field from type date/time in this example to display a bigger appointment for that test purpose.
Special appointments of different types will be marked with related symbols:
- P
Appointments of tickets with pending time as the start time.
- E
Appointments of tickets with escalation times as the start time (first response time, update time, solution time).
- D
Appointments of tickets with a dynamic field from type date/time as the start time.
The edit screen of such a special appointment looks as follows:
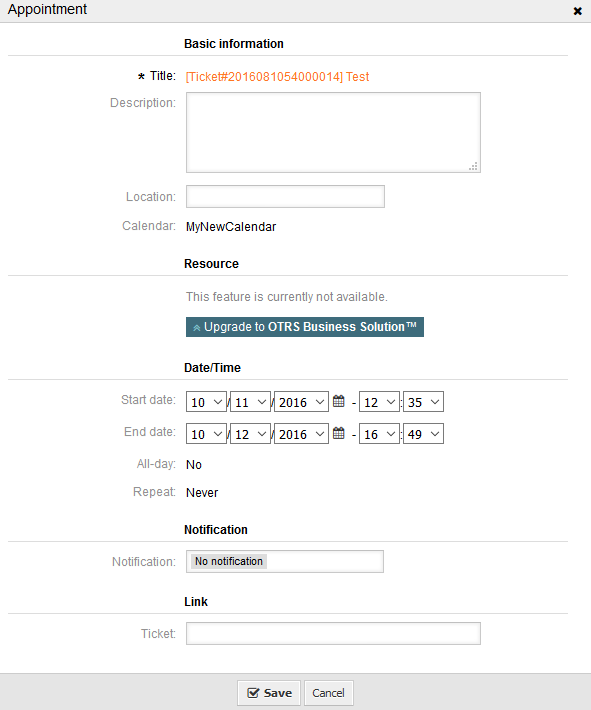
The appointment title will be displayed as ticket number and title and cannot be changed, since it's automatically created, updated and removed, depending on the related ticket. Title will be displayed as a link to the related ticket zoom screen.
Of course, it's still possible to define basic information like a description and a location, which will be stored for that single appointment. For such appointments it's also possible to define notification times and link additional tickets.
Some of those start time values are variable and therefore updatable by the related agent and some are not.
For instance the pending time is a value that can be changed using the pending ticket action in the ticket zoom of the related ticket. Dynamic field values can be changed easily, too.
An escalation value like first response time or the update time are special values which will be computed using a Service / SLA entry assigned to the related ticket.
If, for instance, an automatically created appointment of type pending time is changed using the calendar overview, the related value will be updated in the ticket as well, which is the same behavior as for special appointments of type dynamic field. Therefore it's either possible to update the related ticket using the ticket zoom, or by just updating the appointment that writes back all needed changes to the ticket.
Appointments from type escalation time cannot be updated using the related appointments, as those values are not changeable directly by the agent. Such appointments are simply read-only on the related values, as well as on the drag and drop features/handles.
On every update on the calendar definition or the related tickets, the automatically created appointments will be updated as well. This work will be done by the OTRS daemon in the background. Therefore, it's necessary to have the daemon running for this feature to work properly!
To have a quick overview about upcoming appointments, it's possible to enable a dashboard widget called Appointments.
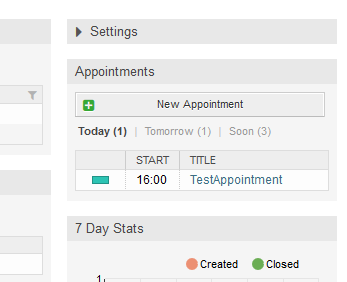
This widget displays upcoming appointments of every accessible calendar by the agent in a simplified manner.
It offers the possibility to create new appointments with a click on the New Appointment button, which forwards the agent to the calendar overview screen and opens a new appointment dialog.
The widget content consists of three filter entries:
- Today
Displays upcoming appointments for the current date.
- Tomorrow
Displays upcoming appointments for the next day.
- Soon
Soon means the next five days, excluding today and tomorrow.
Like in the other dashboard widgets, the agent can switch between the filters by clicking on the filter name:
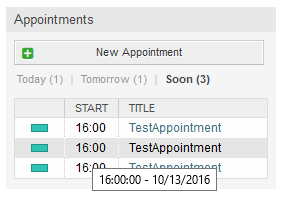
Since the appointment information is simplified and needs to be compact in order to be displayed properly in the small widget, it's possible to show more detailed information about every value in the related tooltip while hovering over the column, as visible in the previous screenshot.
Basically just the color of the related calendar, the start time of the appointment and the appointment title will be displayed to the agent. On hovering over the related column, further information will be displayed if needed. If the agent clicks on such an appointment, the browser redirects to the calendar overview screen and opens the related appointment to show the full set of information.