OTRS allows you to change predefined ticket states and their types, or even add new ones. Two attributes are important for a state: the state name and the state type.
The default states of OTRS are: 'closed successful', 'closed unsuccessful', 'merged', 'new', 'open', 'pending auto close+', 'pending auto close-', 'pending reminder' and 'removed'.
After the pending time has expired, the ticket owner will receive a reminder email concerning the ticket. If the ticket is not locked, the reminder will be sent to all agents in the queue. Reminder tickets will only be sent out during business hours, and are repeatedly sent every 24 hours until the ticket state is changed by the agent. Time spent by the ticket in this status will still add towards the escalation time calculation.
Tickets in this status will be set to "Closed Unsuccessful" if the pending time has expired. Time spent by the ticket in this status will still add towards the escalation time calculation.
Tickets in this status will be set to "Closed Successful" if the pending time has expired. Time spent by the ticket in this status will still add towards the escalation time calculation.
This is the state for tickets that have been removed by the customer. Tickets will not really be deleted, they are just no longer shown as open. In order to enable this state in the customer interface you need to add the state type "removed" to the sysconfig setting "Ticket::Frontend::CustomerTicketZoom###StateType".
This is the end state for tickets that have been successfully resolved. Depending on your configuration, you may or may not be able to reopen closed tickets.
Every state has a name (state-name) and a type (state-type). Click on the States link on the Admin page and press the button "Add state" to create a new state. You can freely choose the name of a new state. The state types can not be changed via the web interface. The database has to be directly modified if you want to add new types or change existing names. The default state types should typically not be modified as this can yield unpredictable results. For instance, escalation calculations and the unlock feature are based on specific state types.
The name of an already existing state can be changed, or new states added through this screen. If the state "new" has been changed via the web interface, this change also has to be configured via the config file Kernel/Config.pm or via the SysConfig interface. The settings specified in the script below have to be modified to ensure that OTRS works with the changed state for "new".
    [...]
    # PostmasterDefaultState
    # (The default state of new tickets.) [default: new]
    $Self->{PostmasterDefaultState} = 'new';

    # CustomerDefaultState
    # (default state of new customer tickets)
    $Self->{CustomerDefaultState} = 'new';
    [...]
Script: Modifying the Kernel/Config.pm settings.
If a new state type should be added, the ticket_state_type table in the OTRS database needs to be modified with a database client program, as shown in the script below.
linux:~# mysql -p
Enter password:
Welcome to the MySQL monitor.  Commands end with ; or \g.
Your MySQL connection id is 23 to server version: 5.0.16-Debian_1-log

Type 'help;' or '\h' for help. Type '\c' to clear the buffer.

mysql> use otrs;
Reading table information for completion of table and column names
You can turn off this feature to get a quicker startup with -A

Database changed
mysql> insert into ticket_state_type (name,comments) values ('own','Own
state type');
Query OK, 1 row affected (0.00 sec)

mysql> quit
Bye
linux:~#
Script: Modifying the OTRS database.
Now it is possible to use the new state type you just created. After a state has been linked with this new state type, the OTRS configuration also has to be changed to ensure that the new state is usable. Just modify the following options via SysConfig:
Ticket -> Frontend::Agent::Ticket::ViewPhoneNew > AgentTicketPhone###StateDefault - to define the default next state for new phone tickets.
Ticket -> Frontend::Agent::Ticket::ViewPhoneNew > AgentTicketPhone###StateType - to define the available next states for new phone tickets.
Ticket -> Frontend::Agent::Ticket::ViewEmailNew > AgentTicketEmail###StateDefault - to define the default next state for new email tickets.
Ticket -> Frontend::Agent::Ticket::ViewEmailNew > AgentTicketEmail###StateType - to define the available next states for new email tickets.
Ticket -> Frontend::Agent::Ticket::ViewPhoneOutbound > AgentTicketPhoneOutbound###State - to define the default next state for new phone articles.
Ticket -> Frontend::Agent::Ticket::ViewPhoneOutbound > AgentTicketPhoneOutbound###StateType - to define the available next states for new phone articles.
Ticket -> Frontend::Agent::Ticket::ViewMove > AgentTicketMove###State - to define the default next state for moving a ticket.
Ticket -> Frontend::Agent::Ticket::ViewMove > AgentTicketMove###StateType - to define the available next states for moving a ticket.
Ticket -> Frontend::Agent::Ticket::ViewBounce > StateDefault - to define the default next state after bouncing a ticket.
Ticket -> Frontend::Agent::Ticket::ViewBounce > StateType - to define the available next states in the bounce screen.
Ticket -> Frontend::Agent::Ticket::ViewBulk > StateDefault - to define the default next state in a bulk action.
Ticket -> Frontend::Agent::Ticket::ViewBulk > StateType - to define the available next states in the bulk action screen.
Ticket -> Frontend::Agent::Ticket::ViewClose > StateDefault - to define the default next state after closing a ticket.
Ticket -> Frontend::Agent::Ticket::ViewClose > StateType - to define the available next states in the close screen.
Ticket -> Frontend::Agent::Ticket::ViewCompose > StateDefault - to define the default next state in the Compose (reply) screen.
Ticket -> Frontend::Agent::Ticket::ViewCompose > StateType - to define the available next states in the Compose (reply) screen.
Ticket -> Frontend::Agent::Ticket::ViewForward > StateDefault - to define the default next state after forwarding a ticket.
Ticket -> Frontend::Agent::Ticket::ViewForward > StateType - to define the available next states in the Forward screen.
Ticket -> Frontend::Agent::Ticket::ViewForward > StateDefault - to define the default next state of a ticket in the free text screen.
Ticket -> Frontend::Agent::Ticket::ViewForward > StateType - to define the available next states in the free text screen.
Ticket -> Core::PostMaster > PostmasterDefaultState - to define the state of tickets created from emails.
Ticket -> Core::PostMaster > PostmasterFollowUpState - to define the state of tickets after a follow-up has been received.
Ticket -> Core::PostMaster > PostmasterFollowUpStateClosed - to define the state of tickets after a follow-up has been received on an already closed ticket.
Ticket -> Core::Ticket > ViewableStateType - to define the state types that are displayed at various places in the system, for example in the Queueview.
Ticket -> Core::Ticket > UnlockStateType - to define the state types for unlocked tickets.
Ticket -> Core::Ticket > PendingReminderStateType - to define the state type for reminder tickets.
Ticket -> Core::Ticket > PendingAutoStateType - to define the state type for Pending Auto tickets.
Ticket -> Core::Ticket > StateAfterPending - to define the state a ticket is set to after the Pending Auto timer of the configured state has expired.
OTRS comes with five default priority levels that can be modified via the "Priorities" link on the Admin page. When creating a customized list of priorities, please keep in mind that they are sorted alphabetically in the priority selection box in the user interface. Also, OTRS orders tickets by internal database IDs in the QueueView.
Note
As with other OTRS entities, priorities may not be deleted, only deactivated by setting the Valid option to invalid or invalid-temporarily.
Important
If a new priority was added or if an existing one was changed, you might also want to modify some values in SysConfig:
Ticket:Core::Postmaster::PostmasterDefaultPriority - defines the default priority for all incoming emails.
Ticket:Frontend::Agent:Ticket::ViewPhoneNew:Priority - defines the default priority in the New Phone Ticket screen for agents.
Ticket:Frontend::Agent:Ticket::ViewEmailNew:Priority - defines the default priority in the New Email Ticket screen for agents.
Ticket:Frontend::Customer:Ticket::ViewNew:PriorityDefault - defines the default priority in the New Ticket screen in the Customer frontend.
From OTRS 2.1 on, it is possible to assign a person as being responsible for a ticket, in addition to its owner. Moreover, all activities connected with the ticket can be watched by someone other than the ticket owner. These two functionalities are implemented with the TicketResponsible and TicketWatcher features, and facilitate the assignment of tasks and working within hierarchical team structures.
The ticket responsibility feature facilitates the complete processing of a ticket by an agent other than the ticket owner. Thus an agent who has locked a ticket can pass it on to another agent, who is not the ticket owner, in order for the second to respond to a customer request. After the request has been dealt with, the first agent can withdraw the ticket responsibility from the second agent.
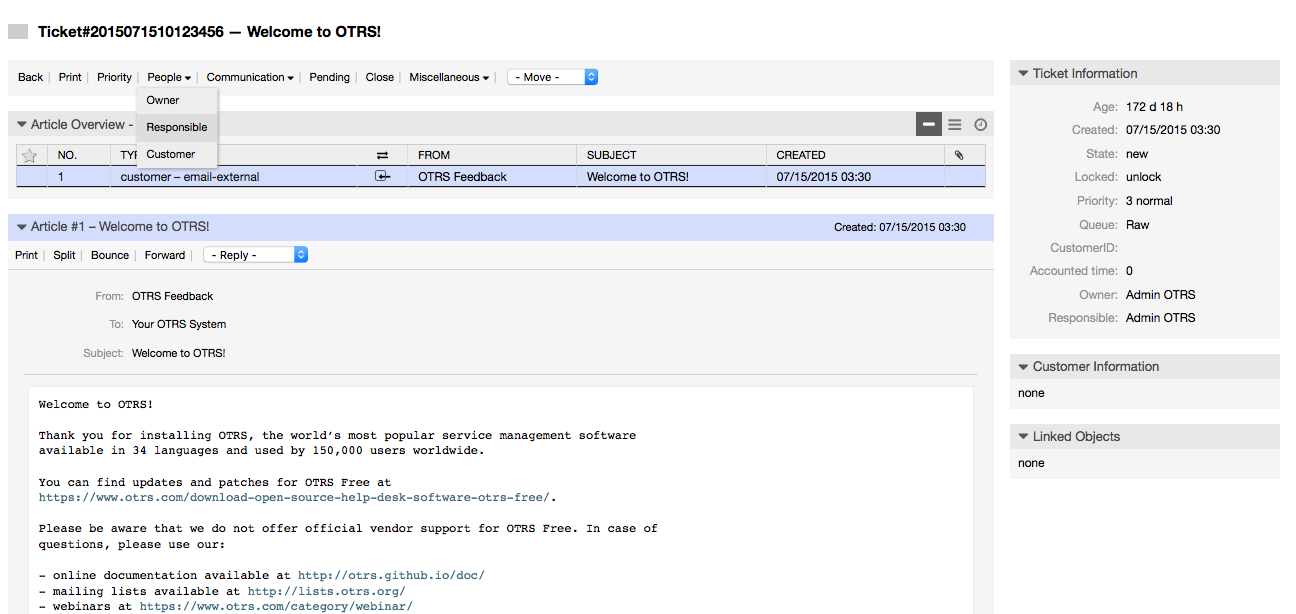
With the configuration parameter Ticket::Responsible, the ticket responsibility feature can be activated. This will cause 3 new links to appear in the ticket activities menu of a zoomed ticket in the agent interface.
Ticket responsibility can be assigned by calling up the ticket content and clicking on the "Responsible" link in the ticket activities menu of a zoomed ticket in the agent interface (see the Figure below).
After clicking on "Responsible", a pop-up dialog to change the responsibility of that ticket will open (see figure below). This dialog can also be used to send a message to the new responsible agent.
The list of all tickets for which an agent is responsible, can be accessed through the Responsible view of the OTRS agent interface, as soon as the ticket responsibility feature gets activated.
From OTRS 2.1 on, select agents such as supervisors can watch certain tickets within the system without processing them, by using the TicketWatcher feature.
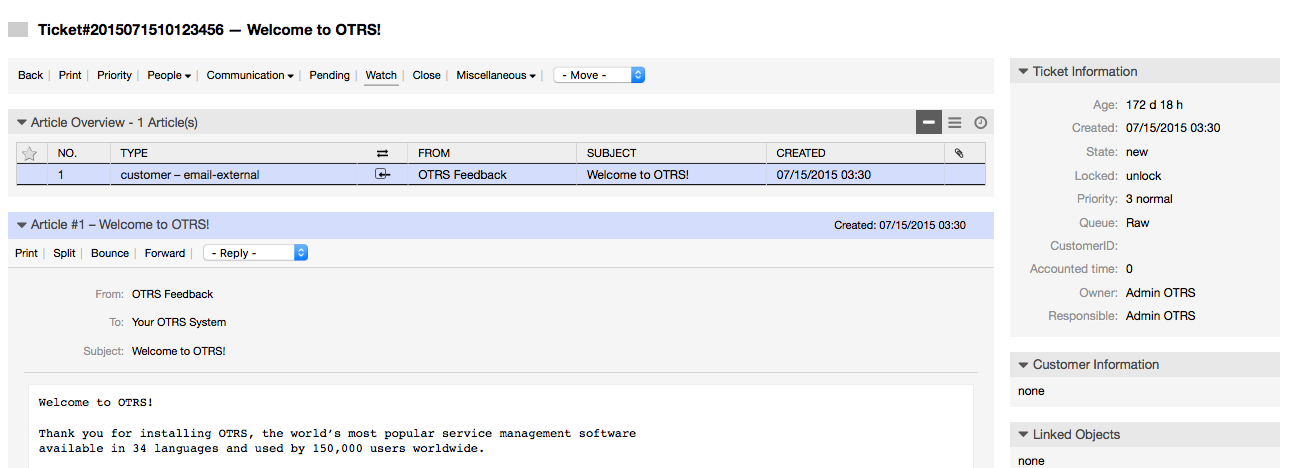
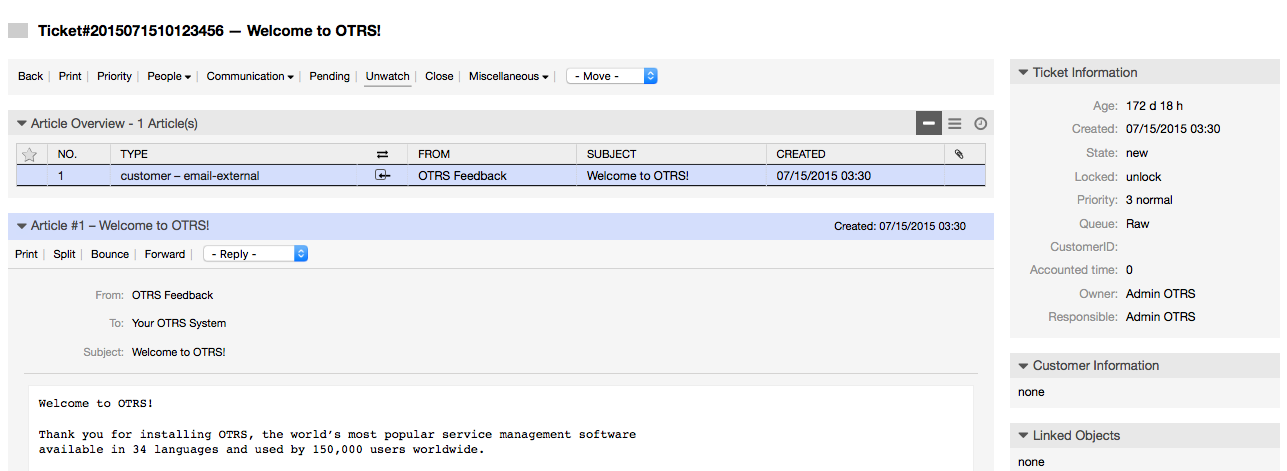
The TicketWatcher feature can be activated with the configuration parameter Ticket::Watcher which adds new links to your actions toolbar. Using Ticket::WatcherGroup, one or more user groups with permission to watch tickets can also be defined.
In order to watch a ticket, go to its zoomed view and click on the "Subscribe" link in the ticket activities menu (see figure below).
If you no longer want to watch a specific ticket, go to its zoomed view and click on the "Unsubscribe" link in the ticket activities menu (see figure below).
The list of all watched tickets can be accessed through the Watched view of the OTRS agent interface (see figure below), as soon as the ticket watcher feature gets activated.


