- Migration existierender Windows-Installationen nach Linux
- Einführung und Vorbereitung
- Downloaden Sie das OTRSCloneDB-Skript um Datenbanken zu klonen
- Enable remote access for the postgresql database of target system
- OTRS-Dienste stoppen
- Drop the existing database of your target system to have an empty database for the clone data
- Geben Sie das PostgreSQL-Passwort Ihrer Datenbank ein
- Klonen Sie Ihre Datenbank in das Zielsystem
- Copy the following files from your windows based system to the target system
- Alle Pakete erneut installieren
- Disable remote access for the postgresql database of your target system
- OTRS-Dienste starten
OTRS kann auf einer Vielzahl von Systemplattformen betrieben werden kann, darunter Enterprise Linux, wie z. B. Red Hat Enterprise Linux, oder SuSE Linux Enterprise Server, sowie auf einer Vielzahl weiterer Linux-Derivate.
Beim Betrieb von OTRS auf Windows-Plattformen mussten wir jedoch immer wieder starke Performance-Einbußen feststellen. Diese konnten auch nach langer und intensiver Analyse aufgrund technischer Differenzen nicht zu unserer Zufriedenheit gelöst werden. Die Entwicklung unseres Windows-Installers und der OTRS Appliance haben wir aufgrund einer nun nur noch eingeschränkten Verfügbarkeit benötigter Drittkomponenten durch andere Hersteller eingestellt.
Unter diesen Bedingungen können wir keinen zukunftssicheren Betrieb von OTRS auf Windows-Plattformen garantieren und empfehlen daher die Migration auf eine der oben genannten Linux-Plattformen oder den Einsatz unserer OTRS Business Solution™ Managed.
Wir möchten Ihnen die Migration von Windows auf Linux erleichtern und Ihnen damit die beste Performance von OTRS bieten. Daher haben wir hier eine detaillierte Anleitung für Sie zusammengestellt.
If you have a windows based installation and you would like to change to a linux based system you will need to setup a linux server or virtual machine and install OTRS there (see the installation instructions). This will be the target system for the migration.
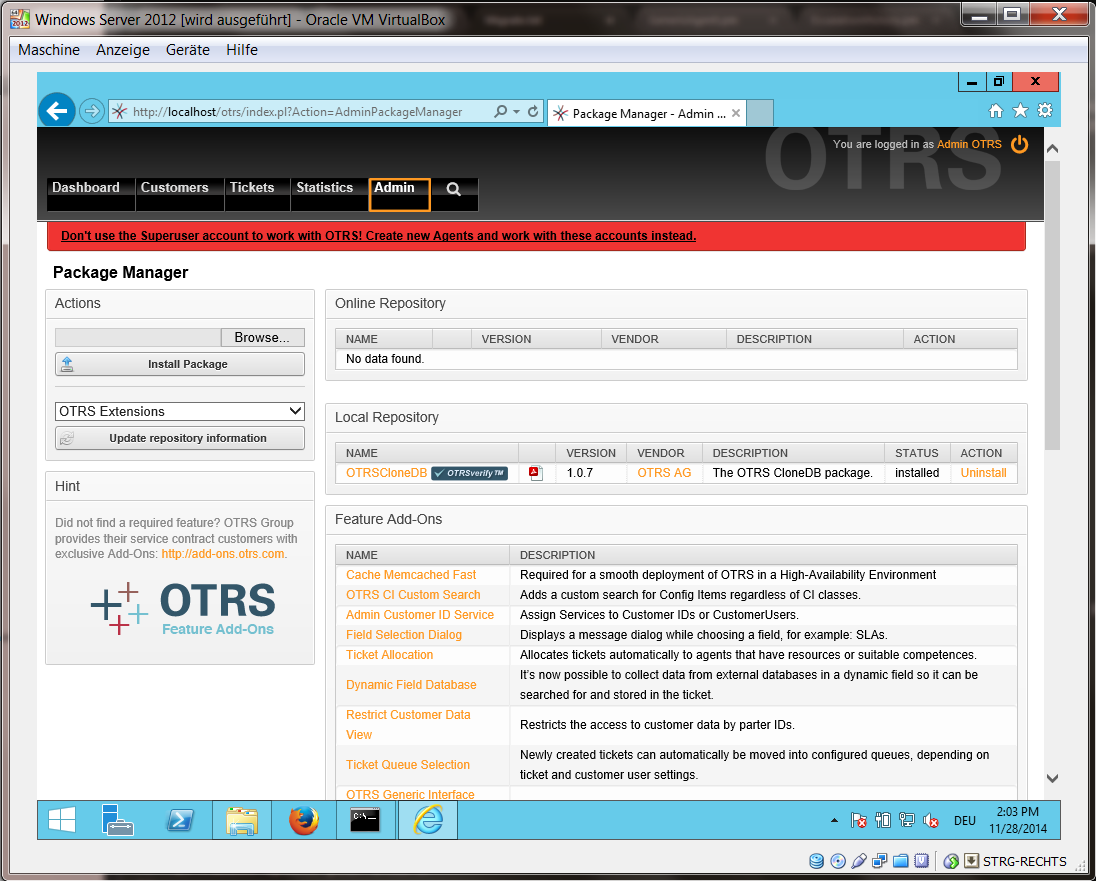
Bitte gehen Sie zum Admin-Menü in Ihrem Windows-System und installieren Sie die neueste Version des OTRSCloneDB-Paketes in Ihr OTRS.
Sie können das OTRSCloneDB-Paket direkt aus dem Paket-Manager installieren. Wählen Sie "OTRS Extensions" aus der Dropdown-Liste auf der linken Seite aus und klicken Sie auf den Button "Verzeichnis aktualisieren". Das Paket OTRSCloneDB wird dann in einer Liste angezeigt, klicken Sie dann auf "Installieren".
You could also download the package manually from the OTRS FTP server and install the package manually as described below. http://ftp.otrs.org/pub/otrs/packages/
Downloaden Sie das Paket mit der höchsten Versionsnummer:
OTRSCloneDB-1.0.10.opm

und installieren Sie es auf Ihrer Windows-basierten Installation:
It is also no problem if you have installed some additional features or custom developments on your OTRS. You just need to take care that all of your installed packages are also compatible with unix based systems. For packages provided by OTRS this is the case.
The OTSRCloneDB script will copy the database data over the network, so we need to enable remote access to the database. The setup is different for the different databases, we will describe opening remote access for a postgresql database here.
After logging into your target system via SSH you need to change into the postgresql directory:
Shell> cd /etc/postgresql/9.4/main
Shell> vi postgresql.conf
Fügen Sie folgende Zeile am Ende der Datei hinzu:
listen_addresses = '*'
Speichern Sie die Datei.
Shell> vi pg_hba.conf
Fügen Sie folgende Zeile am Ende der Datei hinzu:
host all all 0.0.0.0/0 md5
Speichern Sie die Datei.
Starten Sie Ihren postgresql-Server neu
Shell> service postgresql restart
Stop all running services of your target system:
shell> service cron stop
shell> service apache2 stop
shell> su - otrs
shell> cd /opt/otrs/
shell> bin/Cron.sh stop
shell> bin/otrs.Scheduler.pl -a stop
shell> exit
The OTRSCloneDB script will not remove the data in the existing otrs database of the target system, so we need to do this manually:
Wechseln Sie zu dem PostgreSQL-Benutzer:
Shell> su - postgres
Droppen Sie die existierende OTRS-Datenbank:
Shell> dropdb otrs
Erstellen Sie eine neue OTRS-Datenbank für den OTRS-User:
Shell> createdb --owner=otrs --encoding=utf8 otrs
Wechseln Sie zurück zum Root-User:
Shell> exit
Change into the OTRS directory of your target system:
Shell> cd /opt/otrs
and take a look at the configuration file of your target system:
Shell> less Kernel/Config.pm
Sie finden das Datenbank-Passwort, wenn Sie ein wenig scrollen:
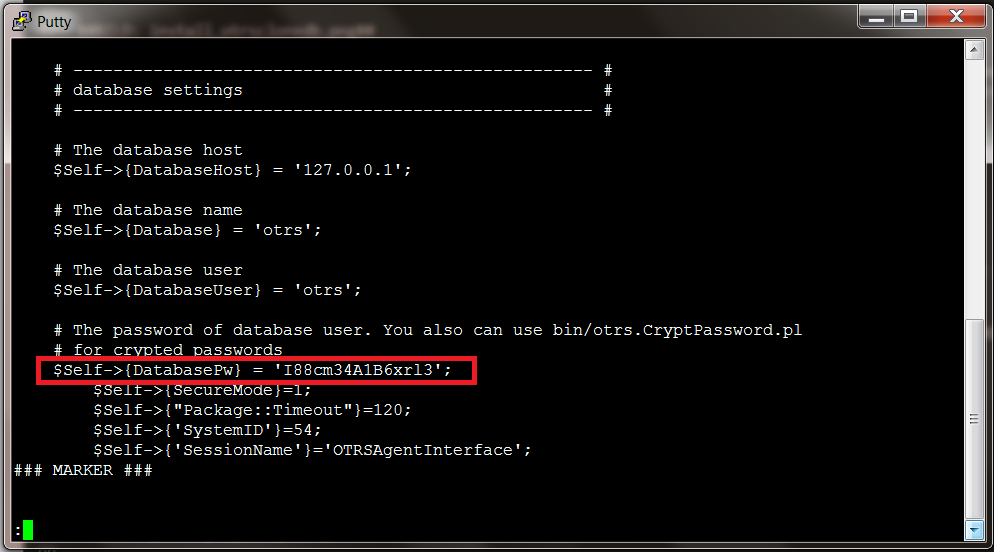
In unserem Beispiel:
I88cm34A1B6xrl3
Notieren Sie sich das Passwort.
Wechseln Sie zu Ihrem Windows-System und öffnen das Sysconfig-Admin-Menü. Wählen Sie die Gruppe "OTRSCloneDB" und die Untergruppe "Configuration":
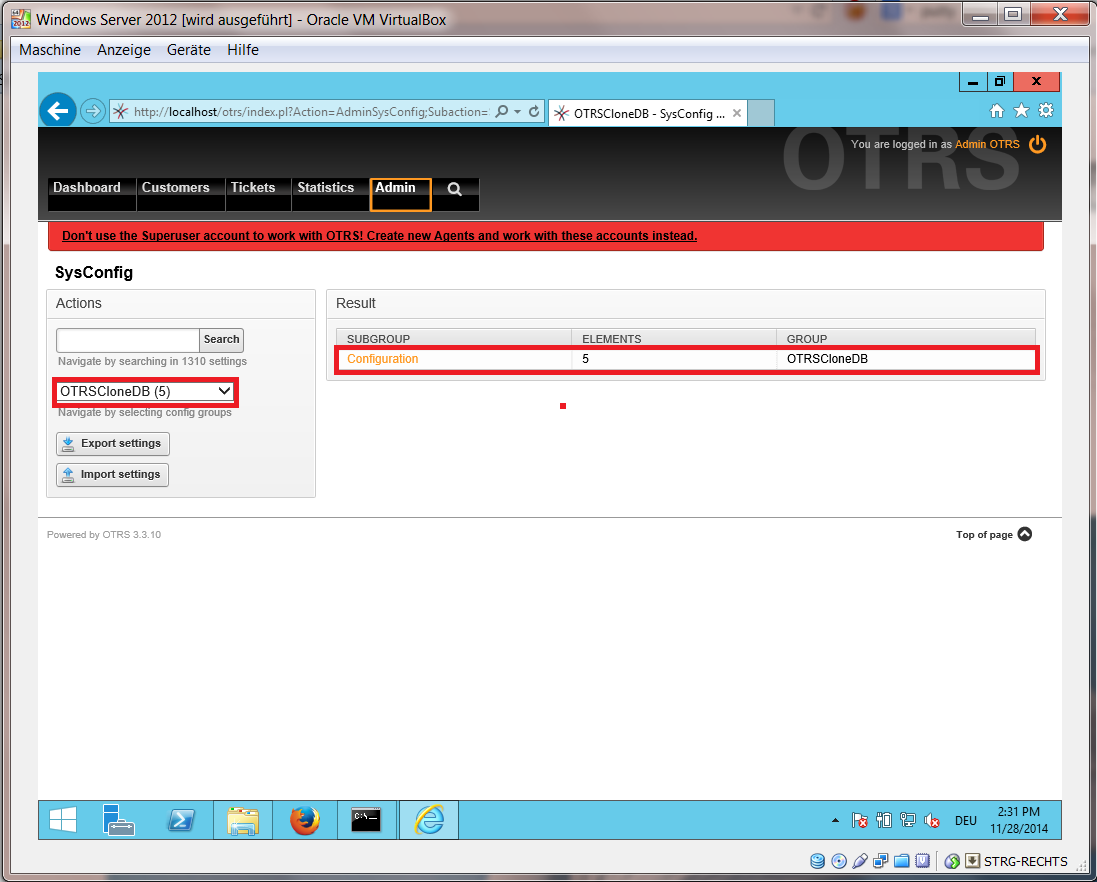
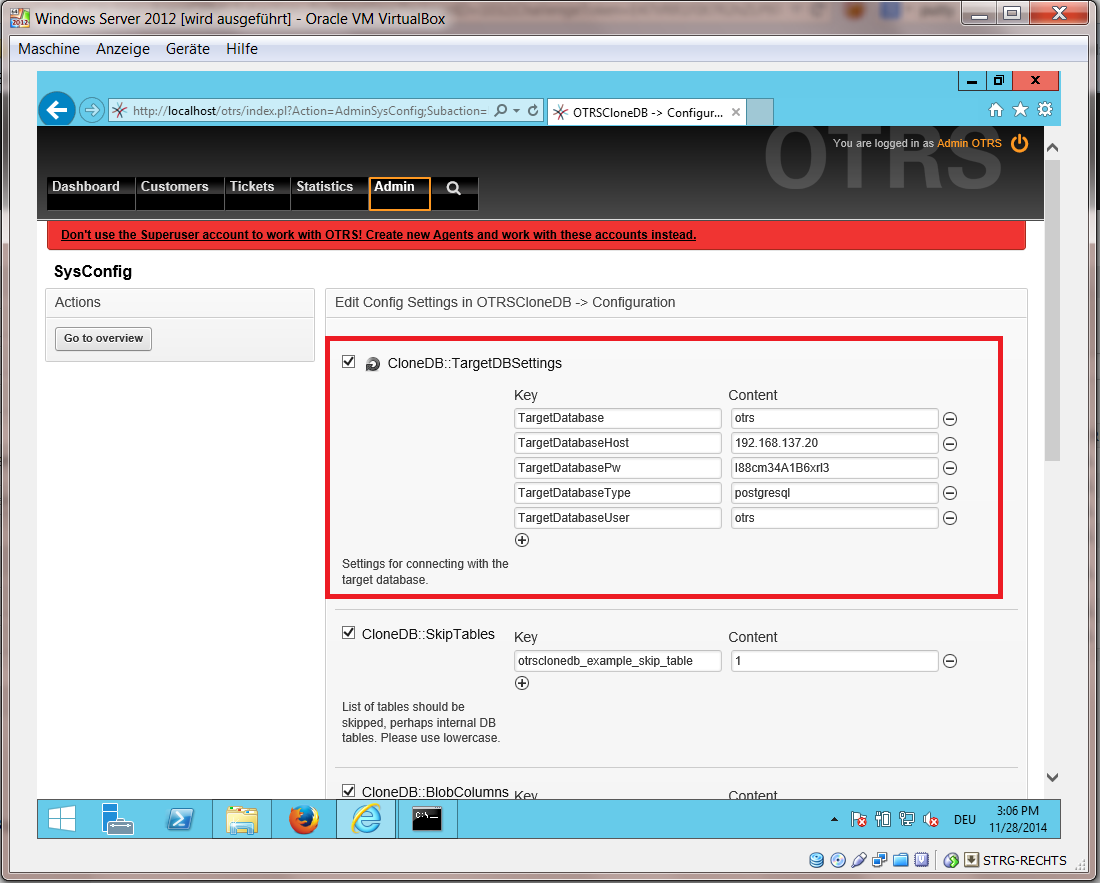
Sie müssen in der SysConfig die Option OTRSCloneDB::TargetSettings mit den folgenden Werten konfigurieren:
TargetDatabaseHost => 192.168.137.20 (Here you need to enter the ip address of your target system)
TargetDatabase => otrs
TargetDatabaseUser => otrs
TargetDatabasePw => I88cm34A1B6xrl3 (Here you need to set the password of your target system)
TargetDatabaseType => postgresql
To run the OTRSCloneDB script we need to switch to the command prompt of our windows based otrs and to change into the base directory of our OTRS installation:
Shell> cd "C:\otrs"
Wenn Sie StrawberryPerl benutzen, müssen Sie eventuell Perl für Ihre Shell aktivieren:
Shell> StrawberryPerl\portableshell.bat
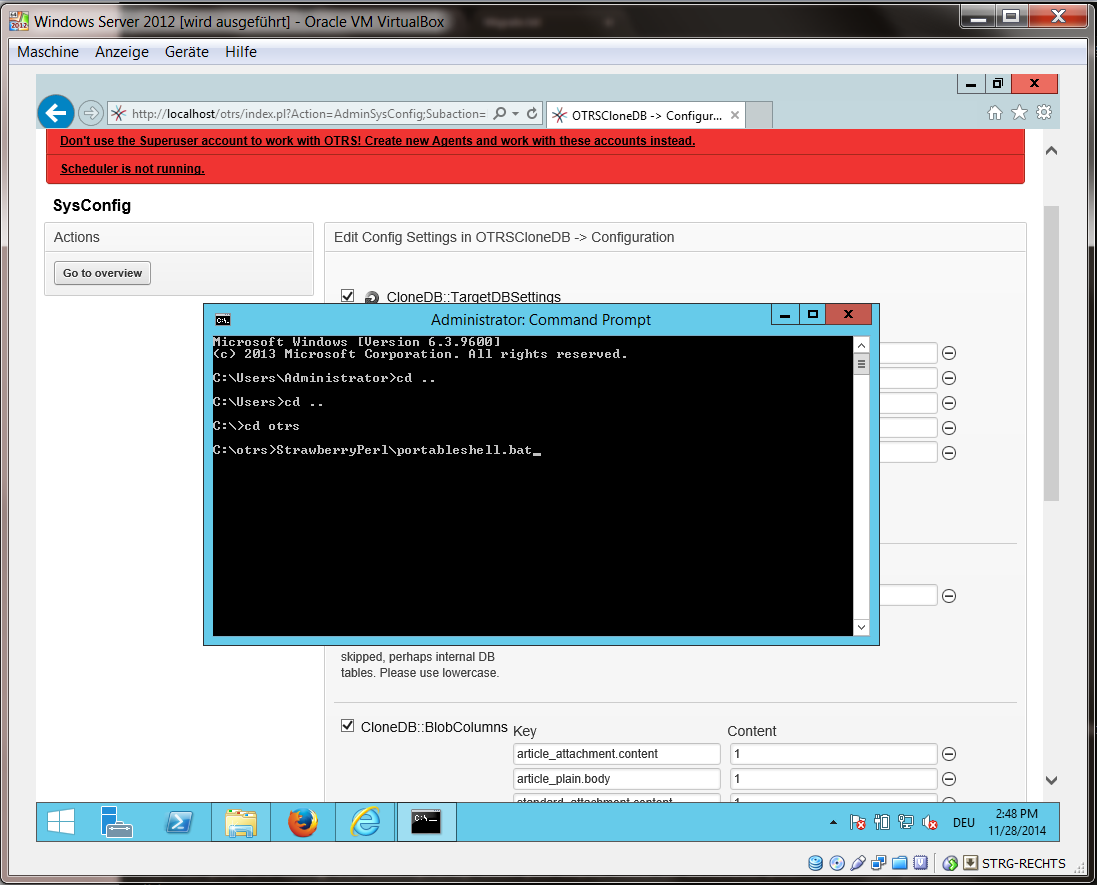
Das OTRSCloneDB-Skript befindet sich im bin-Verzeichnis des OTRS-Verzeichnisses.
Shell> cd "OTRS\bin"
Führen Sie das OTRSCloneDB-Skript aus:
Shell> perl otrs.OTRSCloneDB.pl
Nun sollten Sie einige Informationen und Parameter des Skriptes sehen.
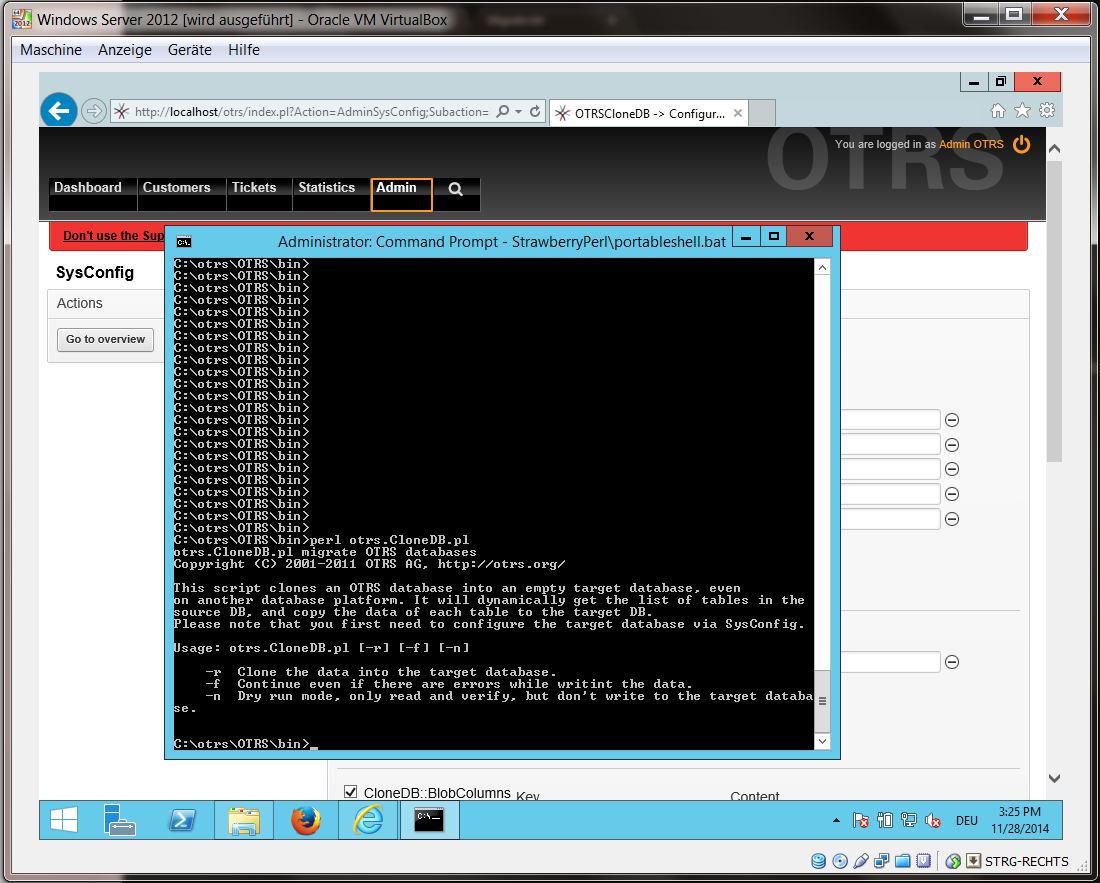
Anmerkung... Fehler die während einer Ausführung ohne Parameter auftreten, können mit falschen Login-Daten für die Datenbank oder mit Problemen in der Datenbankverbindung zusammenhängen.
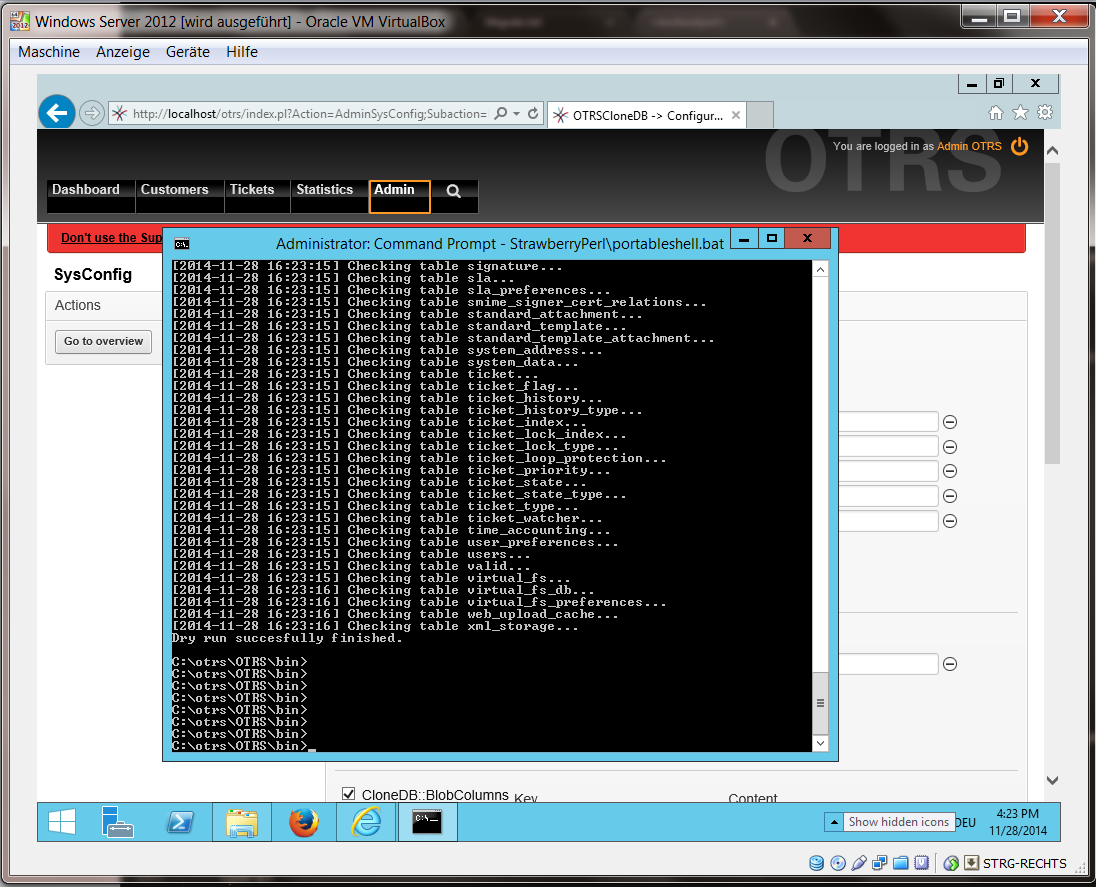
If no errors occurred, check if the dry run is successful:
Shell> perl otrs.OTRSCloneDB.pl -n
Starten Sie das Klonen der Datenbank:
Shell> perl otrs.OTRSCloneDB.pl -r
Ein Beispiel für eine erfolgreiche Migration sieht wie folgt aus:
Generating DDL for OTRS.
Generating DDL for package OTRSCloneDB.
Creating structures in target database (phase 1/2)
...
...
Creating structures in target database (phase 2/2)
...
done.
You need to copy some files from your windows based system to the target system. You can do this for example with a free tool like "WinSCP" (just search the internet for "WinSCP"). Copy the following files from your windows based system:
C:/otrs/OTRS/Kernel/Config/GenericAgent.pm
C:/otrs/OTRS/Kernel/Config/Files/ZZZAuto.pm
C:/otrs/OTRS/var/article/*
C:/otrs/OTRS/var/log/TicketCounter.log
zu Ihrem Zielsystem:
/opt/otrs/Kernel/Config/GenericAgent.pm
/opt/otrs/Kernel/Config/Files/ZZZAuto.pm
/opt/otrs/var/article/*
/opt/otrs/var/log/TicketCounter.log
Open the file /opt/otrs/Kernel/Config/Files/ZZZAuto.pm on the target system and replace all paths like "C:/otrs/OTRS/" with "/opt/otrs/"!
If you have have manually changes in your Kernel/Config.pm then please copy these changes to the target system's Kernel/Config.pm. Don't copy it 1:1 because you will now have different database settings and the file paths on the target system are different from windows!
Reinstall all packages with the package manager to get all custom files back.
shell> bin/otrs.SetPermissions.pl --otrs-user=otrs --otrs-group=otrs --web-user=www-data --web-group=www-data /opt/otrs
shell> su - otrs
shell> cd /opt/otrs
shell> perl bin/otrs.DeleteCache.pl
shell> perl bin/otrs.LoaderCache.pl -o delete
shell> perl bin/otrs.PackageManager.pl -a reinstall-all
shell> exit
Setzen Sie alle Berechtigungen in Ihrem OTRS-System erneut:
shell> bin/otrs.SetPermissions.pl --otrs-user=otrs --otrs-group=otrs --web-user=www-data --web-group=www-data /opt/otrs
Undo all steps you did to enable the remote access for the postgresql database to your target system.
Wechseln Sie in das PostgreSQL-Verzeichnis:
Shell> cd /etc/postgresql/9.4/main
Shell> vi postgresql.conf
Entfernen Sie die folgenden Zeilen am Ende der Datei:
listen_addresses = '*'
Speichern Sie die Datei.
Shell> vi pg_hba.conf
Entfernen Sie die folgenden Zeilen am Ende der Datei:
host all all 0.0.0.0/0 md5
Speichern Sie die Datei.
Starten Sie Ihren postgresql-Server neu
Shell> service postgresql restart
Starten Sie Dienste auf Ihrem Zielsystem:
Shell> service cron start
Shell> service apache2 start
Shell> su - otrs
Shell> cd /opt/otrs/
Shell> bin/Cron.sh start
Shell> bin/otrs.Scheduler.pl -a start
Now you should be able to open the OTRS of your target system in the browser with the imported data of your windows based system.